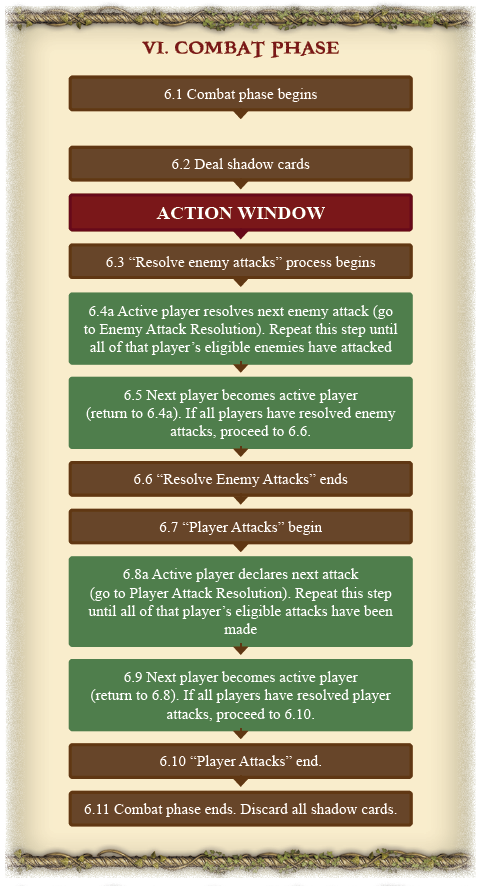
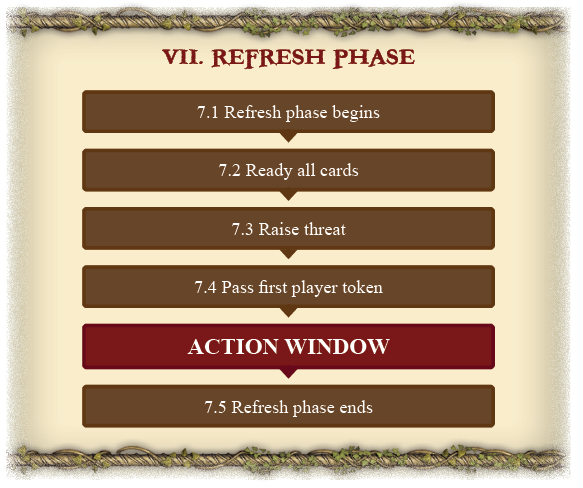
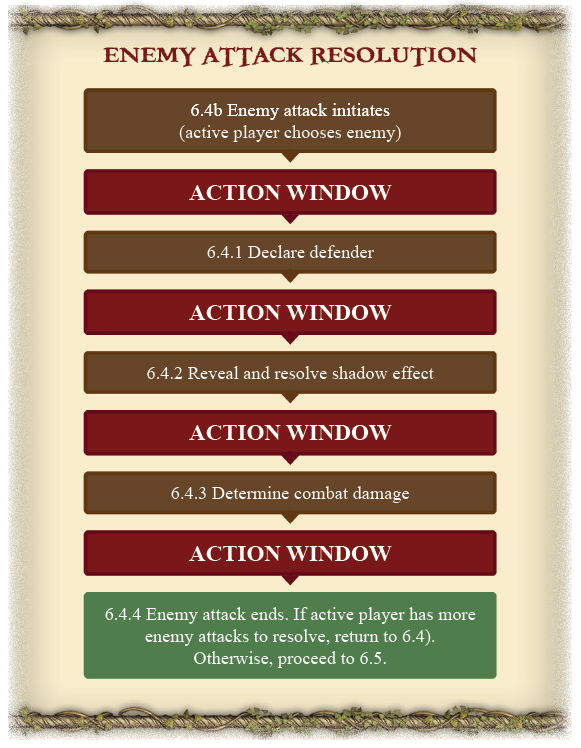
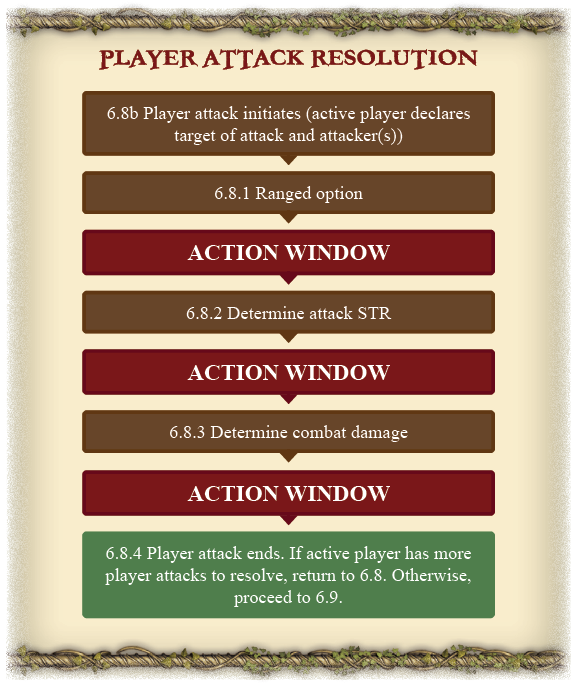
The Quest Companion is free

Home

Back
Home

Back
Home

Back
Home

Back
Home

Back

Overview & Components

In each game of The Lord of the Rings: The Card Game, players begin by choosing a scenario, and then work together in an attempt to complete it. A scenario is completed by successfully moving through all stages of the quest deck. During a scenario, the encounter deck aims to harm the heroes and to raise each player's threat level. A player is eliminated from the game if all of his heroes are destroyed, or if his threat level reaches 50. If all players are eliminated from the game, the players have lost. If at least one player survives and completes the final stage of the quest deck, all players are victorious. Some victory or defeat conditions can be added by a scenario. 

In order to play a The Lord of the Rings: The Card Game, you'll need the following components: 

  • One to three hero(es) and a player deck per player.
  • A scenario, consisting of quest cards in a quest deck and encounter cards in an encounter deck.
  • A threat tracker: conceptually, the higher is your threat to Sauron, the sooner you'll get the attention of his minions. Threat trackers are used to track a player's threat level throughout the game. Threat represents the level of risk a player has taken on during a scenario. If a player's threat level reaches a certain threshold, that player is eliminated from the game. A player's threat level can also draw out enemy encounters and set off unfortunate circumstances throughout the course of the game. 
  • Damage tokens: they represent physical damage that has been inflicted on characters and enemies. 
  • Progress tokens: they represent progress that has been made on a quest. 
  • Resource tokens: these tokens represent the various resources at a hero's disposal. Resource tokens are collected by a player's heroes, and are used throughout the game to pay for cards and card effects. 
  • The first player token which determines which player acts first each phase. At the end of each round, the first player token passes clockwise to a new player.

See also

Home

Back

The Golden Rule

If the game text of a card contradicts the text of this rulebook, the text on the card takes precedence. 

  1. FAQ (1.00) The Golden Rule

See also

Home

Back

FAQ (1.00) The Golden Rule

The rulebook reads: "Any progress tokens that would be placed on a quest card are instead placed on the active location." Legolas (CORE 5) has an effect that reads, "...place 2 progress tokens on the current quest." Legolas' effect would place 2 progress tokens on the quest; the core rule from page 15 instead places those tokens on the active location. Thus, the Legolas ability can successfully resolve, and the core rule can be observed, without creating a golden rule situation.

The Golden Rule applies when there is a direct contradiction between card text and rules text. If it is possible to observe both card text and the text of the rulebook, both are observed.

See also

Home

Back

Decks and Card Types

There are three different types of decks in The Lord of the Rings: The Card Game: the quest deck, the encounter deck, and the player deck. There are also hero cards, which do not belong to any deck. Each deck has its own function and its own set of card types, as described below. In the game, each player plays one player deck, and the players work together to move through a fixed quest deck. A randomized encounter deck operates in conjunction with the quest deck in each scenario to challenge the players as they play against the game.

  1. The Quest Deck
  2. The Encounter Deck
  3. Hero Cards & the Player Deck
  4. Card Properties

See also

Home

Back

The Quest Deck

Each scenario represents a quest that the players are attempting to complete. At the beginning of a game, the players must choose which scenario they wish to play against for that game. A scenario consists of a sequential deck of quest cards (referred to as "the quest deck") and a randomized encounter deck of enemy, location, treachery, and objective cards. 

  1. Quest Cards

See also

Home

Back

Quest Cards

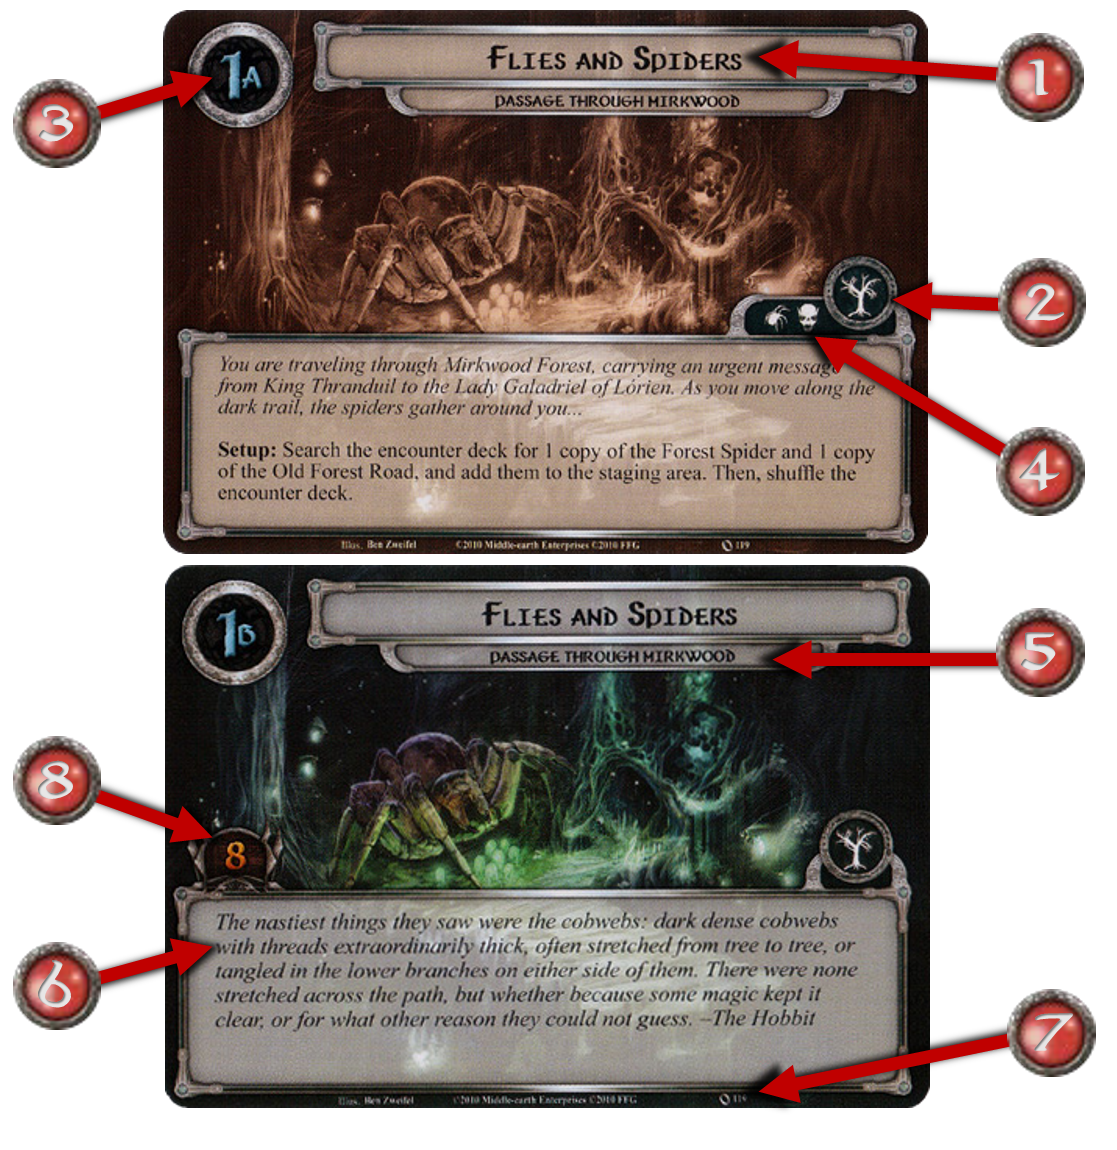
Each quest card represents one of the various stages of the quest the players are pursuing in a scenario. Each quest card is a numbered step in a fixed, sequential order. These cards have their sequential information printed on both sides, so they can be placed in then correct order without spoiling the contents of the latter stages in the scenario. Side A is the back of the card, and provides story and setup information. After reading and following any instructions on Side A, players flip the card to Side B. Side B contains the information necessary to move to the next stage of the quest. 

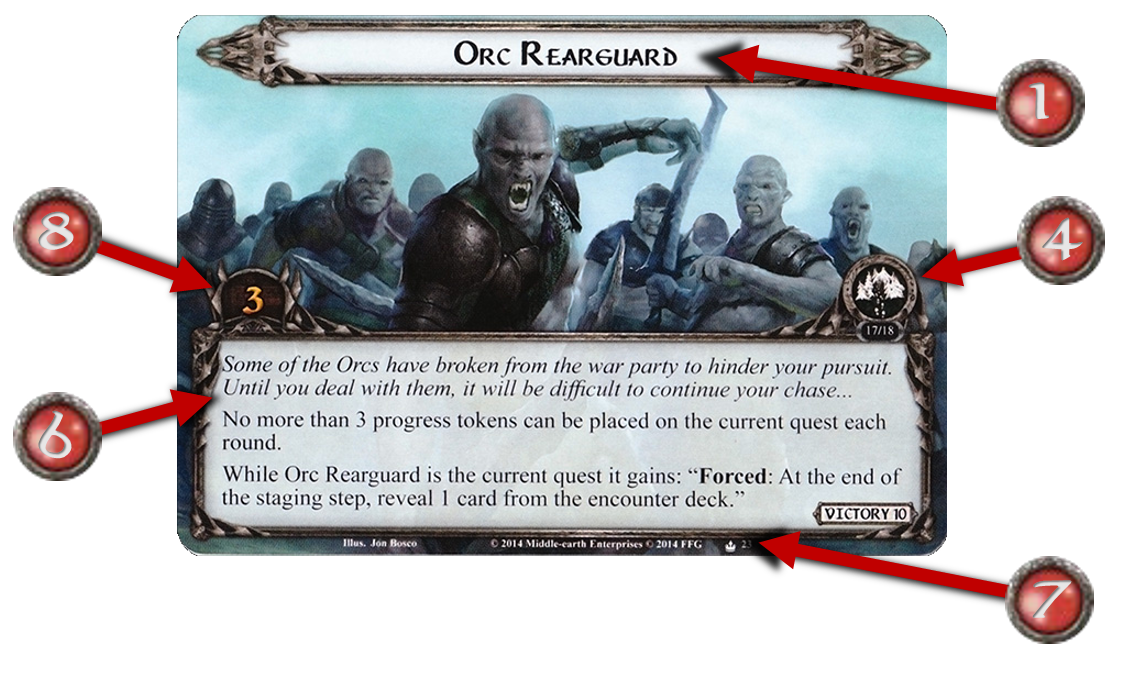
  1. Card Title: The name of this card. Each sequential stage in a scenario has its own unique name. 
  2. Scenario Symbol: A visual icon that identifies this scenario, matching it to a subset of encounter cards. 
  3. Sequence: This number determines the order in which the scenario deck is stacked at the beginning of the game. When setting up, card 1A is placed on top, followed by 2A, 3A, and so forth. Players proceed from side A to side B on each stage of a scenario. 
  4. Encounter Information: A group of icons that, along with the scenario symbol, identify which encounter cards should be shuffled into the encounter deck when playing this scenario. 
  5. Scenario Title: The name of this scenario. 
  6. Game Text: Story, setup instruction, special effects, or conditions that apply during this stage of the scenario. 
  7. Set Information: Every card has an icon denoting the set it belongs to, as well as a unique identification number within the set. 
  8. Quest Points: The number of progress tokens that must be placed on this card in order to proceed to the next stage of the scenario.

See also

Home

Back

The Encounter Deck

The encounter deck represents the villains, hazards, places, and circumstances that stand between the players and the successful completion of their quest. An encounter deck consists of enemy, location, treachery, and objective cards. The contents of the encounter deck are determined by the scenario the players are attempting. The encounter deck is shuffled at the beginning of the game. 

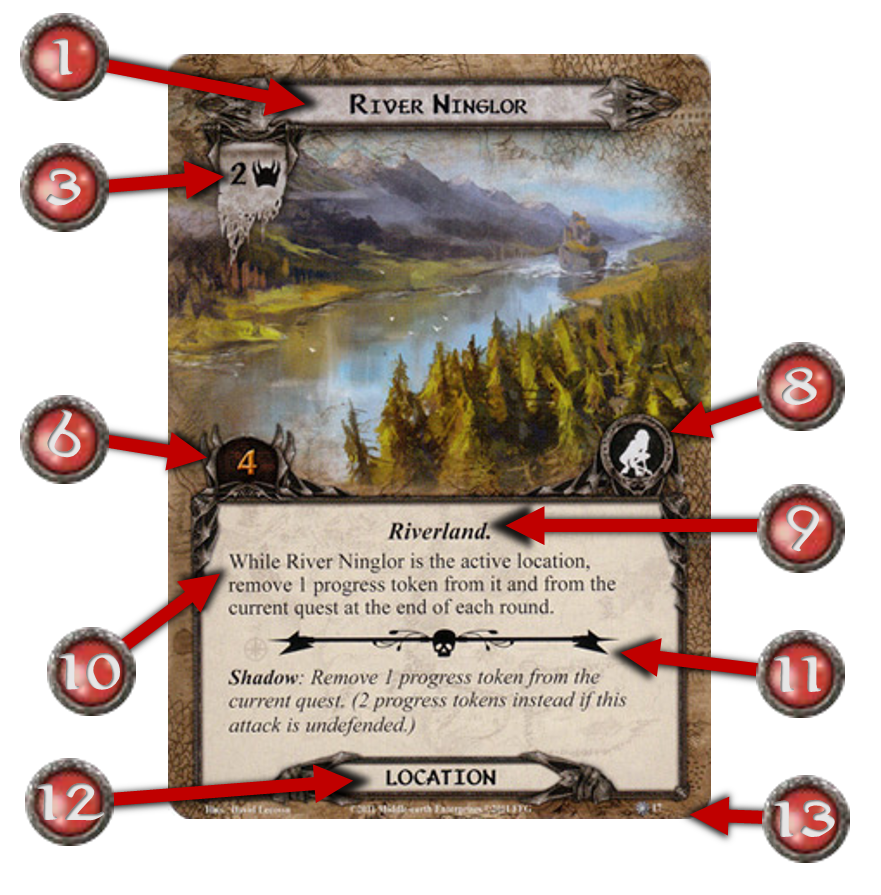
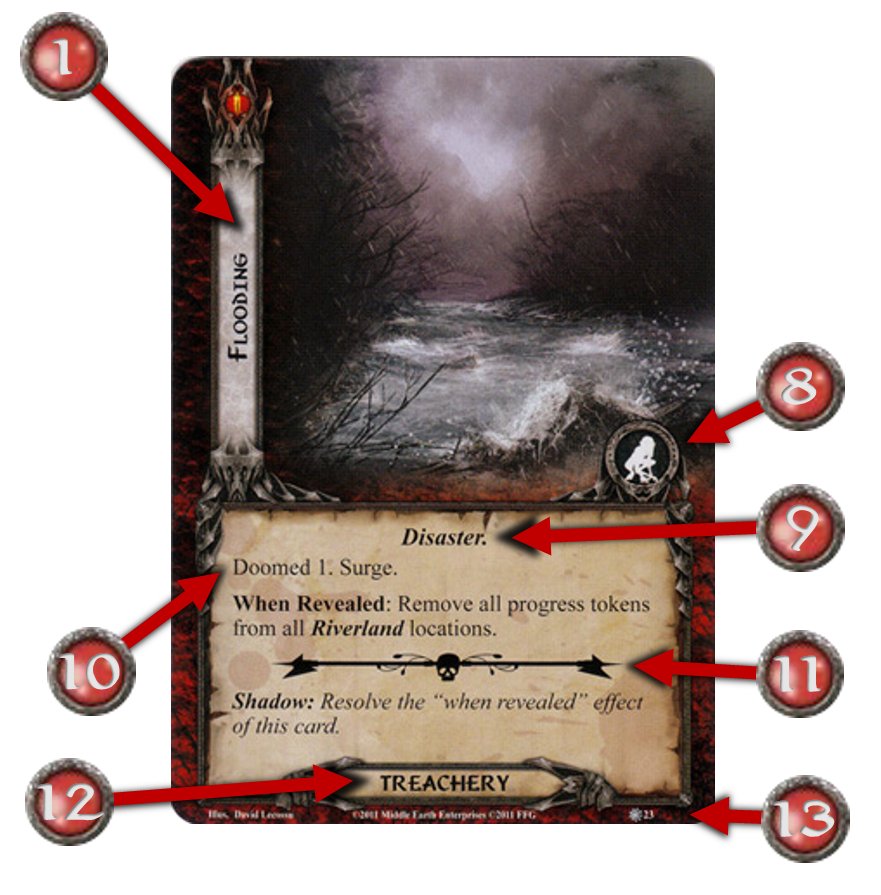
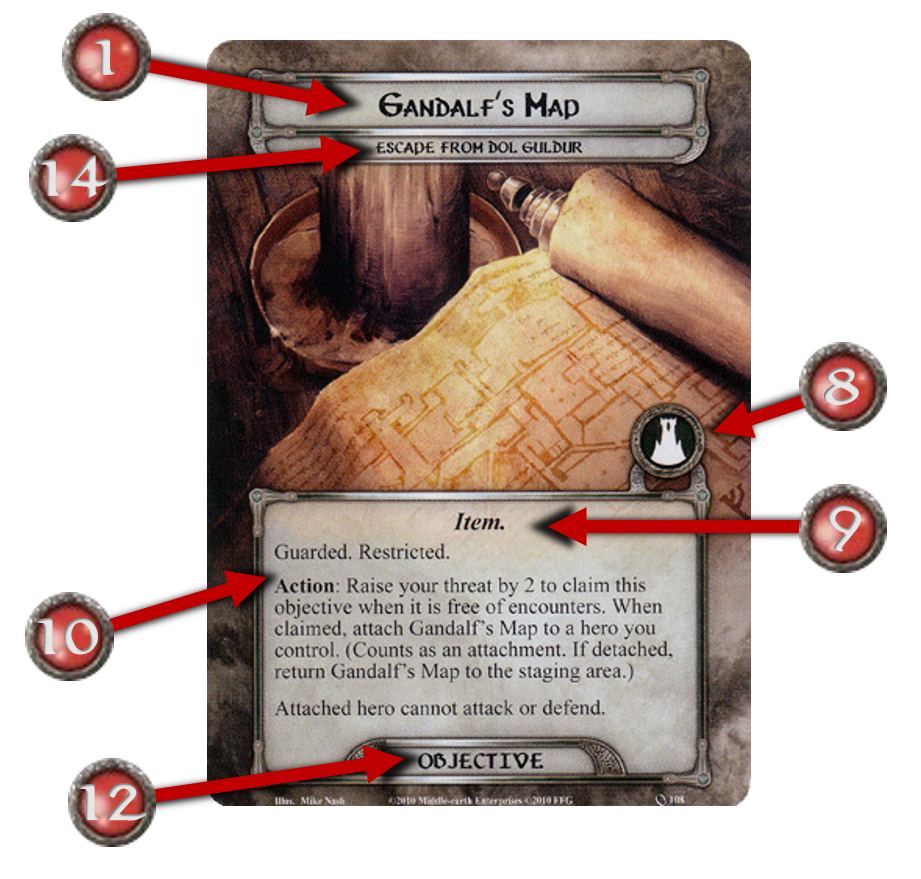
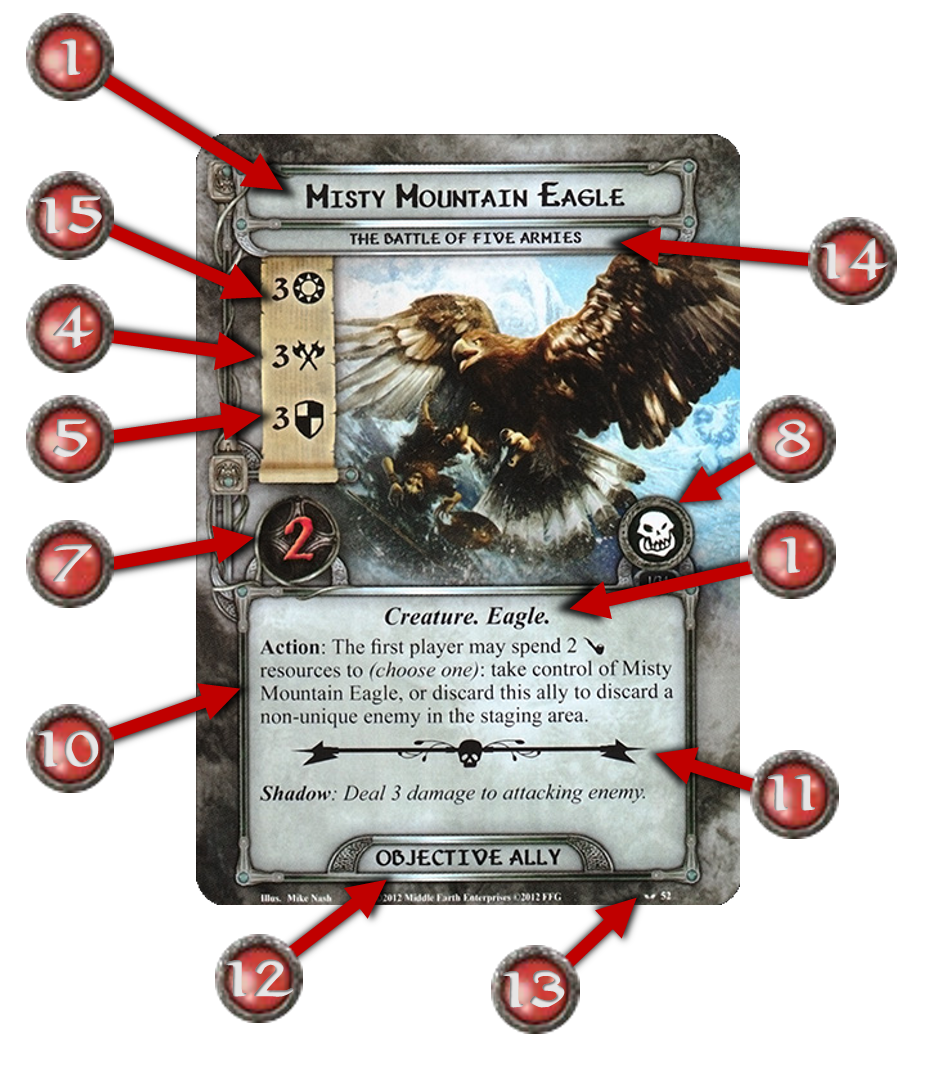
  1. Encounter Cards Anatomy
  2. Enemy Cards
  3. Location Cards
  4. Treachery Cards
  5. Objective Cards
  6. Objective-Ally Cards

See also

Home

Back

Encounter Cards Anatomy

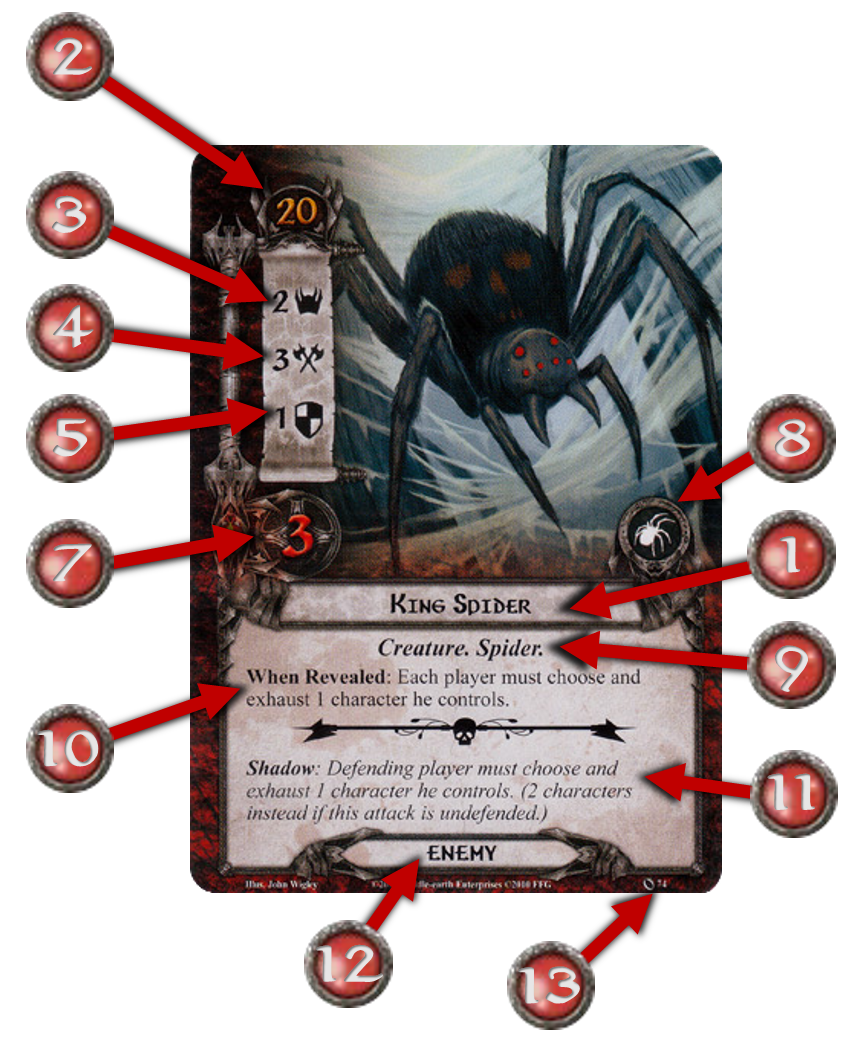
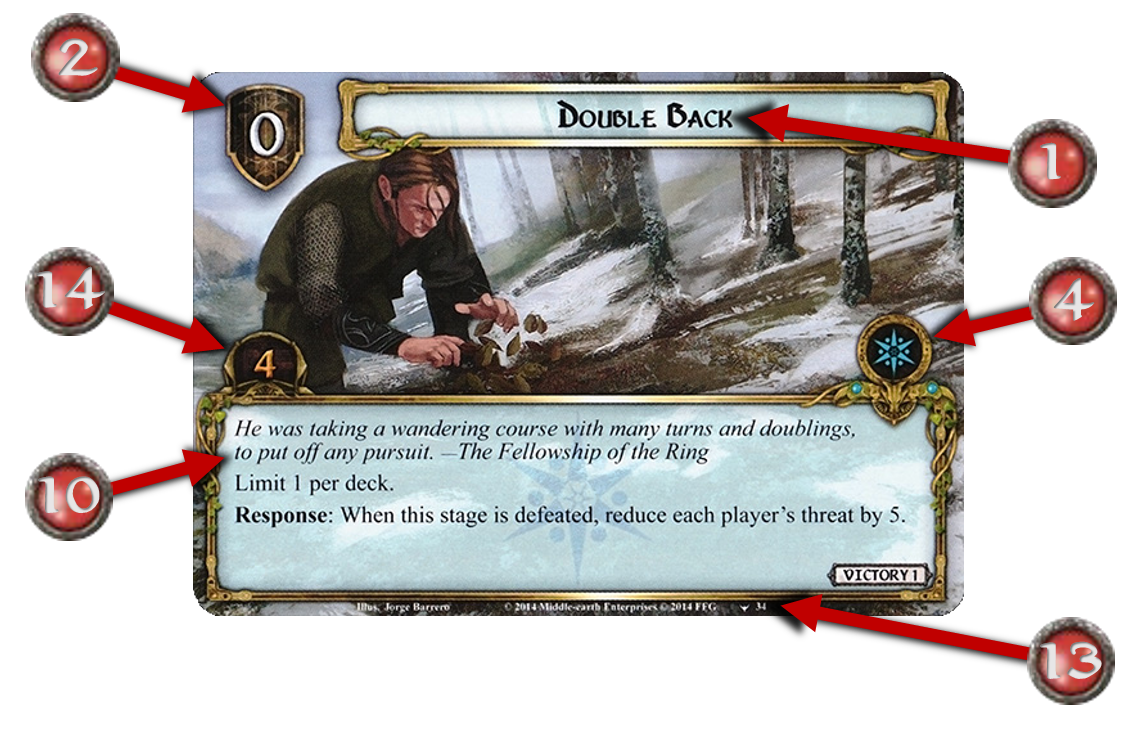
  1. Card Title: The name of this card. A card with a symbol next to its name is unique.
  2. Engagement Cost: This number determines when this enemy card will move from the staging area and engage a player. 
  3. Threat Strength (): The degree of danger this enemy or location represents when it threatens the players from the staging area. 
  4. Attack Strength (): The effectiveness of this enemy when it attacks.
  5. Defense Strength (): The effectiveness of this enemy when it defends. 
  6. Quest Points: The number of progress tokens that must be placed on this card to fully explore the location and discard it from play or to defeat a side quest. 
  7. Hit Points: The amount of damage required to destroy this card. 
  8. Encounter Set Icon: Indicates which set of encounter cards this card belongs to. Used in conjunction with the "Encounter Information" icons on side A of the quest cards of any scenario to determine which encounter sets are used to build the encounter deck. 
  9. Traits: Text designators that, while carrying no rules in themselves, may be affected by other cards in play. 
  10. Game Text: The special abilities unique to this particular card when it is in play. 
  11. Shadow Effect Icon: If a card has a shadow effect, that effect is denoted by this icon, which also serves to separate the shadow effect from the card's in play effect. 
  12. Card Type: Indicates whether this card is an enemy, location, treachery, or objective. 
  13. Set Information: Every card has an icon denoting the set it belongs to, as well as a unique identification number within the set. 
  14. Scenario Title: The name of the scenario to which this objective card belongs. 
  15. Willpower Strength (): The effectiveness of this character when it commits to a quest. 

See also

Home

Back

Enemy Cards

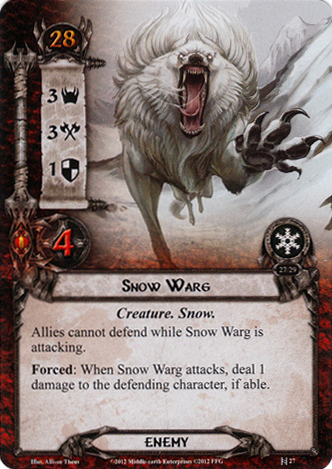
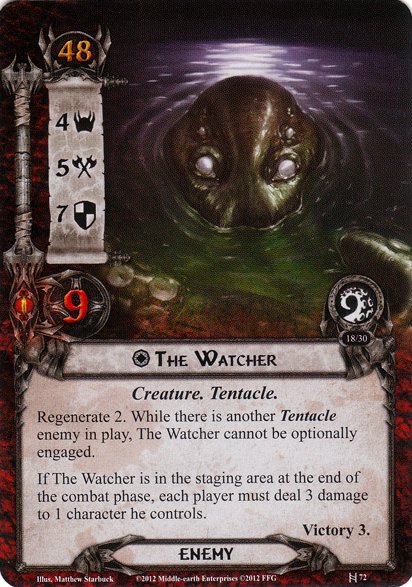
Enemy cards represent the villains, creatures, monsters, and minions that attempt to capture, destroy, or mislead the heroes as they pursue their quest. Enemy cards engage individual players and remain in play until they are defeated. 

See also

Home

Back

Location Cards

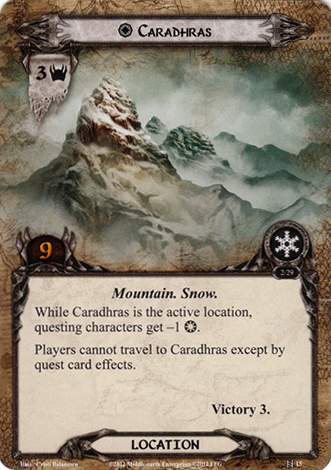
Location cards represent the perilous places to which the players may travel during a scenario. They are a distant threat to the players from the staging area, and during the course of the quest players may opt to travel to a location to confront its threat. 

See also

Home

Back

Treachery Cards

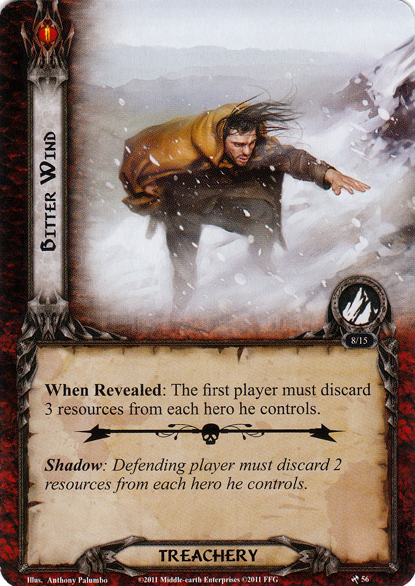
Treachery cards represent traps, curses, maneuvers, pitfalls, and other surprises the players might confront during a scenario. When a treachery card is revealed from the encounter deck, its text effects are resolved immediately, and it is then placed in the encounter discard pile. 

See also

Home

Back

Objective Cards

Depending on the scenario, objective cards can represent a number of different elements, ranging from the goals of a scenario, to allies who assist the players, to keys that allow the players to advance to the next stage of a quest, to artefacts that are necessary to defeat a difficult enemy or overcome a particular challenge. Unless otherwise specified, objective cards are shuffled into the encounter deck when setting up a scenario.

See also

Home

Back

Objective-Ally Cards

An objective-ally card is considered to be both an objective and an ally. The text effects of each of these cards commits it to the quest when it is in the staging area. This means that these cards count their stats and assist the players when resolving a quest. Any card effect that affects characters committed to the quest can also affect these objective-ally cards. If an effect allows the players to take control of any of these objective-ally cards, it is moved into the controlling player's play area. Once there, they can use it the same as any other ally. When this occurs, the card is no longer considered to be in the staging area, and is no longer committed to the quest (unless its controller commits it during the quest phase).

See also

Home

Back

Hero Cards & the Player Deck

The player deck includes a combination of ally, attachment, and event cards shuffled into a deck from which a player draws his cards throughout the game. No more than three copies of any ally, attachment, or event card, by title, can be included in a player's deck. A tournament deck must contain a minimum of 50 cards. Within these guidelines any combination of allies, attachments, and events can be used in the player deck.   

Q: Can a player have cards in his player deck from a sphere that doesn't match the sphere of one of his heroes? 

A: There is nothing in the rules that disallows this, although a player will need to find clever card interactions to make use of such cards. 

  1. Player Cards Anatomy
  2. Hero Cards
  3. Attachment Cards
  4. Ally Cards
  5. Event Cards
  6. Contracts
  7. The One Ring and the Master Trait Cards
  8. [ALeP] Player Objectives

See also

Home

Back

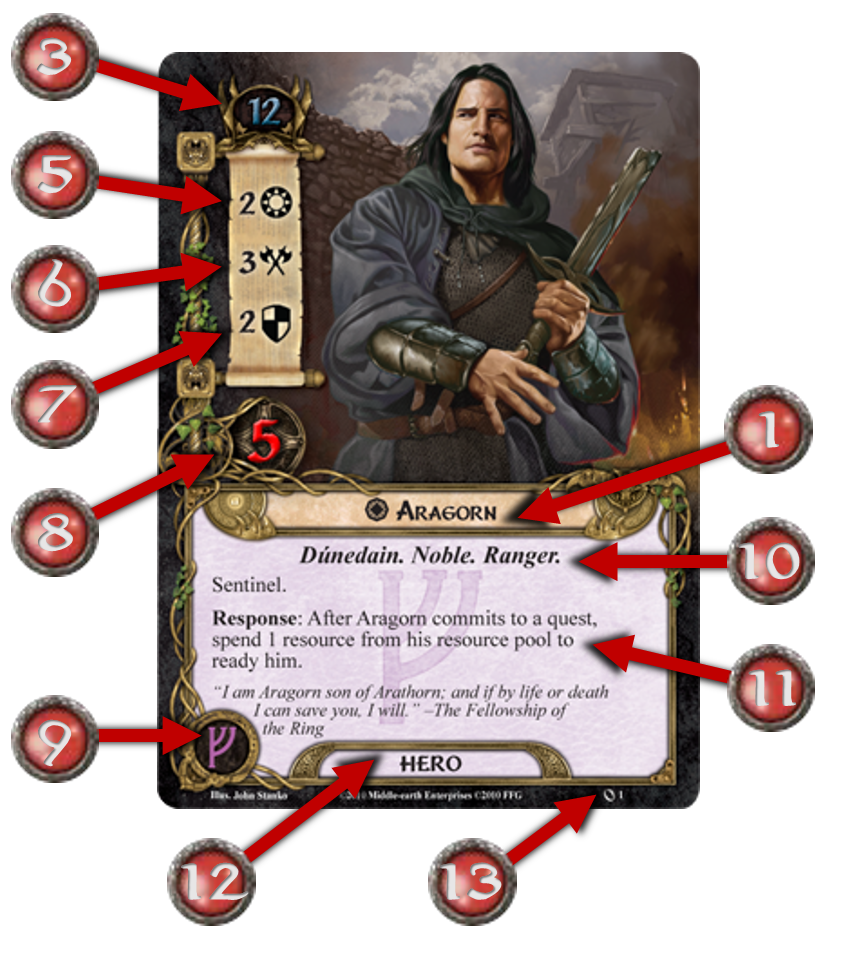
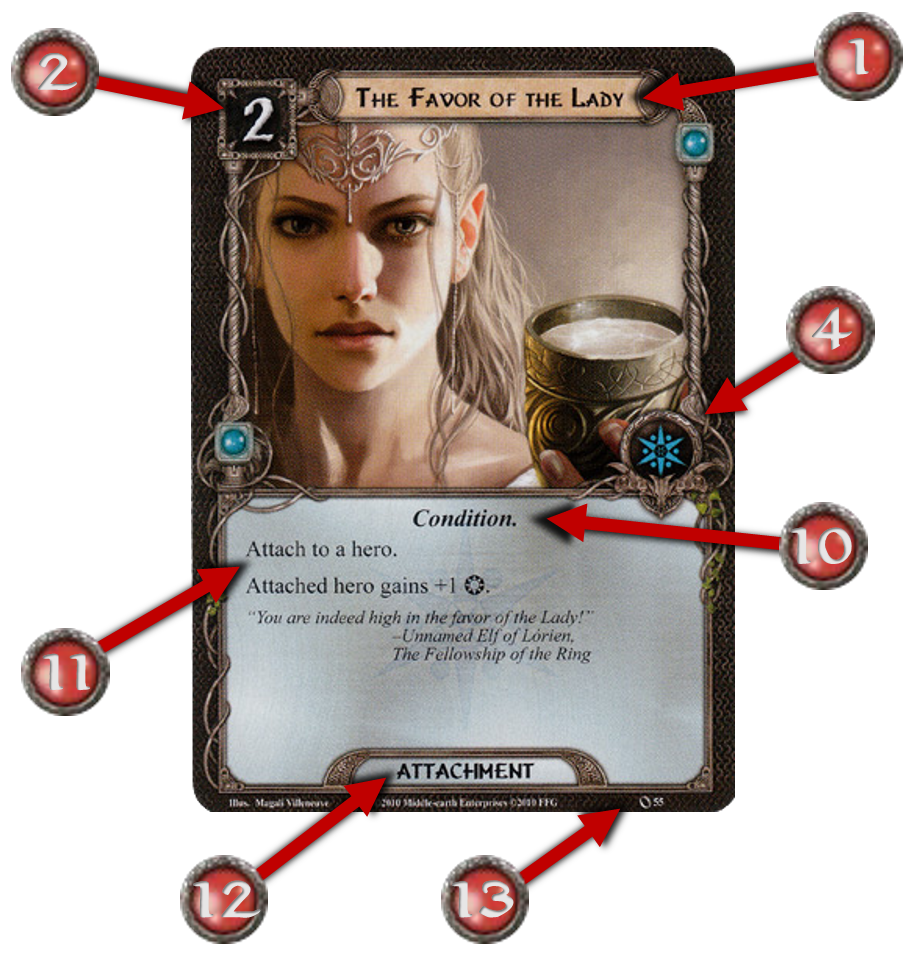
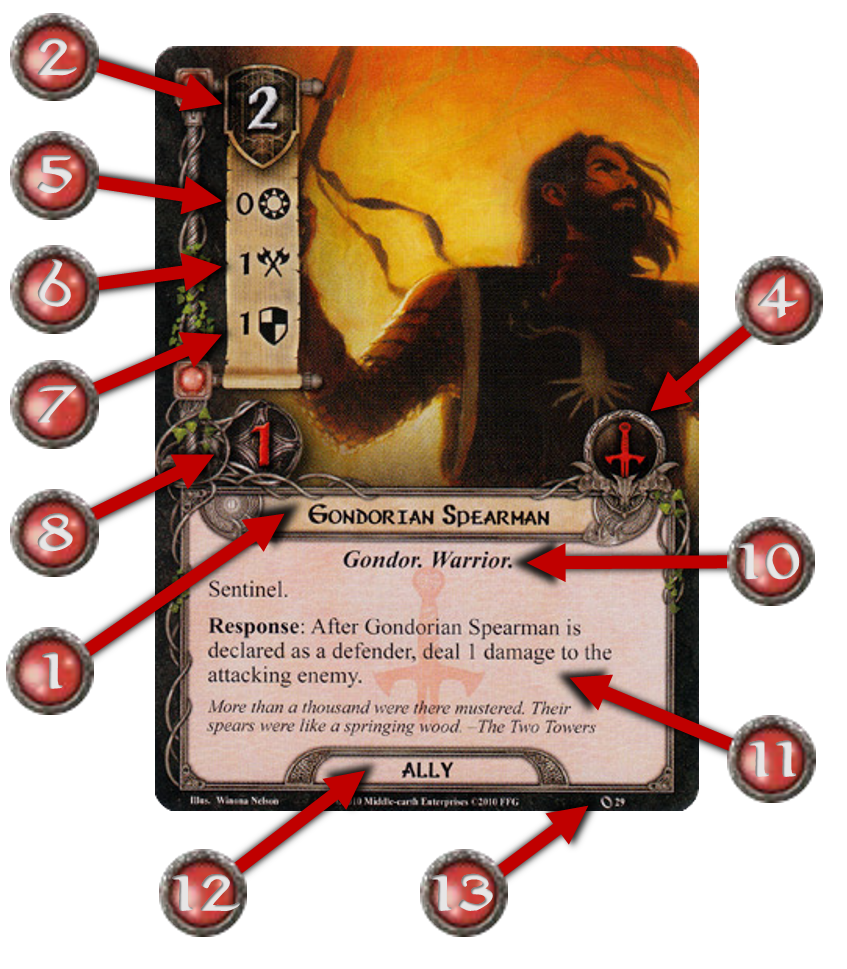
Player Cards Anatomy

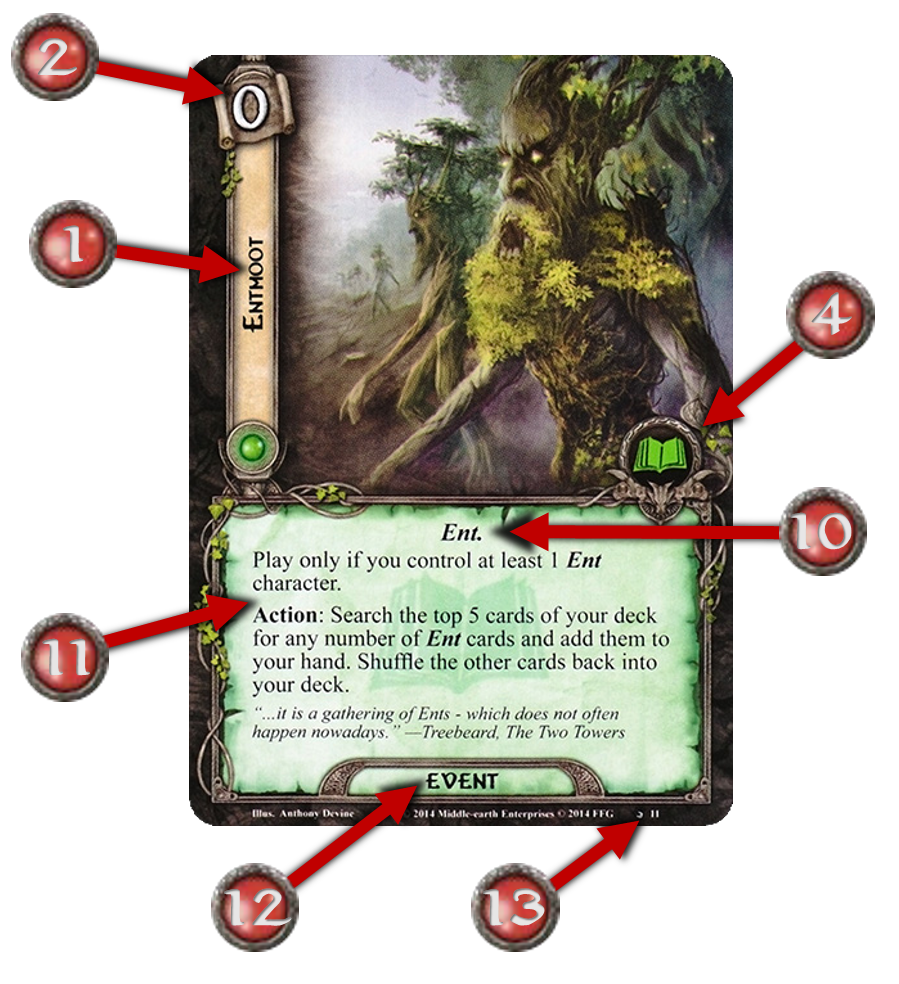
  1. Card Title: The name of this card. A card with a symbol next to its name is unique.
  2. Cost: The number of resources a player must spend from the appropriate resource pool(s) to play this card from his hand. Cost is not found on hero cards. 
  3. Threat Cost: Found only on hero cards, this number is the amount of threat a player must add to his threat tracker at the beginning of any game in which he is using this hero. 
  4. Sphere of Influence Icon: Indicates which sphere this card belongs to. The card's template color also indicates this. Neutral cards have a grey template and no sphere of influence icon.
  5. Willpower Strength (): The effectiveness of this character when it commits to a quest. 
  6. Attack Strength (): The effectiveness of this character when it attacks. 
  7. Defense Strength (): The effectiveness of this character when it defends. 
  8. Hit Points: The amount of damage required to destroy this card.
  9. Resource Icons: Found only on hero cards, these icons indicate the sphere(s) of influence to which resource tokens in this hero's resource pool belong. They also indicate to which sphere(s) the hero card itself belongs. 
  10. Traits: Text designators that, while carrying no rules in themselves, may be affected by other cards in play. 11. 
  11. Game Text: The special abilities unique to this particular card. Some cards have italicized flavor text, featuring quotations from The Lord of the Rings novels. 
  12. Card Type: Indicates whether this card is a hero, ally, attachment, or event. 
  13. Set Information: Every card has an icon denoting the set it belongs to, as well as a unique identification number within the set. 
  14. Quest Points: The number of progress tokens that must be placed on this card to defeat a side quest. 

See also

Home

Back

Hero Cards

Hero cards represent the main characters a player controls in an attempt to complete a scenario. Heroes start in play, and they provide the resources that are used to pay for the cards (allies, attachments, and events) in a player's deck. Heroes can also commit to quests, attack, defend, and in many cases they bring their own card abilities to the game. Each player, chooses 1-3 hero cards and starts the game with them in play. Hero Cards does not count toward the 50-cards minimum of a legal tournament deck. 

  1. Sméagol/Gollum

See also

Home

Back

Sméagol/Gollum

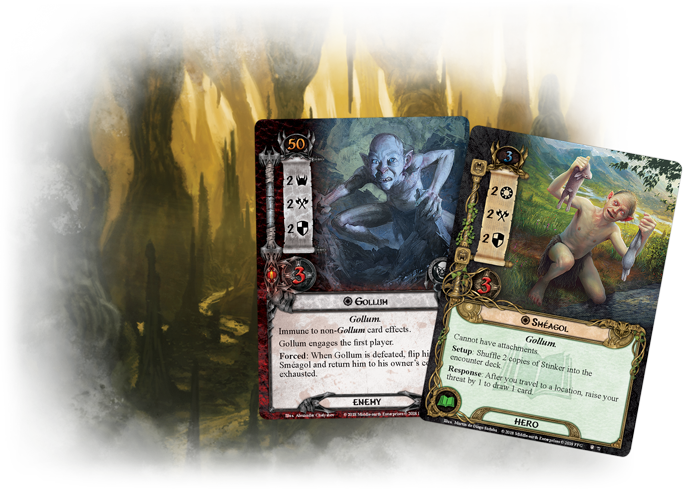
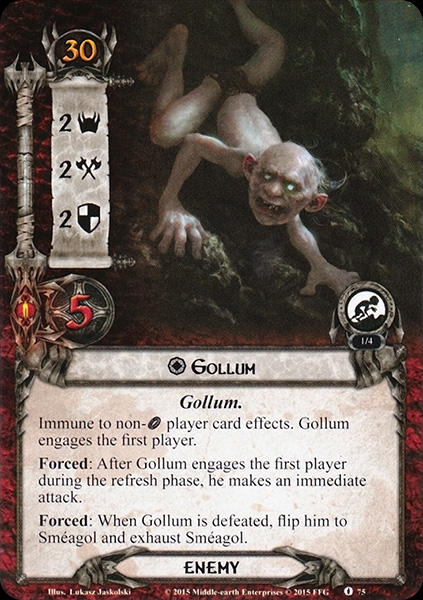
Sméagol / Gollum is a double-sided hero / enemy card.

Each side of this card represents a different aspect of this iconic character. Sméagol is a hero who wants the see Sauron defeated, but Gollum is an enemy who seeks revenge against those who stole his "precious". Sméagol cannot be chosen as a starting hero when playing saga expansions or the Shadows of Mirkwood cycle.

When a player selects Sméagol as a starting hero, he must shuffle two copies of "Stinker" into the encounter deck. The "when revealed" effect on Stinker will cause Sméagol to be flipped to Gollum. When this happens, the Sméagol hero leaves play and the Gollum enemy enters play engaged with its owner in the ready position.

When Gollum is in play, he engages the first player. When Gollum is defeated, he is flipped to Sméagol. When this happens, Gollum leaves play and the Sméagol hero enters play under its owner's control in the exhausted position.

See also

Home

Back

Attachment Cards

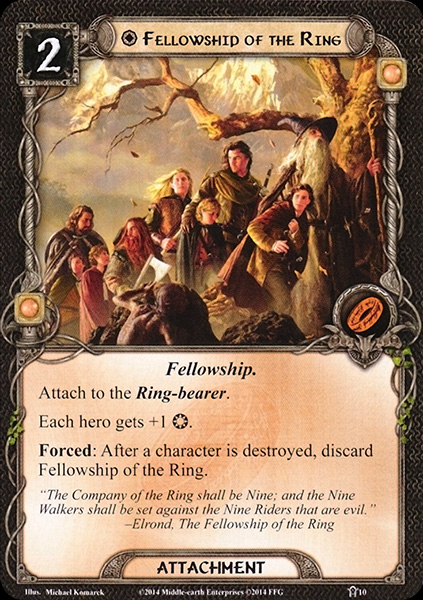
Attachment cards represent weapons, armor, artefacts, equipment, skills, and conditions. When played, they are always attached to (placed slightly under) another card, and they tend to modify or influence the activity of the card to which they are attached. If the card to which an attachment is attached leaves play, the attachment card is discarded. 

See also

Home

Back

Ally Cards

Ally cards represent characters (friends, followers, creatures, and hirelings) that assist a player's heroes on the quest. Ally cards are played from a player's hand, and they remain in play until they are destroyed or removed from play by a card effect. 

See also

Home

Back

Event Cards

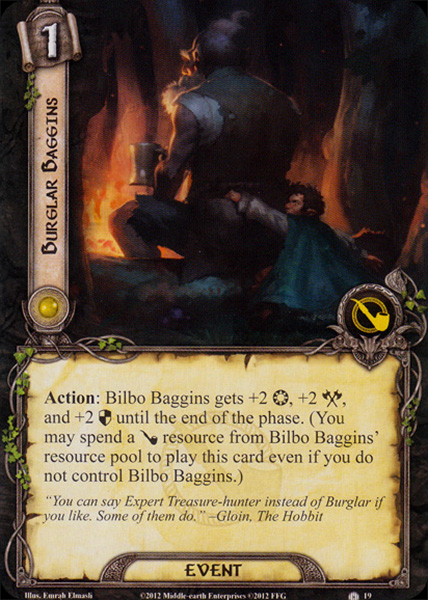
Event cards represent maneuvers, actions, tactics, spells, and other instantaneous effects at a player's disposal. An event card is played from a player's hand, its text effects are resolved, and the card is then placed in its owner's discard pile. 

See also

Home

Back

Contracts

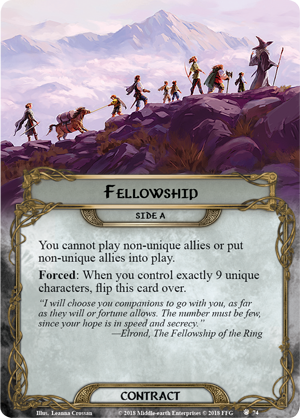
Contracts can represent literal contract like the one Bilbo signed with the Dwarves before joining their quest to Erebor, or they can represent a social contract like the bond of trust shared by all nine members of the Fellowship of the Ring.

Contracts count as player cards, but they are never included in a player's deck and don't count towards a player's minimum deck size. Instead, each player may choose one contract to put into play along with his heroes at the beginning of the game with the "A" side faceup. If a contract places restrictions on the content of a player's deck, those restrictions must be met in order to choose the contract.

See also

Home

Back

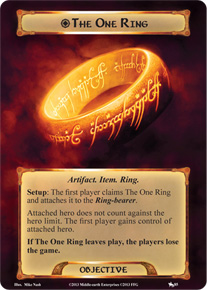
The One Ring and the Master Trait Cards

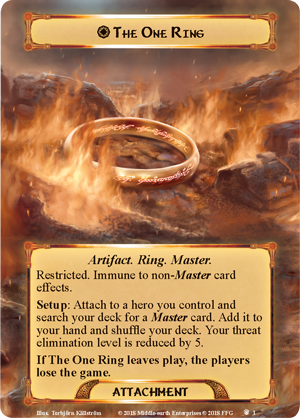
The One Ring is a player card with its own unique card frame and its own special rules.

The One Ring has a Setup text that instructs you to attach it to a hero you control. This is done immediately after placing your heroes in your play area. If two or more players have The One Ring in their decks, the first player decides which player will put his copy of The One Ring into play. Each other copy is removed from the game.

The One Ring is immune to non-Master card effects. Cards with the Master trait represent the power of the Master Ring, and can only be used by the player who controls The One Ring. Cards with the Master trait cannot be used when playing the saga expansions.

See also

Home

Back

[ALeP] Player Objectives

Player Objectives

Player objective is a new player card type introduced in The Shire's Reckoning expansion. They represent additional priorities or optional goals that heroes may be pursuing during the game. They are considered to be both player cards and objective cards.

Player objectives are immune to encounter and quest card effects and are under no player's control.

At the end of Setup (see the online ALeP FAQ for more details), the players as a group may put into play one (and only one) player objective from their collection(s). Add it to the staging area with Side A faceup and trigger its Setup effect. The Setup effect on Side A allows players to "opt in" to the objective before it flips to Side B. During the game, a player may trigger the effects on a player objective if, and only if, they opted in to it.

Some effects on a player objective may require exhausting it (which an opted-in player can do even though they don't control it). Exhausted player objectives ready at the beginning of the refresh phase, at the same time as all other player cards in play.


Q: What happens to a player objective when players do not share the same staging area?

A: At any point of a game, if the players do not share a common staging area, remove any player objective from the game. 

Q: Are player objectives considered unclaimed or unguarded objectives for quests like Escape from Dol Guldur or The Storm on Cobas Haven?

A: Yes, though keep in mind they are immune to encounter and quest card effects. For example, while a player objective would cause Spider of Dol Guldur to surge, it could not become guarded by a Siege Ship.

See also

Home

Back

Card Properties

  1. Spheres of Influence
  2. Neutral Cards
  3. Unique Cards
  4. Unique Encounter Cards
  5. Character Cards
Home

Back

Spheres of Influence

Leadership Sphere

The sphere of Leadership emphasizes the charismatic and inspirational influence of a hero, and that hero's potential to lead, inspire, and command both allies and other heroes alike. 

Lore Sphere

The sphere of Lore emphasizes the potential of a hero's mind. Intellect, wisdom, experience, and specialized knowledge are all under the domain of this sphere. 

Spirit Sphere

The sphere of Spirit emphasizes the strength of a hero's will. Determination, resilience, courage, loyalty, and heart are all aspects of this sphere. 

Tactics Sphere

The sphere of Tactics emphasizes a hero's martial prowess, particularly as it relates to combat and to overcoming other tactical challenges that might confront the players during a quest. 

See also

Home

Back

Neutral Cards

Neutral cards belong to no sphere of influence.  

See also

Home

Back

Unique Cards

Some cards in this game represent specific, formally named characters, locations, and items from the Middle-earth setting. These cards are referred to in the game as "unique." They are marked with a symbol before their card title to indicate their uniqueness. If any player has a unique card in play, no player can play or put into play another card with the same title. Any attempt to do so will fail to the extent that the card attempting to enter play remains in its current location (hand, deck, discard pile) and does not enter play. This rule applies to all unique hero, ally, attachment, and event cards that might enter play. Note that a unique card is eligible to enter play if another card with the same title is in a player's discard pile but not currently in play. Multiple copies of the same non-unique card can be in play simultaneously. 

If any player has a unique card in play, no player can play or put into play another card with the same title. So if a player uses a unique hero, then an ally with the same title cannot enter play. If a unique hero leaves play for any reason, players can play or put into play other cards that share the same title as that hero. That hero is then ineligible to re-enter play until there is no card with the same title in play. 

See also

Home

Back

Unique Encounter Cards

A unique encounter card cannot enter play if there is another copy of that card already in play. If this is the case, the card's effects are ignored and the encounter card is placed in the encounter discard pile. 

See also

Home

Back

Character Cards

Sometimes, game or rules text will refer to "character" cards. Both heroes and allies are considered to be "characters." Card text that says "choose a character" allows a player to choose either a hero or an ally card as the target of the effect. 

  1. FAQ (1.13) 'Character' & Enemies

See also

Home

Back

FAQ (1.13) 'Character' & Enemies

"Character" refers to both hero and ally cards. Enemy cards are not considered characters. 

See also

Home

Back

Card Effects

There are several kinds of card effects in The Lord of the Rings: The Card Game

On the hero and player cards, card effects fall into one of 7 categories: passive effects, actions, responses, valour trigger, forced effects, setup effects and keywords. 

On the cards found in the quest and encounter decks, card effects fall into one of 7 categories: passive effects, actions, responses, forced effects, when revealed effects, shadow effects, travel effects, and keywords. Each of these card effect types is explained below.

  1. Passive Effects
  2. Actions
  3. Responses
  4. Forced Effects
  5. When Revealed Effects
  6. Travel Effects
  7. Shadow Effects
  8. Valour Trigger
  9. Setup Effects
  10. Keywords
  11. Effects Advanced Concepts
  12. Threat

See also

Home

Back

Passive Effects

Constant (or passive) effects continually affect the game state as long as the card is in play and any other specified conditions are met. These effects have no bold trigger, as they are always active. 

See also

Home

Back

Actions

Actions are denoted by a bold "Action:" trigger on a card. Actions are always optional, and can be triggered by their controller during any action window in the game sequence. In order to trigger an action on a hero, ally, or attachment card, the card on which the action is printed must be in play, unless the action specifies that it can be triggered from an out of play state. Event cards are actions that are played directly from a player's hand.

Some action triggers are preceded by a specific phase of the game. This type of trigger means that the following action can only be triggered during the specified phase. For example, an effect with the trigger "Quest Action:" can only be triggered during an action window of the quest phase. Actions without a specified phase can be triggered during any action window throughout the round.

  1. Encounter Cards With Actions
  2. FAQ (1.10) Limitations on Actions

See also

Home

Back

Encounter Cards With Actions

An "Action:" on an encounter card in play can be triggered by any player, following normal restrictions on triggering abilities.

See also

Home

Back

FAQ (1.10) Limitations on Actions

Protector of Lorien (CORE 70) reads, "Action: Discard a card from your hand to...." This action may be triggered three times per phase, as long as the card's controller has cards in hand to discard.

Actions are only limited by whether or not a player can pay the cost of the action, or by built in limitations on the card itself, such as "limit once per round." 

See also

Home

Back

Responses

Responses are denoted by a bold "Response:" trigger on a card. Responses are always optional, and can be triggered by their controller in response to (i.e. immediately after) a specified game occurrence. In order to trigger a response on a hero, ally, or attachment card, the card on which the response is printed must be in play, unless the response specifies that it can be triggered from an out of play state. Event cards with "Response:" effects are responses that are played from a player's hand

  1. FAQ (1.08) Responses per Trigger

See also

Home

Back

FAQ (1.08) Responses per Trigger

Theodred (CORE 2) reads, "Response: After Theodred commits to a quest...." This effect can only be triggered once each time Theodred commits to a quest.

If a response or forced response is triggered, the effect can only occur once per trigger. 

See also

Home

Back

Forced Effects

Forced effects are initiated by specific occurrences throughout a game, and they occur automatically, whether the card's controller wants them to or not. They are denoted by a bold "Forced:" trigger on a card. These effects initiate and resolve immediately, whenever their specified prerequisite occurs.

  1. FAQ (1.09) Forced Response
  2. FAQ (1.58) Triggering Forced effects

See also

Home

Back

FAQ (1.09) Forced Response

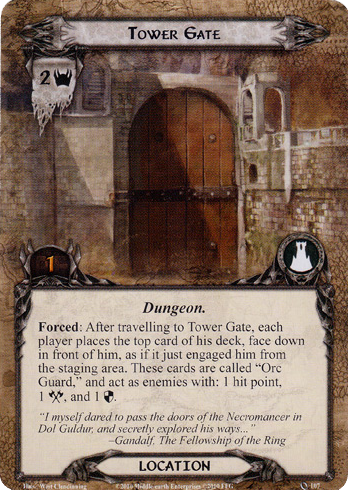
Tower Gate (CORE 107) reads, "Forced: After travelling to Tower Gate...." If a player wishes to play a response such as Strength of Will (CORE 47) after the players travel to Tower Gate, he must wait until after the forced response resolves.

Forced responses resolve immediately when their specified prerequisite occurs, and before any response effects that also can be triggered off the same prerequisite.

See also

Home

Back

FAQ (1.58) Triggering Forced effects

Stage 1B of Helm’s Deep reads: "Forced: At the end of the round, advance to stage 2A,” and stage 2B reads “Forced: At the end of the round, place 1 progress here for each enemy in the staging area." When the end of the round triggers, the players resolve the Forced effect on stage 1 and advance to stage 2, but they do not resolve the Forced effect on stage 2B because it was not in play when the end of the round triggered.

A Forced effect must be in play and active at the time its trigger occurs in order to resolve its effect. If the resolution of another effect causes a Forced effect to enter play or become active after its triggered has occurred, that Forced effect is not resolved.

See also

Home

Back

When Revealed Effects

When revealed effects are a special case of forced effects, that occur automatically as soon as the encounter card is revealed. They are denoted by a bold "When Revealed:" trigger on a card. When revealed effects do not resolve when the card is revealed as a shadow effect.  

  1. FAQ (1.22) 'When Revealed' Effects

See also

Home

Back

FAQ (1.22) 'When Revealed' Effects

If the players use the Stage 3b "Don't Leave the Path!" (CORE 121) quest card effect to search for a King Spider and put it into play, the "When Revealed" effect on the King Spider will not trigger, since the effect on "Don't Leave the Path!" does not specifically use a form of the word "reveal."

A card is only considered to be revealed if the card or game effect causing the card to enter play specifically uses a form of the word "reveal".  

See also

Home

Back

Travel Effects

Some location cards have travel effects, which are denoted by a bold "Travel:" trigger on a card. Travel effects are costs or restrictions that some or all players must pay or meet in order to travel to that location. If the players cannot fulfill the requirement of a location's travel effect, the players cannot travel to that location.  

See also

Home

Back

Shadow Effects

Some of the cards in the encounter deck have a secondary effect that is known as a shadow effect. These effects are offset from a card's non-shadow game effects by , and they are formatted in italic type. Shadow effects are also denoted by a bold and italic "Shadow:" trigger on the card. Shadow effects only resolve when the card is dealt to an attacking enemy during combat. 

Q: Is a shadow card effect considered an encounter card effect? 

A: Yes. Cards that prevent characters from cancelling encounter card effects also prevent players from cancelling shadow card effects. 

See also

Home

Back

Valour Trigger

Actions and Responses with the Valour trigger, presented as "Valour Action" or "Valour Response," can only be triggered by a player whose threat is 40 or higher. 

If an event card has two effects, one with the Valour trigger and one without, you may only choose one of these two effects to trigger when you play the card. You may still only choose the effect with the Valour trigger if your threat is 40 or higher

See also

Home

Back

Setup Effects

If a player card with Setup instructions is in a player's deck at the beginning of a game, that player searches his deck for that card and follows its instructions before drawing his first hand. 

Similarly, Setup instructions on heroes trigger at the beginning of the game.

Similarly, if an encounter card card with Setup is in the encounter deck at the beginning of a game, search the encounter deck for that card and follow its instructions before resolving the Setup instructions on the quest.

See also

Home

Back

Keywords

Keywords are used as shorthand for common game effects that appear on a number of cards. The keywords and their role in the game are explained below. Keywords are denoted textually, usually at the beginning of a card's rules text. Many keywords are specific to a scenario and one should refer to the instructions given on the quest sheet. Below are listed the generic keywords. 

FAQ (1.01) Surge, Doomed, and Guarded keywords should be resolved any time the card on which they occur is revealed from the encounter deck, including during setup.  

  1. Archery X
  2. Battle
  3. Doomed X
  4. Player Card With Doomed X
  5. Encounter
  6. Guarded
  7. Guarded (X)
  8. Indestructible
  9. Ranged
  10. Restricted
  11. Secrecy X
  12. Sentinel
  13. Siege
  14. Surge
  15. Time X
  16. Victory X
  17. Devoted

See also

Home

Back

Archery X

While a card with the archery keyword is in play, players must deal damage to character cards in play equal to the specified archery value at the beginning of each combat phase. This damage can be dealt to characters under any player's control, and it can be divided among the players as they see fit. If there is disagreement as to where to assign archery damage, the first player makes the final decision. If multiple cards with the archery keyword are in play, the effects are cumulative. Remember that does not block archery damage.

See also

Home

Back

Battle

If a quest card has the battle keyword, when characters are committed to that quest, they count their total instead of their total when resolving the quest. Enemies and locations in the staging area still use their in opposition to this quest attempt.

See also

Home

Back

Doomed X

If an encounter card with the doomed keyword is revealed during the staging step of the quest phase or in setup, each player must raise his threat level by the specified value. 

See also

Home

Back

Player Card With Doomed X

If a player card with the Doomed X keyword is played or put into play, each player must raise his threat level by the specified value. 

See also

Home

Back

Encounter

Encounter is a keyword that appears on player cards with an encounter card back, and it has the following rules: 
  • Player cards with the encounter keyword cannot be included in any player's deck because they have encounter card backs. Instead, when setting up a scenario, each player may set up to 3 cards with the encounter keyword aside, out of play. These cards do not count toward the player's deck minimum of 50 cards. 
  • Player cards with the encounter keyword have a dash (-) instead of a cost because they are never played from a player's hand. Instead, player cards with the encounter keyword are meant to be shuffled into the encounter deck. In order to shuffle one of the set aside player cards into the encounter deck, a card effect must instruct a player to do so. 
  • The "when revealed" effect on player cards with the encounter keyword cannot be canceled. 
  • If a player card with the encounter keyword is dealt as a shadow card to an enemy, it is treated like an encounter card: place it in the encounter discard pile after resolving that enemy's attack. 
  • If a player card with the encounter keyword leaves play, it is removed from the game. Do not place it in a player's discard pile or in the encounter deck discard pile. 

See also

Home

Back

Guarded

The guarded keyword is a reminder on some objective cards to reveal and attach the next card of the encounter deck to the objective when it enters the staging area from the encounter deck, and place them both in the staging area. The objective cannot be claimed as long as any encounter card is attached. Once that encounter is dealt with, the objective remains in the staging area until it is claimed. If another objective card comes up while attaching a card for the guarded keyword, place the second objective in the staging area, and use the next card of the encounter deck to fulfill the original keyword effect. Enemy and location cards attached to guarded objectives do still count their threat while the enemy or location is in the staging area. An encounter card attached to a guarded objective is dealt with in the following method, depending on its card type: 

  • Enemy: The enemy leaves play, either by being defeated or as the result of a card effect. 
  • Location: The location leaves play, either by being fully explored or as the result of a card effect. 
  • Treachery: The treachery's effects resolve, or are cancelled. (Treachery cards are immediately triggered when they are revealed.) 

Once all encounter cards attached to a guarded objective are dealt with, the players can claim the objective in the manner specified by its card text.  

Q: Does the Guarded keyword trigger when the encounter card it's on is "added" to the staging area (and not "revealed")? 

A: No. In order for the Guarded keyword to trigger, the encounter card it appears on must be "revealed" from the encounter deck.

See also

Home

Back

Guarded (X)

During the planning phase, Tyler plays "Necklace of Girion" which has the Guarded (enemy or location) keyword, so he discards cards from the top of the encounter deck until he discards an enemy or location. In this case the first card he discards is Lonely Lands. He adds the Lonely Lands to the staging area and attaches Necklace of Girion to it as a Guarded objective. Once that Lonely Lands is explored, Tyler will take control of the Necklace of Girion and attach it to a hero of his choice.

Guarded (X) is a new version of the Guarded keyword that appears on both objective cards and some player card attachments. X is a card type: enemy or location. When a card with Guarded (X) enters play, discard cards from the encounter deck until an encounter card with the matching type is discarded. Then, add that card to the staging area and attach the Guarded (X) card to it as a guarded objective. Once attached, an objective card with the Guarded (X) keyword works just like an objective with the original Guarded keyword. If the encounter deck is empty while resolving the Guarded (X) keyword, shuffle the encounter discard pile into the encounter deck and finish resolving the Guarded (X) keyword.

A player card attachment with the Guarded (X) keyword cannot be attached to a character until it is free of encounters. Once free of encounters, its owner gains control of it attaches it to an eligible card.

See also

Home

Back

Indestructible

An enemy with the Indestructible keyword cannot be destroyed by damage, even when it has damage on it equal to its hit points.

See also

Home

Back

Ranged

A character with the ranged keyword can be declared by its controller as an attacker against enemies that are engaged with other players. A character can declare ranged attacks against these targets while its owner is declaring attacks, or it can participate in attacks that are declared by other players. In either case, the character must exhaust and meet any other requirements necessary to make the attack. 

Q: What counts as a "ranged" attack? 

A: A ranged attack is an attack made by a character with the ranged keyword against an enemy engaged with another player. 

Q: Can a character with the Ranged keyword join an attack against an enemy in the staging area? 

A: No. The Ranged keyword only gives characters with that keyword the ability to attack enemies engaged with another player. 

See also

Home

Back

Restricted

Some attachments have the restricted keyword. A character can never have more than two attachments with the restricted keyword attached. If a third restricted attachment is ever attached to a character, one of the restricted attachments must immediately be moved to its owner's discard pile. 

See also

Home

Back

Secrecy X

Secrecy lowers the cost to play the card by the specified value, provided the threat of the player who is playing the card is 20 or below. Secrecy only applies when the card is played from hand, and never modifies the printed cost of the card.  

See also

Home

Back

Sentinel

A character with the sentinel keyword can be declared by its controller as a defender during enemy attacks that are made against other players. A character can declare sentinel defense after the player engaged with the enemy making the attack declares "no defenders." The defending sentinel character must exhaust and meet any other requirements necessary to defend the attack. 

See also

Home

Back

Siege

If a quest card has the siege keyword, when characters are committed to that quest, they count their total instead of their total when resolving the quest. Enemies and locations in the staging area still use their in opposition to this quest attempt.

See also

Home

Back

Surge

When an encounter card with the surge keyword is revealed during the staging step of the quest phase or in setup, reveal 1 additional card from the deck. Resolve the surge keyword immediately after resolving any when revealed effects on the card. 

See also

Home

Back

Time X

Time X is a keyword that represents the urgency of the heroes' quest. When a card with the Time X keyword is revealed, the players put X resource tokens on that card. These tokens are called "time counters." At the end of each refresh phase, remove 1 time counter from each card with the Time X keyword, if able. When the last time counter is removed, there will be a triggered effect that resolves on that card. Some encounter cards will also remove time counters, making it more difficult for the players to predict when they will run out of time. 

See also

Home

Back

Victory X

Some enemy and location cards award victory points when they are defeated. When such a card leaves play, one player should place it near his threat dial to remind the players of the victory points when they are scoring at the end of the game. It is recommended that one player collects all the victory cards the players earn during the scenario, as victory points are applied to the score of the entire group. 

See also

Home

Back

Devoted

While each non-, non- hero you control shares at least one trait with a card with the Devoted keyword, that card does not require a resource match. The trait that is shared does not need to be the same for each hero.

For example, an ally with the Devoted keyword and the Gondor and Scout traits may be played without a resource match if all of your heroes have the Gondor trait, all of your heroes have the Scout trait, or some of your heroes have the Gondor trait and the remainder have the Scout trait.

See also

Home

Back

Effects Advanced Concepts

  1. FAQ (1.37) Timing of Effects Resolution
  2. FAQ (1.02) Simultaneous Effect Timing
  3. FAQ (1.51) Limitations on Card Effects
  4. FAQ (1.03) Conflict Effect Targeting
  5. FAQ (1.53) Canceling an Encounter Card Effect
  6. FAQ (1.54) Canceling an Encounter Card
  7. FAQ (1.55) Lasting Effects
  8. 'Does Not Stack'
  9. FAQ (1.43) Modifiers of Variable Quantities
  10. Immune to Card Effects
  11. FAQ (1.47) Immune to Player Card Effects
  12. FAQ (1.14) The Word 'Cannot'
  13. FAQ (1.26) The Word 'Switch'
  14. FAQ (1.15) The Word 'Then'
  15. FAQ (1.16) The Phrase 'Put Into Play'
  16. FAQ (1.21) Search Effects
  17. FAQ (1.31) Self-Referential Effects
  18. FAQ (1.36) Triggered Abilities vs Constant Abilities
  19. FAQ (1.44) 'Must X or Y' vs 'Must Either X or Y'
  20. FAQ (1.56) 'Cannot Have Attachments'
Home

Back

FAQ (1.37) Timing of Effects Resolution

When resolving multiple effects with a shared condition, players should use this order of resolution: passive abilities first, Forced effects second, Response actions third. When determining the order of effect resolution among abilities within those categories, players should first resolve abilities that use the word "when" and then resolve abilities with the word "after". A player card effect that cancels an encounter card effect interrupts this timing structure. A cancel effect must be triggered immediately after the encounter card effect that it cancels.

See also

Home

Back

FAQ (1.02) Simultaneous Effect Timing

Tom plays Sneak Attack (CORE 23) to put Beorn (CORE 31) into play during the combat phase. Sneak Effect has the condition, "At the end of the phase, if that ally is still in play, return it to your hand." During combat, Tom uses Beorn's triggered effect, which has the condition, "At the end of the phase in which you trigger this effect, shuffle Beorn back into your deck." At the end of the phase, a situation arises in which two conflicting effects are attempting to resolve simultaneously on Beorn. The first player determines which of the two effects resolves first. (The second effect no longer applies when Beorn leaves play.)

If two or more conflicting effects would occur simultaneously, the first player decides the order in which the effects resolve.

See also

Home

Back

FAQ (1.51) Limitations on Card Effects

When a card with a triggered effect has a limit on the number of times that effect can be triggered (i.e. "Once per round," "Limit 3 times per phase," etc.), the limit is specific to that card. However, if a card has a limit of "once per game," that limitation is specific to the player who triggered it. 

See also

Home

Back

FAQ (1.03) Conflict Effect Targeting

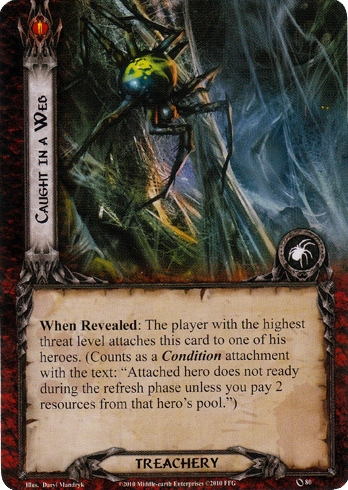
The card Caught in a Web (CORE 80) has an effect that reads, "The player with the highest threat level attaches this card to one of his heroes." Tom and Kris are tied for the highest threat level when Caught in a Web is revealed, so the first player determines whether the card affects Tom or Kris.

If an encounter or quest effect attempts to target a single player or card, and there are multiple eligible targets, the first player selects the target of the effect from among the eligible options. 

See also

Home

Back

FAQ (1.53) Canceling an Encounter Card Effect

If a player plays A Test of Will (CORE 50) to cancel the "˜when revealed' effect of Dark Sorcery (TLR 65), each player must still raise his threat by 2 for the Doomed 2 keyword on Dark Sorcery. Additionally, any effects that triggers after a card with the Sorcery trait is revealed will still trigger because Dark Sorcery has the Sorcery trait, and even though its "˜when revealed' effect was canceled, the card itself was still revealed.

When an encounter card effect is canceled, the game proceeds as if that encounter effect was never triggered. 

The rest of the encounter card is resolved as normal. 

See also

Home

Back

FAQ (1.54) Canceling an Encounter Card

If a player plays The Door is Closed (AA 92) to cancel Dark Sorcery (TLR 65), the Doomed 2 keyword on Dark Sorcery will not trigger, nor will any effects that trigger after a card with the Sorcery trait is revealed, because the entire encounter card was canceled.

When an encounter card is canceled, the game proceeds as if that encounter card was never revealed, except for it still fulfills that encounter card reveal. Effects that would have triggered in response to the canceled encounter card being revealed cannot be triggered. 

See also

Home

Back

FAQ (1.55) Lasting Effects

Many effects last only for the duration of one action (immediately after being triggered), but some effects last for a set period of time, or even indefinitely. Effects that last for longer than a single action are called lasting effects. 

Multiple lasting effects may affect the same card at the same time. The order in which the lasting effects take place is irrelevant, since the net sum of all lasting effects is applied to the card. 

If one of a hero's, ally's, enemy's, or location's statistics (, , , or ) is ever lower than 0 after all effects are applied, that statistic is rounded up to 0. Any time a new effect is applied to a card, the net sum of all active effects should be recalculated. 

If one of a hero's, ally's, enemy's Hits Points is ever lower than 0 after all effects are applied, the character or enemy is immediately discarded.

There are two classes of lasting effects in the game: those created by player cards and those created by encounter cards. Each class is handled differently as follows: 

If a player triggers the Quest Action on Nenya (RM 121) to add Galadriel's (RM 112) 4 willpower to another hero until the end of the phase, that +4 willpower bonus will not be recalculated if Galadriel's willpower is increased later that phase

A lasting effect created by a player card ability must be calculated at the time that the ability is triggered, and that effect is not recalculated if the game state changes. 

Part of the "˜when revealed' ability on Poisoned Vapour (ToS 61) reads: "Until the end of the combat phase, treat each damaged character's text box as if it were blank (except for Traits)." If Aragorn (ToS 1) had 1 damage at the time Poisoned Vapour was revealed, his text box would be treated as if it were blank. However, if that damage was healed, his text box would no longer be considered blank. If he was damaged again, his text box would be treated as if it were blank until the end of the combat phase.

A lasting effect created by an encounter card ability, is recalculated if the game state changes. 

See also

Home

Back

'Does Not Stack'

Ancient Forest reads: "While Ancient Forest is in the staging area each Forest location in the staging area gets +1 and +3 quest points. This ability does not stack with other copies of Ancient Forest." This means that even if there are 2 copies of Ancient Forest in the staging area, each Forest location in the staging area will only get +1 and +3 quest points total.

Some cards have passive abilities with the text "This ability does not stack with..." While two or more effects that do not stack with one another are active, only one of them will affect the game state. 

See also

Home

Back

FAQ (1.43) Modifiers of Variable Quantities

The game state constantly checks and (if necessary) updates the count of any variable quantity that is being modified. Any time a new modifier is applied, the entire quantity is recalculated, considering all active modifiers. A quantity cannot be reduced below zero: a card cannot have "negative" cost, stats, keywords, etc. 

See also

Home

Back

Immune to Card Effects

Some encounter cards have the text, "Immune to card effects." This means that the encounter card cannot be selected as the target of any card effect, and it ignores the effect of any card that would directly interact with it. 

See also

Home

Back

FAQ (1.47) Immune to Player Card Effects

Some encounter cards have the text "Immune to player card effects". This text means that player cannot select the encounter card as the target of any card effect and it ignores the effect of any player card that would directly interact with it. 

Cards with the text "Immune to player card effects" ignore the effects of all player cards. This means that player card effects cannot directly influence or interact with a card that is immune to player card effects. Examples include dealing damage to an enemy, placing progress on a location, altering a card's text or statistics, moving a card, engaging an enemy, traveling to a location, or discarding a card. 

Pippin's (TBR 4) passive ability cannot increase the engagement cost of an enemy that is immune to player card effects, because that enemy will ignore Pippin's effect. However, if you engage an enemy who is immune to player card effects and has an engagement cost higher than your threat, you may still use Pippin's Response to draw a card, because this response is not affecting the enemy in any way.

However, a card that is immune to player card effects can still be affected by normal framework effects such as placing progress from questing successfully, engaging an enemy during the encounter phase, or dealing damage through an attack made by a character. 

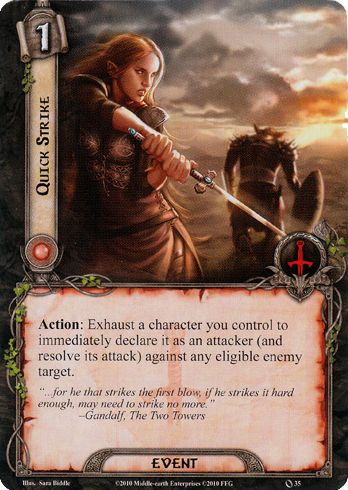
Hands Upon the Bow (D 131) cannot be used to attack an enemy that is immune to player card effects, because it clearly indicates that the player must pick an enemy in the staging area to attack. This is different from Quick Strike (Core 35), which targets a character and allows them to perform a normal attack, which is a framework effect.

Additionally, cards that are immune to player card effects cannot be chosen as targets of player card effects. This means that any player card that uses a form of the words "target" or "choose" cannot choose a card that is immune to player card effects as its target. This includes the "attach to..." text of any player attachment. Player cards that do not use the word "target" or "choose" but force the player to choose a specific card cannot choose a card that is immune to player card effects. 

Q: Can I play an attachment on an enemy or location that is immune to player card effects? 

A: No. Playing an attachment on a card is a form of targeting, and cards with "immune to player card effects" cannot be targeted by player cards. 

See also

Home

Back

FAQ (1.14) The Word 'Cannot'

If a card effect uses the word "cannot", then it is an absolute: that effect cannot be overridden by other effects. 

See also

Home

Back

FAQ (1.26) The Word 'Switch'

In order for a switch to occur, switched items must exist on both sides of the switch. 

Home

Back

FAQ (1.15) The Word 'Then'

If a card effect uses the word "then," then the preceding effect must resolve successfully for the subsequent dependent effect to resolve. 

See also

Home

Back

FAQ (1.16) The Phrase 'Put Into Play'

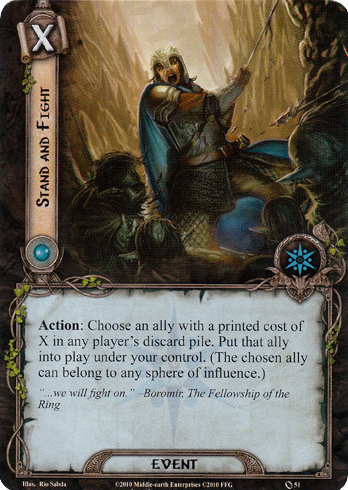
The quest Through the Caverns (CORE 124) has the text, "The players, as a group, cannot play more than one ally card each round." While this quest is active, a player can put an ally into play with Stand and Fight (CORE 51), even if an ally has already been played this round.

If a card effect uses the phrase "put into play," it means that the card enters play through a card effect instead of through the normal process of paying resources and playing the card from hand. "Put into play" effects are not considered to be playing the card, and will not trigger any effects that refer to a card being played. "Put into play" will, however, trigger any effects that occur when a card "enters play". 

See also

Home

Back

FAQ (1.21) Search Effects

Whenever a player searches through a deck, that player shuffles the deck after searching it unless a card effect says otherwise. Players do not shuffle or change the order of a discard pile after searching it. 

See also

Home

Back

FAQ (1.31) Self-Referential Effects

If a card refers to its own title in its text it should be read as referring only to that copy of the card. A card that refers to other copies of itself will use the language "any copy of..." or "another copy of..." or "a card with the title..."

See also

OWN
Home

Back

FAQ (1.36) Triggered Abilities vs Constant Abilities

Triggered abilities are abilities on cards that have a bold trigger word such as Action or Response. These abilities are only applied when they are triggered. Constant abilities are abilities on cards that have an ongoing effect without a bold trigger word. Because passive abilities don't have a trigger they are always active and cannot be "triggered". 

See also

Home

Back

FAQ (1.44) 'Must X or Y' vs 'Must Either X or Y'

If a card instructs a player to perform one task or perform a second task using the structure "... must X or Y..." then the player must attempt to perform the first task, and performs the second task instead only if the first task cannot be performed.

If a card instead uses the structure "... must either X or Y..." then the player may choose which task to perform, although one of them must be performed in full, if able.

Home

Back

FAQ (1.56) 'Cannot Have Attachments'

The text "cannot have attachments" is absolute. It is possible to play attachments on a card with this text while its text box is considered to be blank, but any attachments on that card must be discarded immediately the moment its text is active again.

See also

Home

Back

Threat

Q: Can a player's threat be reduced below 0? 

A: No. The threat dial does not allow negative values.

See also

Home

Back

Resources & Card Payment

  1. FAQ (1.25) Collecting, Adding, Moving or Gaining resources
  2. Card Payment
  3. FAQ (1.40) The Letter 'X'
  4. Paying for Neutral Cards
  5. Paying for Card Abilities
  6. Paying Costs

See also

Home

Back

FAQ (1.25) Collecting, Adding, Moving or Gaining resources

Collecting resources refers to both collecting resources during the resource phase and gaining resources through other card effects. An effect that prevents a hero from collecting resources prevents both methods of acquiring new resources. 

Adding a resource to a hero's pool is the act of taking a resource from the token bank and placing it in that hero's pool. Adding a resource always results in the total number of resources controlled by the players being increased. 

Moving a resource is the act of taking a resource from one hero's pool and placing it in another hero's pool. This does not count as "˜adding' a resource because it did not take a new resource from the token bank and the total number of resources controlled by the players did not increase. 

Gaining a resource is a blanket term that includes collecting, adding and moving. Any time the number of resources in a hero's pool is increased, that hero has gained one or more resources. 

See also

Home

Back

Card Payment

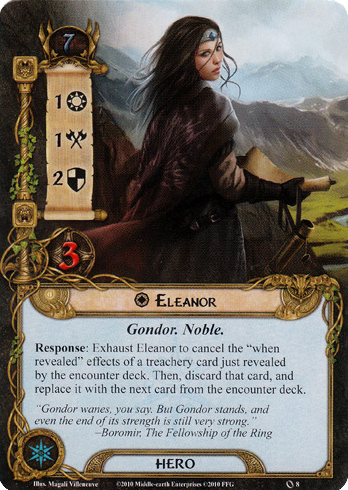
Tom has 3 heroes: Glóin (who has a Leadership resource icon and 3 resources in his pool), Éowyn (who has a Spirit resource icon and 2 resources in her pool), and Eleanor (who has a Spirit resource icon and 2 resources in her pool). Tom wishes to play the Guard of the Citadel card from his hand. The Guard of the Citadel belongs to the Leadership sphere, so Tom must spend resources from Glóin's pool to play this card. Since the Guard of the Citadel has a cost of 2, Tom moves 2 resources from Glóin's pool to the token bank and places the Guard of the Citadel into his play area. Tom also wishes to play the Northern Tracker card from his hand, which belongs to the sphere of Spirit, and has a cost of 4. To play this card, Tom takes 2 resources from Éowyn's pool, and 2 resources from Eleanor's pool, for a total of 4. He can do this because both Éowyn and Eleanor have Spirit resource icons. Tom spends these tokens and places them in the token bank, and then places the Northern Tracker in his play area.

In order for a player to play a card from his hand (or to activate certain card effects), he must pay for it by spending resource tokens from the resource pool of a hero who has a resource icon that matches the card's sphere of influence. This is called a resource match. Resources that are spent to pay for cards or card effects are taken from their hero's resource pool and placed in the general token bank. 

Cards with a cost of zero do not require a resource to be spent in order to pay their cost, but they do require at least one hero under that player's control to have a resource icon that matches the card's sphere. 

If a player has multiple heroes with similar resource icons, he may use resources from multiple pools of the same sphere to pay for a single card or effect. 

See also

Home

Back

FAQ (1.40) The Letter 'X'

Unless specified by a card effect, or granted player choice, the letter "X" is equal to 0.  

See also

Home

Back

Paying for Neutral Cards

Neutral cards, which belong to no sphere of influence, require no resource match to play. This means that they can be paid for with resources from any hero's pool. Also, when paying for a neutral card, a player may combine resources from heroes with different resource icons.

See also

Home

Back

Paying for Card Abilities

Some cards have abilities that can be triggered from play, but still require the triggering player to pay resources. Triggering a card ability from a card already in play requires no resource match, unless otherwise, specified by the ability. 

See also

Home

Back

Paying Costs

Many cards are written in a "pay or exhaust X to do Y" manner. When confronted with such a construct, everything before the word "to" is considered the cost, and everything after the word "to" is considered an effect. Costs can only be paid with cards or resources that a player controls. If an effect is cancelled, the cost is still considered to have been paid.

See also

Home

Back

Card Status

  1. Control & Ownership
  2. Ready & Exhausted
  3. In Play & Out of Play
  4. Removed from Game
Home

Back

Control & Ownership

A player "owns" his heroes and the cards that he has chosen for the player deck he is playing. A player "controls" all cards that he owns, unless another player or the encounter deck takes control of the card through a game effect. Any time a card leaves play, it reverts its owner's hand, deck, or discard pile (as directed by the effect forcing the card out of play). 

When a player plays an ally card, it comes into play under his control and is placed in his play area. If another player takes control of that ally, it is moved to the controlling player's play area. Ally cards cannot be played under the control of another player, they can only change control through card effects. 

When a player plays an attachment card, he has the option of giving control of that card to another player by attaching the card to one of that player's characters. Players always assume control of attachments that have been played on their characters. If control of that character changes, so does the control of any attachments on that character.
  1. FAQ (1.06) Control of Non-Objective Encounter Cards
  2. FAQ (1.07) Control of Objective Cards
  3. FAQ (1.17) Unclaimed Objectives
  4. FAQ (1.23) Attachments
  5. FAQ (1.38) Control of Attachments

See also

Home

Back

FAQ (1.06) Control of Non-Objective Encounter Cards

Players do not gain control of encounter cards unless control of the card is explicitly granted by a card effect. When an encounter card becomes an attachment and attaches to a character, that character's controller does not gain control of the attachment. 

See also

Home

Back

FAQ (1.07) Control of Objective Cards

When a player claims an objective card, he gains control of that card unless otherwise directed by a card effect. 

See also

Home

Back

FAQ (1.17) Unclaimed Objectives

An unclaimed objective is one that is not currently claimed and under the control of a player. An unclaimed objective can be guarded or unguarded. A guarded objective is treated like an attachment if guarded by an enemy or location, and remains attached to that card until it leaves play, at which point it will return to the staging area. Any unclaimed objective in the staging area that is not attached to a card is considered to be unguarded. If an objective is claimed at one point, and then returns to the staging area, it regains the status of unclaimed.

See also

Home

Back

FAQ (1.23) Attachments

Any objective card that attaches to another card is treated as an attachment in addition to its other card types. 

Any non-objective card that attaches to another card loses its original card type and gains the attachment card type.

The "Attach to..." rules text on an attachment is only a play restriction, and is not taken into account after the card is already attached. 

See also

Home

Back

FAQ (1.38) Control of Attachments

When a player plays an attachment on a character controlled by another player, that character's controller gains control of the attachment. When a player plays an attachment into the staging area, or on an enemy or location, that player retains control of that attachment.

See also

Home

Back

Ready & Exhausted

Characters and attachment cards enter the game in then "ready" position"“that is, face up on the playing surface in front of their controller.  

When a card has been "used" for some purpose, such as to commit to a quest, to attack, to defend, or to use a character ability that requires the card to exhaust, it is turned 90 degrees sideways and considered "exhausted." An exhausted card cannot exhaust again (and therefore cannot partake in any action that requires exhaustion) until it has been readied once more. When a player is instructed by the game or by a card effect to ready a card, he moves that card to its normal upright position.

Q: If an attachment gives a permanent stat bonus, does that bonus still apply when the attachment is exhausted? 

A: Yes. Exhausting an attachment does not negate any permanent bonus that attachment grants to the attached character. 

  1. FAQ (1.12) Exhaustion & Attachments

See also

Home

Back

FAQ (1.12) Exhaustion & Attachments

Steward of Gondor (CORE 26) reads, "Action: Exhaust Steward of Gondor to...." Using this action only exhausts the Steward of Gondor card, not the hero to which it is attached. Additionally, exhausting the hero to which Steward of Gondor is attached does not exhaust the Steward of Gondor card.

Attachments and the card to which they are attached exhaust and ready independent of one another. 

See also

Home

Back

In Play & Out of Play

"In play" refers to cards that have been played or put into play (in a player's play area), to cards that are waiting in the staging area, to the currently revealed quest card, and to encounter cards that are engaged with that player.

"Out of play" states are "in a player's hand," "in a deck," or "in a discard pile." Card effects do not interact with cards in an out of play state unless the effect specifically refers to that state.  

See also

Home

Back

Removed from Game

Players may be instructed to remove cards from the game. When a card is removed from the game, it should be set aside and ignored for the rest of the game. Do not place any "removed from game" cards in the discard pile, as effects that bring cards back from the discard pile no longer interact with these cards. 

See also

Home

Back

Areas of Play

  1. Player's Hand
  2. Staging Area
  3. Discard Piles
  4. FAQ (1.48) Discarding Cards vs Placing Cards in the Discard Pile
  5. Running Out of Cards
  6. FAQ (1.29) Victory Display
Home

Back

Player's Hand

There is no limit to the amount of cards a player can have in his hand. 

See also

Home

Back

Staging Area

The staging area is a unique element of the game's playing field. It represents the potential dangers the players might face as they progress on their quest. 

During the quest phase, enemy and location cards are revealed from the encounter deck and placed in the staging area. Cards in the staging area are imminent threats to the players, including enemies that need to be defeated and locations that need to be explored. While a location is in the staging area, the players are not considered at that location; instead it represents a distant threat. Players have the option of traveling to a location during the travel phase. Similarly, enemies in the staging area are not yet engaged with any of the players. Enemies engage players when a player's threat level is high enough to draw out that enemy. Players also have the option to voluntarily engage enemies during the encounter phase.

Q: What is the difference between "adding" a card to the staging area versus "placing" a card in the staging area? 

A: There is no difference between "adding" a card to the staging area versus "placing" a card in the staging area. These words are used interchangeably and mean the same thing in all instances.

  1. FAQ (1.35) 'Enters the Staging Area'
  2. FAQ (1.39) Staging Objective Cards
  3. FAQ (1.45) 'Reveal' vs 'Reveal and Add'

See also

Home

Back

FAQ (1.35) 'Enters the Staging Area'

Enters the staging area is a term that applies to a card (enemy, location, objective, etc.) that is placed in the staging area. This term applies whether the card in question has been revealed from the encounter deck, placed in the staging area from out of play, returned from the discard pile or from engaged with a player, or by other means. 

See also

Home

Back

FAQ (1.39) Staging Objective Cards

When a player reveals an objective from the encounter deck, he adds it to the staging area unless that objective instructs the player to do something different. 

See also

Home

Back

FAQ (1.45) 'Reveal' vs 'Reveal and Add'

Any time encounter cards are "revealed" from the encounter deck, the players should follow the rules for staging. If a card effect uses the phase "Reveal and add to the staging area", it means the same as simply using the word "reveal", and the above steps should still be followed (i.e. treachery cards should still be discarded after resolving its effects, unless otherwise indicated by the card's text). 

See also

Home

Back

Discard Piles

Each player has his own discard pile, and the encounter deck also has its own discard pile. Whenever a card is discarded, it goes to the discard pile belonging to the card's originating deck.

See also

Home

Back

FAQ (1.48) Discarding Cards vs Placing Cards in the Discard Pile

When a character is destroyed, or an event card is played, it is placed in the discard pile. This is not the same as being "discarded." Cards are only discarded when a card effect instructs a player to discard a card.

See also

Home

Back

Running Out of Cards

If a player runs out of cards in his player deck, he continues to play the game with the cards he has in play and in his hand. He does not reshuffle his discard pile. If the encounter deck is ever out of cards during the quest phase, the encounter discard pile is shuffled and reset back into the encounter deck. 

See also

Home

Back

FAQ (1.29) Victory Display

The victory display is a game area where victory points are tracked. Cards in the victory display are considered to be out of play, but are not considered to be a part of the encounter discard pile. Cards in the victory display are not considered "removed from game," and some card effects may still interact with them. 

  1. "Limit 1 Copy in the Victory Display"

See also

Home

Back

"Limit 1 Copy in the Victory Display"

The player side quest, The Storm Comes, has the text: "Limit 1 copy of The Storm Comes in the victory display." This text prevents more than 1 copy of The Storm Comes from entering the victory display. If the players defeat The Storm Comes, and there is already a copy of that side quest in the victory display, then the copy that was just defeated is placed in its owner's discard pile.

See also

Home

Back

Players

  1. First Player
  2. Last Player
  3. Next Player
  4. Table Talk
Home

Back

First Player

The players determine a first player based on a majority group decision during step 4 of setting up the game. At the end of each round, the first player passes the first player token to the next player clockwise on his left. That player becomes the new first player. 

  1. FAQ (1.30) 'First Player' Elimination

See also

Home

Back

FAQ (1.30) 'First Player' Elimination

If the player with the first player token is eliminated, the first player token immediately passes clockwise to the next eligible player.  

See also

Home

Back

Last Player

Some cards refer to the "last player." The last player is considered to be the player sitting directly to the right of the first player. If there is only one player playing, then that player is considered to be both the first and last player. 

See also

Home

Back

Next Player

The shadow effect of Pathless Country (TBR 72) reads: "Shadow: After this attack, the attacking enemy engages the next player then makes an immediate attack." If there is only one player in the game, there is no next player to engage. The word "then" indicates that the immediate attack is conditional on the attacking enemy engaging the next player, so the enemy will not make an immediate attack.

The next player is the player sitting directly to the left of the player referenced by the card effect. If there are no other players in the game, there is no next player. 

  1. FAQ (1.46) Next Player

See also

Home

Back

FAQ (1.46) Next Player

If there is only one player in the game, there is no next player. Card effects that target the "next" player will not trigger if there is only one player in the game. 

See also

Home

Back

Table Talk

Players are permitted and encouraged to talk to one another during play, and to work as a team to plan and execute the best course of action. Players can discuss anything they would like, but they cannot name or read out loud directly from cards in their hand, or from cards that they have seen but the rest of the players have not.

See also

Home

Back

Difficulty Levels

  1. Standard Mode
  2. Easy Mode
  3. Nightmare Mode

See also

Home

Back

Standard Mode

Standard Mode is the default difficulty for a given scenario. Players who wish can continue to play their games in Standard Mode, following all of a scenario's normal setup instructions. 

See also

Home

Back

Easy Mode

Easy Mode is an alternative mode of play, ideal for new players and for players who prefer the narrative and cooperative aspects of the game with less challenge. 

To play a scenario in Easy Mode, simply take the following steps during setup of any scenario: 

During step 2 of Setup, "Place Heroes and Set Initial Threat Levels", add one resource to each hero's resource pool. 

When building the encounter deck, remove any card with the "difficulty" indicator around its encounter set icon (a gold border) from the current scenario's encounter deck. 

In Standard Mode, you include all cards marked with the appropriate encounter set icons when you build your encounter deck. 

In Easy Mode, when you build the encounter deck, you remove all encounter cards designated as "difficult." These encounter cards are marked with the "difficulty" indicator (a gold border) around their encounter set icons. 

Some older scenarios (including those in early printings of the core game) do not have the above mentioned "difficulty" indicator icon on relevant cards in their encounter decks.

You will find the appropriate list of cards to take off the encounter deck in the rulesheet dedicated to each scenario.

See also

Home

Back

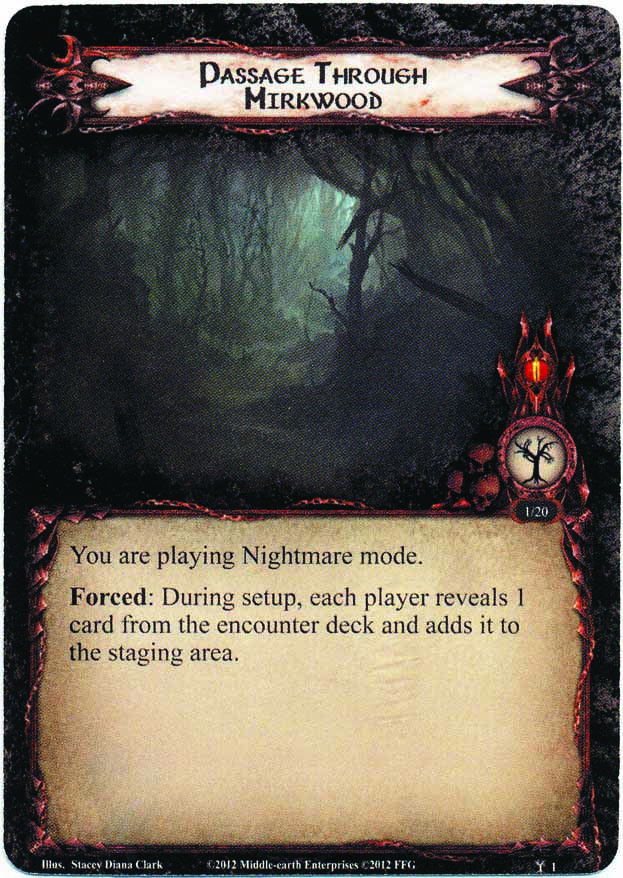
Nightmare Mode

The twenty-two card Nightmare Decks increase the challenge levels of the scenarios they modify, and Nightmare Mode appeals most to those skilled veterans who hunt for new challenges, deadlier enemies, and taller mountains to scale. Nightmare Decks can be purchased via Print On Demand.

Home

Back

Seafaring Rules

  1. Ships
  2. The Corsair Deck
  3. Preparing Your Fleet
  4. Heading
  5. Sailing
Home

Back

Ships

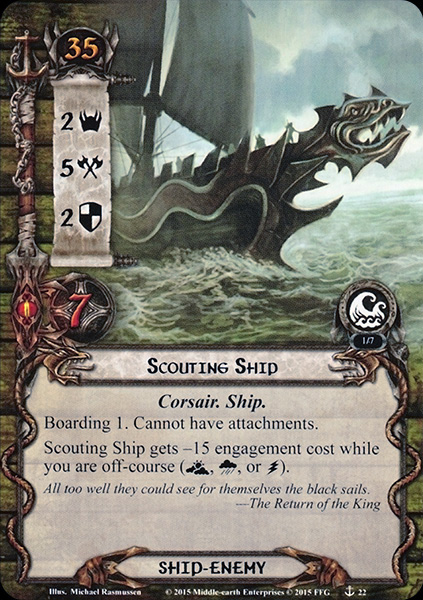
There are two kinds of ship cards: Ship-Enemies and Ship-Objectives. Both ship-enemies and ship-objectives count as ship cards, but have different rules associated with them. 

  1. Ship-Enemies
  2. Ship-Objectives

See also

Home

Back

Ship-Enemies

Ship-enemies function in the same way as enemies and are considered to be enemies for all purposes, with the following exceptions: 

  • Attacks made by ship-enemies can only be defended by ship-objectives. Non-ship cards cannot defend against a ship-enemy.
  • If an attack made by a ship-enemy is left undefended, damage from that attack must be assigned to a ship-objective you control, instead of to a hero you control. 

See also

Home

Back

Ship-Objectives

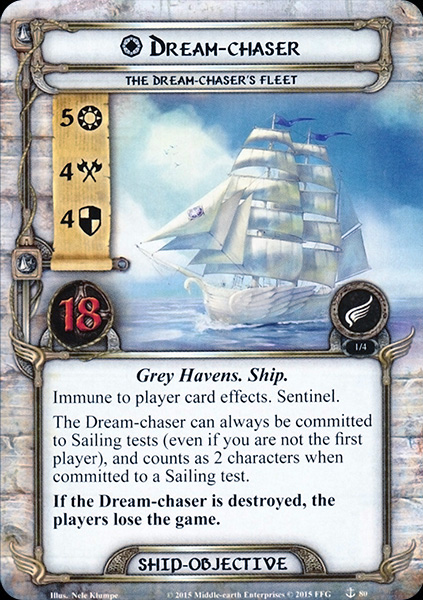
Ship-objectives are encounter cards (not player cards) which function in the same way as objective-allies and are considered to be allies (and characters) for all purposes, with the following exceptions:

  • Ship-objectives can only attack ship-enemies. Non-ship enemies cannot be attacked by a ship-objective. 
  • Ship-objectives can only defend against attacks made by ship-enemies. Ship-objectives cannot defend against attacks made by non-ship enemies. 

See also

Home

Back

The Corsair Deck

The Corsair Deck is a separate deck made up of only non-Ship enemies, and represents the sailors, pirates and raiders players may encounter on Corsair ships.

When ships are included in a scenario's encounter deck, that scenario's Setup will instruct the players to "prepare the Corsair Deck." This is done by removing all non-Ship non-unique enemies from the encounter deck, placing them in a separate facedown pile, and shuffling it. This pile is referred to as the Corsair Deck. The other non-unique enemies and ship-enemies remain in the standard encounter deck.

The enemies in the Corsair Deck are only revealed through encounter card effects, such as the Boarding keyword.

The Corsair Deck has its own discard pile. Whenever a non-Ship Corsair enemy would be placed in the discard pile, place it in the Corsair discard pile instead.

When the Corsair Deck runs out of cards, immediately shuffle the Corsair discard pile back into the Corsair Deck.

See also

Home

Back

Preparing Your Fleet

When ships are included in a scenario's encounter deck, that scenario's Setup will instruct the players to "prepare their fleet." To prepare their fleet, each player chooses and takes control of one of the unique ship-objectives included in the encounter sets.

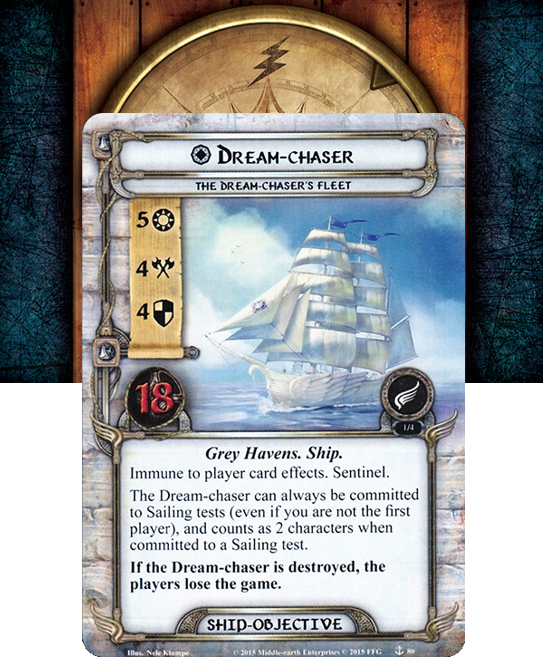
  • If playing with the Dream-chaser encounter set, one of the players must choose the Dream-chaser. In a game with only one player, that player takes control of the Dream-chaser and one other ship-objective of his or her choice. Each ship-objective that is not used is then removed from the game. Finally, the player who controls the Dream-chaser attaches the Heading card to the Dream-chaser and sets it to .
  • If playing with The Hunt for the Dreadnaught encounter set, ship-objectives must be chosen on their Basic side. Each ship-objective (including the 4 Gondorian Warships) that is not used is then set aside.

See also

Home

Back

Heading

The Heading card attached to the Dream-chaser represents the fleet's current ability to navigate their ships with the wind and through the many hazards that may appear at sea. A bad heading represents sailing poorly, into hazards such as enemies or foul weather. 

The symbol shown on the Heading card is called "your current heading." All players share the same heading. Some cards will have additional or different effects depending on the current heading. The possible headings are described below: 

  • : This is the only heading that is considered to be "on-course," and is the best possible setting. Your heading cannot shift any further on-course than this. You are traveling windward, with maximum maneuverability.
  • /: These headings are considered "off-course." You are struggling against the elements and are not navigating properly. 
  • : This heading is considered "off-course," and is the worst possible setting. Your heading cannot shift any further off-course than this. You are traveling against the wind, and are completely at the mercy of the sea. 

If you are instructed to shift your heading off-course, you must rotate the Heading card 90° counterclockwise so that your current Heading is one step closer to the worst setting (). If it is already at the worst setting (), it cannot shift off-course. 

If you are instructed to shift your heading on-course, you must rotate the Heading card 90° clockwise so that your current Heading is one step closer to on-course (). If it is already at on-course (), it cannot shift on-course. 

Note: When you are instructed to shift your heading on-course, it does not shift all the way to the on-course () setting; it only shifts one step closer to the on-course () setting.

See also

Home

Back

Sailing

Sailing is a keyword that represents that the players are currently traveling across the sea on their ships. At the beginning of each quest phase (before committing characters to the quest), if the main quest has the Sailing keyword, the first player must perform a Sailing test. 

Sailing Tests 

Sailing tests represent the players' ability to change their course or alter their sails and riggings in such a way as to adapt to the changing winds. 

In order to perform a Sailing test, you must first shift your heading off-course. This represents the shifting of the winds, and the difficulty of navigating at sea. (If it is already at , it does not change.) 

Then, the player performing the Sailing test exhausts any number of characters he controls, committing them to the Sailing test. After choosing which characters to commit to the Sailing test, that player looks at a number of cards from the top of the encounter deck equal to the total number of characters committed to the Sailing test. If the encounter deck does not contain enough cards to look at, shuffle the encounter discard pile back into the encounter deck first. 

Some encounter cards have a symbol on the bottom left corner of their text box. This symbol represents a success when performing a Sailing test. For each symbol found on the looked at encounter cards, you may shift your heading on-course. If no symbols are found, your heading stays the same. Then, discard all of the looked at cards. 

symbols have no effect other than representing success during a Sailing test. 

Players have the opportunity to use Action effects before and after a Sailing test, but not during.

See also

Home

Back

The Hobbit Saga Expansion Rules

  1. Treasure Cards
  2. Bilbo Baggins
  3. Baggins Sphere

See also

Home

Back

Treasure Cards

A player is permitted to add a treasure card to his player deck before the game begins if both of the following conditions are met: 

  1. The player has discovered the specific treasure card he wishes to use through game text in a previous scenario using the same group of heroes he is currently playing with. 
  2. The specific treasure card belongs to a treasure set that is listed in the setup instructions for the scenario currently being played. The treasure set icon appears in place of a sphere icon on treasure cards, and can also be used to identify which scenario it can be discovered in.
Tom has discovered the treasure card Sting in the We Must Away, Ere Break of Day scenario. While setting up to play the Over the Misty Mountains Grim scenario, he sees that Sting belongs to a treasure set that can be used during that scenario. Therefore, he adds 1 copy of Sting to his deck.

Any treasure card that meets the above conditions can be added to a player's deck during the setup of a scenario. No more than 1 copy of any treasure card, by title, can be added to a player's deck. Treasure cards added to a deck do not count towards that deck's 50 card minimum. 

  1. Card Title 
  2. Cost 
  3. Treasure Set Icon 
  4. Traits 
  5. Game Text 
  6. Card Type 
  7. Set Information

See also

Home

Back

Bilbo Baggins

The Hobbit Saga Expansions feature Bilbo Baggins, a new hero card with a special set of rules.

This version of Bilbo must be used when playing the scenarios in this set. The Bilbo Baggins hero card included in this box belongs to a unique sphere of influence, the Baggins sphere, denoted by the symbol. As Thorin and his companions came to rely on the unlikely hero, players will need Bilbo's help to defeat each scenario in this deluxe expansion. 

The cards (including Bilbo Baggins) and the treasure cards are intended for use only when playing the scenarios included in The Hobbit Saga Expansion boxes.

In The Hobbit Saga Expansions, the version of Bilbo Baggins has the text: "The first player gains control of Bilbo Baggins." When the first player token passes during the refresh phase, the first player gains control of Bilbo Baggins, all resources in his pool, and all cards attached to him. If Bilbo Baggins is the last hero under a player's control, and he then leaves that player's control, that player is immediately eliminated from the game.  

See also

Home

Back

Baggins Sphere

As a hero, Bilbo Baggins collects 1 resource during the resource phase. 

Therefore, managing a limited number of resources becomes an important part of each scenario. In addition to paying for cards that match Bilbo Baggins's sphere (as well as neutral cards), there are numerous situations in these scenarios in which resources can be used to assist the players. 

See also

Home

Back

The Lord of the Rings Saga Expansion Rules

  1. The One Ring
  2. Gollum/Sméagol
  3. Fellowship Sphere
  4. Staging Rules
  5. Campaign Mode

See also

Home

Back

The One Ring

The Lord of the Rings Saga Expansions feature The One Ring, an objective card that the players must use when playing the scenarios in this set. 

When setting up the scenarios in The Lord of the Rings Saga Expansions boxes, the first player must attach The One Ring to a Ring-bearer he controls.

While attached to a hero, The One Ring has the text: "Attached hero does not count against the hero limit." Therefore, it is possible for the first player to begin the game with up to 4 heroes under his control if one of those heroes is a Ring-bearer with The One Ring attached. 

The One Ring has the text: "The first player gains control of attached hero." When the first player token passes during the refresh phase, the first player gains control of the attached Ring-bearer, all resources in that hero's resource pool, and all cards attached to that hero. If the hero with The One Ring attached is the last hero under a player's control, and that hero leaves that player's control, then that player is immediately eliminated from the game. 

The One Ring also has the text: "If The One Ring leaves play, the players lose the game." Just like in the books, the players will need to carefully guard the Ring-bearer because if the attached hero leaves play, then The One Ring is also discarded and the players lose the game. 

See also

Home

Back

Gollum/Sméagol

Included in The Land of Shadow is a unique, double-sided encounter card: Gollum / Sméagol. Each side of this card represents a different aspect of the iconic character: Gollum is an enemy card while Sméagol is an objective-ally. Just as in the books, Gollum will stop at nothing to reclaim his "Precious" while Sméagol wishes to aid his "nice Master." 

Because the Gollum / Sméagol card does not have an encounter card back, it can never be shuffled into the encounter deck. Instead, a scenario featuring Gollum / Sméagol will instruct the players to put him into play during setup, and identify which side to put faceup. 

While his enemy side is faceup, Gollum looks like this: 

When the players defeat Gollum, discard all damage tokens from him and turn him Sméagol side faceup. When that happens, the Gollum enemy leaves play and the Sméagol objective-ally enters play. 

While his objective-ally side is faceup, Sméagol looks like this: 

The last line of Sméagol's text box cannot be affected by card text, including encounter card and quest card effects. If Sméagol takes damage equal to his hit points, the players immediately lose the game. 

If an effect causes Sméagol is to be flipped to Gollum, discard all damage tokens from Sméagol. When Sméagol flips to Gollum, the Sméagol objective-ally leaves play, and the Gollum enemy enters play. Gollum always enters play in the "ready" position, regardless of whether Sméagol was ready or exhausted when he was flipped to Gollum.

See also

Home

Back

Fellowship Sphere

 The Fellowship sphere, denoted by the icon, is a sphere of influence in The Lord of the Rings: The Card Game with its own set of rules. 

The Fellowship sphere emphasizes the sacrifice and determination of the valiant heroes who took up the burden of carrying The One Ring in the fight against Sauron. The Fellowship sphere cards are only intended to be used when playing the scenarios presented in The Lord of the Rings Saga Expansions. 

Heroes belonging to the Fellowship sphere can only be used when playing the scenarios in The Lord of the Rings Saga Expansions. Also, only 1 hero from the Fellowship sphere can be played at a time. Therefore, it is not possible for there to be more than 1 hero belonging to the Fellowship sphere in play at any time.

  1. Resources Card Payment
  2. Frodo Baggins
  3. Aragorn

See also

Home

Back

Resources Card Payment

The Lord of the Rings Saga Expansions features Frodo Baggins and other heroes who belong to the Fellowship sphere. When using these versions of those heroes, players cannot start with any other version(s) of these heroes as a starting hero or include any other version(s) of these heroes in their decks. 

As a hero, a Fellowship sphere hero collects 1 resource during the resource phase. In addition to paying for cards that match the Fellowship sphere, resources from a Fellowship sphere hero pool may be spent to pay for neutral cards as well. 

A hero from the Fellowship sphere cannot be used as a hero when playing any scenario from a product other than The Lord of the Rings Saga Expansions.

See also

Home

Back

Frodo Baggins

The Lord of the Rings Saga Expansions feature Frodo Baggins, a hero who belongs to the Fellowship sphere. 

When using this version, players cannot start with any other version(s) of Frodo Baggins as a starting hero or include any other version(s) of Frodo Baggins in their decks. 

As a hero, this version of Frodo Baggins collects 1 resource during the resource phase. In addition to paying for cards that match the Fellowship sphere, resources from Frodo Baggins' pool may be spent to pay for neutral cards as well. 

When setting up any scenario in The Black Riders, The Road Darkens or The Land of Shadow expansion, the first player must take control of a hero from the Fellowship sphere with the Ring-bearer trait at the beginning of each game and attach The One Ring to that hero.

Because this version of Frodo Baggins belongs to the Fellowship sphere, he cannot be used as a hero when playing any scenario from a product other than The Lord of the Rings Saga Expansions.

Q: When playing a scenario in The Road Darkens saga expansion in Campaign Mode, can I use the Fellowship sphere Frodo Baggins from The Black Riders box as my Ring-bearer?

A: Yes. When setting up the game in Campaign Mode you must choose a hero from the Fellowship sphere with the Ring-bearer trait and attach The One Ring to that hero. Any hero that meets these qualifications is a legal choice. 

See also

Home

Back

Aragorn

The Lord of the Rings Saga Expansions features Aragorn, a hero who belongs to the Fellowship sphere. 

When using this version, players cannot start with any other version(s) of Aragorn as a starting hero or include any other version(s) of Aragorn in their decks. 

As a hero, this version of Aragorn collects 1 resource during the resource phase. In addition to paying for cards that match the Fellowship sphere, resources from Aragorn's pool may be spent to pay for neutral cards as well. 

Aragorn has the text: "The first player gains control of Aragorn." When the first player token passes during the refresh phase, the first player gains control of Aragorn, all resources in Aragorn's resource pool, and all cards attached to Aragorn. If Aragorn is the last hero under a player's control, and he leaves that player's control, then that player is immediately eliminated from the game. 

Aragorn also has the text: "If Aragorn leaves play, the players lose the game." This text cannot be modified by player card effects or encounter card effects. 

Because this version of Aragorn belongs to the Fellowship sphere, he cannot be used as a hero when playing any scenario from a product other than The Lord of the Rings Saga Expansions. 

When setting up any scenario in The Treason of Saruman or The Flame of the West Saga Expansions, the first player must take control of Aragorn from the Fellowship sphere at the beginning of each game.

See also

Home

Back

Staging Rules

When playing the scenarios in The Lord of the Rings Saga Expansions, players reveal encounter cards individually in player order during the Staging step of the Quest phase. Beginning with the first player, each player reveals 1 encounter card and resolves its staging before the next player reveals a card. If an encounter card has an effect that uses the word "you" then the encounter card is referring to the player who revealed the card. If the revealed encounter has the Surge keyword, the player who revealed that card reveals an additional encounter card. Encounter cards with the Doomed X keyword still affect each player. 

  1. Peril

See also

Home

Back

Peril

Peril is a keyword in The Lord of the Rings Saga Expansions. When a player reveals an encounter card with the Peril keyword, he must resolve the staging of that card on his own without conferring with the other players. The other players cannot take any actions or trigger any responses during the resolution of that card's staging.

Q: If an encounter card effect with the Peril keyword causes an enemy to make an attack against me, can my friend use his character with the Sentinel keyword to defend the attack?

A: Yes. Once the enemy attack is initiated, it should follow each step of "˜resolving enemy attacks,' and the action windows in-between each step are open to all players.

See also

Home

Back

Campaign Mode

Campaign mode is an exciting way of playing The Lord of the Rings: The Card Game that combines all the scenarios from the The Lord of the Rings Saga Expansions into one epic adventure! To play campaign mode, the players play through each scenario in order. Players only advance to the next scenario after they have defeated the current scenario. If the players lose a scenario, there is no penalty but they must play it again in order to defeat it before they can advance to the next scenario.

Q: In Campaign Mode, if I used one version of a hero in a previous scenario and I wish to use a different version of that hero for next scenario, do I incur a +1 threat penalty? 

A: No. As long as the new hero shares the same title as the previous hero, there is no penalty. 

Q: When playing Campaign Mode as a group, if we wish to trade control of heroes within the group, do we incur a +1 threat penalty for each hero who traded control? 

A: No. As long as no heroes were removed from the game and replaced with a different hero, the players do not incur a +1 threat penalty for trading heroes within the group. 

Q: If I began my campaign with only 2 heroes, do I incur a +1 threat penalty if I add a third hero during the setup for a scenario? 

A: No. As long as no heroes were removed from the game and replaced with a different hero, the players do not incur a +1 threat penalty for adding a new hero. 

Q: If I began my campaign with 3 heroes, can I choose not to use 1 or 2 of those heroes when setting up a scenario in order to lower my starting threat? 

A: No. Each player must use each of his heroes as recorded in the Campaign Log when setting up a scenario in Campaign Mode. 

Q: If a hero's name is on the list of Fallen Heroes, can I play the ally version of that hero? 

A: No. When a hero's name is added to the list of Fallen Heroes, that character is considered to be incapacitated for the duration of that campaign. Therefore, each version of that character, hero or ally, cannot be used. 

Q: If a hero is destroyed during a scenario in Campaign Mode and I choose to replay the scenario, is that hero's name still added to the list of Fallen Heroes? 

A: No. Players should only record their results in the Campaign Log after successfully defeating a scenario. Furthermore, if the players defeat the scenario but are still unhappy with the result, they may choose not to record their results and try again. 

  1. The Campaign Log
  2. The Fellowship of Heroes
  3. Campaign Pool

See also

Home

Back

The Campaign Log

The Campaign Log is used to track the course and development of the entire campaign. At the end of each scenario, the players record their results by entering all of the relevant information in the Campaign Log. 

When setting up a scenario in campaign mode, the players refer back to the Campaign Log to make sure they are using all of the correct cards. In this way the results of each scenario can affect the outcome of the next one, and the decisions players make in the first adventure may determine their success on future scenarios.

See also

Home

Back

The Fellowship of Heroes

When playing campaign mode, players must record the names of their heroes in the Campaign Log at the beginning of the first scenario. If a hero is in a player's discard pile at the end of the game, that hero's name is added to the list of Fallen Heroes in the Campaign Log. A hero whose name appears on the list of Fallen Heroes cannot be used by any player when playing future scenarios in that campaign. 

While playing campaign mode, players may change the cards in their decks between games, but they must use the same heroes for each scenario with two exceptions: 

  • If a hero is in its controller's discard pile at the end of a scenario, that hero's name is added to the list of Fallen Heroes and its controller may choose a new hero when setting up the next game. The new hero is recorded in the Campaign Log and each player receives a permanent +1 starting threat penalty for the rest of the campaign. 
  • If a player wishes to trade a hero he controls for a hero with a different name, he may replace 1 hero he controls with a new hero when setting up the game. The new hero is recorded in the Campaign Log and each player receives a permanent +1 starting threat penalty for the rest of the campaign.
  1. Frodo Baggins
  2. Aragorn
  3. Saruman & Grí­ma

See also

Home

Back

Frodo Baggins

When playing the scenarios in The Treason of Saruman or The Flame of the West in campaign mode, players cannot use any card titled "Frodo Baggins."

See also

Home

Back

Aragorn

When setting up a scenario in campaign mode, if a player had previously recorded Aragorn as one of his heroes in the campaign log, that player loses control of that version of Aragorn. That player may choose a different hero to replace Aragorn without incurring the +1 threat penalty. Record the new hero in the campaign log. Any cards with the permanent keyword that were attached to the previous version of Aragorn are transferred to the Fellowship sphere Aragorn. 

If Aragorn had previously been added to the list of fallen heroes, remove his name from the list and each player incurs a permanent +1 threat penalty. 

When playing the scenarios in The Land of Shadow in campaign mode, players cannot use any card with the title "Aragorn." 

See also

Home

Back

Saruman & Grí­ma

When playing the scenarios in The Treason of Saruman, the players cannot use any ally or hero card with the title "Saruman" or "Grí­ma." 

See also

Home

Back

Campaign Pool

The list of boons and burdens that the players earn as they play through The Lord of the Rings Saga Expansions in Campaign Mode is called the Campaign Pool. After the players defeat a scenario and record their results in the Campaign Log, they must add any boons and/or burdens earned to the Campaign Pool. 

  1. Boons & Burdens
  2. Permanent
  3. Functions Like a Player Card
  4. Campaign Cards

See also

Home

Back

Boons & Burdens

Boons are neutral player cards that must be earned by playing through a scenario in campaign mode in order to be used. Players are not allowed to include these cards in a game until after they are earned, unless a scenario directs them to do otherwise. When the players earn a boon card, they enter that boon's title in the Campaign Pool. If a boon card has the Permanent keyword, the players record which hero it is attached to in the Notes section. When setting up future scenarios in the current campaign, the players may include any boon cards as recorded in the Campaign Pool in their decks. These cards do not count against their deck minimum. If a boon with the Permanent keyword was recorded as being attached to a specific hero, that boon must be attached to the specified hero at the start of the game. If a boon card has an encounter card back, that card must shuffled into the encounter deck when setting up the game. 

Burdens are encounter cards that can be earned when playing through a scenario in campaign mode and subsequently included in the encounter deck. Instead of an encounter set icon, burdens have a "burden set icon" used to identify what burden set they belong to. Because burdens don't belong to an encounter set, they should not be included in an encounter deck until the players are instructed to include them (even if the burden set icon is the same as an encounter set icon used for the scenario). When a player earns a burden card, he enters that burden's title in the Campaign Pool. If a burden card has the Permanent keyword, the players record which hero it is attached to in the Notes section. When setting up a scenario in the current campaign, the players must refer to their Campaign Log and include each burden card listed in the Campaign Pool in the encounter deck. If a player has earned a burden card with a player card back, that card is shuffled into his deck after he has drawn his starting hand. If a hero is added to the list of fallen heroes, then all boons and burdens with the Permanent keyword attached to that hero are removed from the Campaign Pool.

Q: If I use the ability on Leaf-wrapped Lembas ("Add Leaf-wrapped Lembas to the victory display, and remove it from the campaign pool, to ready all heroes in play.") but I lose the scenario and have to play it again, do I still remove Leaf-wrapped Lembas from the campaign pool? 

A: No. While removing the boon from the campaign pool is part of the cost to trigger the Action on each of the Gift attachments (Phial of Galadriel, Three Golden Hairs, Lórien Rope, or Leaf-wrapped Lembas), that decision should not be recorded until after the scenario is defeated. Even then, if the players are unhappy with the result, they may still choose not to record their results and try again.

See also

Home

Back

Permanent

Permanent is a keyword found on some boons and burdens. Once a boon or burden with the permanent keyword is earned, it is attached to a hero and that choice is recorded in the Campaign Log. A card with the permanent keyword can only be attached to one hero for the duration of a campaign. Attachments with the permanent keyword cannot be discarded from the attached hero while that hero is in play. If a hero leaves play, attachments with the permanent keyword attached to that hero are removed from the game. 

See also

Home

Back

Functions Like a Player Card

"Functions like a player card" is a term that appears on some burdens (like The Searching Eye or Poisoned Councils), which is a burden treachery card with a player card back. Those cards are encounter cards, but they have a player card back because it is meant to be shuffled into a player's deck. The term "functions like a player card" is on those cards clarify that it should not be placed in the encounter discard pile after resolving its effect. Instead, the player who drew one of those cards holds that card in his hand like a regular player card. If one of those cards is discarded from a player's hand, it is placed in that player's discard pile. 

See also

Home

Back

Campaign Cards

The campaign card is a card type that serves to place a scenario within the larger campaign. When setting up a scenario in campaign mode, the players must place the campaign card for that scenario next to the quest deck and follow any additional setup instructions on the card. After the players defeat that scenario, they turn over the campaign card and follow any resolution instructions, updating their Campaign Log accordingly. 

See also

Home

Back

Setting the Game

  1. Shuffle Decks
  2. Place Heroes & Set Initial Threat Level
  3. Setup Token Bank
  4. Determine First Player
  5. Draw Setup Hand
  6. Set Quest Cards
  7. Follow Setup Instructions
Home

Back

Shuffle Decks

As with a deck of playing cards, shuffle all player decks separately until they are randomized. Do not shuffle the hero cards into the player decks. 

Build the encounter deck from the encounter sets indicated on the quest cards. 

Follow the instructions on the "Setup" face of the Nightmare Mode card. Remove all indicated cards and shuffle the Nightmare Deck in the encounter deck. 

Don't forget to remove any card with the "difficulty" indicator around its encounter set icon (a gold border) from the current scenario's encounter deck. Some older scenarios (including those in early printings of the core game) do not have the above mentioned "difficulty" indicator icon on relevant cards in their encounter decks. 

Shuffle the encounter deck. Do not shuffle the quest cards into the encounter deck. 

See also

Home

Back

Place Heroes & Set Initial Threat Level

Each player places his heroes in front of him, adds up the threat cost of the heroes he controls, and sets his threat tracker at the same value. This value is that player's starting threat level for the game.

The players must record the names of their heroes in the Campaign Log at the beginning of the first scenario. If a player changed heroes between two scenarios or if one of his previous heroes has been added to the Fallen Heroes list and been replaced by another hero, the player receives a permanent +1 starting threat penalty for each hero change. Follow any Setup instruction on Boons & Burdens from the Campaign Pool. Permanent Boons or Burdens must be attached to the heroes who earned them, according to what was recorded in the Campaign Log. If a player card with Setup instructions is in a player's deck at the beginning of a game, that player searches his deck for that card and follows its instructions before drawing his first hand. Similarly, if an encounter card with Setup is in the encounter deck at the beginning of a game, search the encounter deck for that card and follow its instructions before resolving the Setup instructions on the quest. 

When setting up any scenario in The Lord of the Rings Saga Expansions, the first player must take control of a hero from a Hero with the Ring-bearer trait with The One Ring attached to that hero or Aragorn at the beginning of each game. 

When playing any scenario in The Hobbit Saga Expansions, the first player must take control of Bilbo Baggins. 

Add one resource to each hero's resource pool. 

See also

Home

Back

Setup Token Bank

Place the damage tokens, progress tokens, and resource tokens in a pile next to the encounter deck. All players take tokens from this bank as needed throughout the game. 

See also

Home

Back

Determine First Player

The players determine a first player based on a majority group decision. If this proves impossible, determine a first player at random. Once determined, the first player takes the first player token and places it in front of him as reference. 

See also

Home

Back

Draw Setup Hand

Each player draws 6 cards from the top of his player deck. If a player does not wish to keep his starting hand, he may take a single mulligan, by shuffling these 6 cards back into his deck and drawing 6 new cards. A player who takes a mulligan must keep his second hand.  

See also

Home

Back

Set Quest Cards

Arrange the quest cards in sequential order, based off the numbers on the back of each card. Stage 1A should be on top, with the numbers increasing in sequence moving down the stack. Place the quest deck near the encounter deck, in the center of the play area. 

See also

Home

Back

Follow Setup Instructions

The back of the first quest card sometimes provides setup instructions for a scenario. Follow these instructions before flipping the quest card. 

Flip the Nightmare Mode card from the "Setup" face to the "Nightmare Mode" face and follow any additional instruction. 

Place the Campaign Card next to the quest card and follow any additional instruction. 

  1. FAQ (1.01) Encounter Keywords
  2. FAQ (1.19) Card Effects during Setup

See also

Home

Back

FAQ (1.01) Encounter Keywords

Surge, Doomed, and Guarded keywords should be resolved any time the card on which they occur is revealed from the encounter deck, including during setup.

See also

Home

Back

FAQ (1.19) Card Effects during Setup

"When Revealed" effects are resolved if the cards are revealed during setup. A player can trigger responses during setup, following the normal game rules. Players cannot take Actions during setup. "When Revealed" effects that last "until the end of the phase" will last until the end of the first resource phase. Effects that last "until the end of the round", will last until the end of the first round. Players then begin the game starting with the first game round. 

See also

Home

Back

Round Sequence

The Lord of the Rings: The Card Game is played over a series of rounds. Each round is divided into 7 phases. Some phases are played simultaneously by all players, while in other phases the players act separately, with the first player acting first and play proceeding clockwise around the table. 

The 7 phases are, in order: 

  1. Resource 
  2. Planning 
  3. Quest 
  4. Travel 
  5. Encounter 
  6. Combat 
  7. Refresh 

Once all 7 phases are complete, the round is over, and play proceeds to the resource phase of the next round.

  1. Resource Phase
  2. Planning Phase
  3. Quest Phase
  4. Travel Phase
  5. Encounter Phase
  6. Combat Phase
  7. Refresh Phase
  8. Ending the Game
  9. Player Elimination & Defeat
  10. Winning the Game

See also

Home

Back

Resource Phase

Each player simultaneously adds 1 resource token to each of his heroes' resource pools. A resource pool is a collection of resource tokens stored near a hero card. These tokens belong to that hero's pool, and can be used to pay for cards that belong to that hero's sphere of influence. Each hero has 1 resource pool. 

After collecting resources, each player draws 1 card from his player deck and adds it to his hand.

When a player is instructed to draw one or more cards, he always draws those cards from the top of his own player deck. If a player has no cards remaining in his player deck, he does not draw. 

See also

Home

Back

Planning Phase

This is the only phase in which a player can play ally and attachment cards from his hand. The first player plays any and all ally and attachment cards he wishes to play first. The opportunity to play cards then proceeds clockwise around the table. 

If a hero is exhausted, resources may still be spent from that hero's resource pool. 

After a player plays an ally or attachment card from his hand, he places it face-up and ready in his play area. Attachment cards should be placed partially overlapping, either above or below, the card to which they are attached.  

See also

Home

Back

Quest Phase

In the quest phase, the players attempt to make progress on the current stage of their quest. This phase is broken into three steps: 

  1. Commit characters, 
  2. Staging, 
  3. Quest resolution. 

Players have the opportunity to take actions and play event cards at the beginning and ending of each step. 

  1. Step 1: Commit Characters
  2. Step 2: Staging
  3. Step 3: Quest Resolution
  4. Quest Advancement
  5. FAQ (1.05) Removing Progress Tokens From Quests
  6. FAQ (1.20) Engaged Enemies
  7. FAQ (1.24) Questing Successfully
  8. Side Quest
  9. Multiple Quest Card in Play

See also

Home

Back

Step 1: Commit Characters

Each player may commit characters to the current quest card. Characters are exhausted when they commit to a quest. Players commit characters to the quest as a team, starting with the first player, and then proceeding clockwise around the table. Each player may commit as many of his characters to the quest as he would like. 

Q: Does a player commit his characters to a quest at once, or one character at a time? When can a player trigger responses to committing his characters to a quest? 

A: A player commits all characters he wishes to commit to a quest at once. Responses to the characters committing (such as those on Aragorn and Théodred) can then be triggered in the order of that player's choice. After a player has committed his characters (and triggered any responses to those characters committing), the next player has the opportunity to commit his characters to the quest. 

See also

Home

Back

Step 2: Staging

After each player has had the opportunity to commit characters to the quest, the encounter deck reveals one card per player. This is known in the game as staging. These encounter cards are revealed one at a time, with any "when revealed" effects being resolved before the next card is revealed. Enemy and location cards revealed in this manner are placed in the staging area, treachery cards are resolved and (unless otherwise indicated by the card text) placed in the discard pile. If the encounter deck is ever empty during the quest phase, the encounter discard pile is shuffled and reset back into the encounter deck.

Q: When I reveal the last card of the encounter deck, do I immediately reset the quest deck before resolving the staging of the revealed card? 

A: No. Resolve the staging of the revealed card, including any "˜When Revealed' effects, before resetting the quest deck, if able. If you are unable to completely resolve the staging of the card because it instructs you to interact with the encounter deck in some manner, then reset the quest deck and finish resolving the effect.

Q: If a player is eliminated during the staging step of the quest phase, before all encounter cards are revealed, does the elimination reduce the number of cards that should be revealed for staging? 

A: The base number of cards to be revealed is determined at the beginning of the staging step, and does not change if a player is eliminated during staging.

See also

Home

Back

Step 3: Quest Resolution

Finally, the players compare the combined willpower strength () of all committed characters against the combined threat strength () of all cards in the staging area. 

Tom commits Éowyn (4 ), and Kris commits both Aragorn (2 ) and a Guard of the Citadel (1 ) to the current quest. A Gladden Fields location card (3 ) is in the staging area. After all players have committed their characters, the encounter deck reveals 1 card per player: an East Bight Patrol (3 ) and a Hummerhorns (1 ). The players have a combined of 7, and the quest deck has a combined of 7. As it stands, this quest attempt will end in a draw. However, Tom decides to use Éowyn's ability, which allows him to discard 1 card from his hand to increase her by 1, taking the player's combined committed to 8, so the players place 1 progress token on the current quest card.

If the is higher, the players have successfully quested, and they make progress on the quest. A number of progress tokens equal to the amount by which their overcame the are placed on the current quest card. Note that if there is an active location, progress tokens are placed on that location until it is explored, and the remainder are then placed on the current quest. 

If the is higher, the players have unsuccessfully quested, and they are driven back by the encounter deck. Each player must raise his threat dial by the amount by which the was higher than the combined of all committed characters. 

If the combined committed score is equal to the combined score in the staging area: no progress tokens are placed, and the players do not increase their threat dials. 

Characters committed to a quest are considered committed to that quest through the end of the quest phase, unless removed from the quest by a card effect. They do remain exhausted once this step is complete. 

Q: If the players do not commit any characters to a quest, does the staging area still count its threat against them? 

A: Yes, the threat in the staging area still counts against the players, who have a combined committed willpower of 0. 

See also

Home

Back

Quest Advancement

Players immediately advance to the next stage of a quest as soon as they place a number of progress tokens equal to or greater than the number of quest points the current quest card has. Additional progress tokens earned against the quest do not carry over to the next stage. All progress tokens on the quest are returned to the token bank when players advance to the next stage. Players follow any instructions on the newly revealed quest card as it is revealed. 

The game state of other cards does not change; cards in the staging area remain in the staging area, cards engaged with players remain engaged, exhausted characters remain exhausted, damage tokens and resources remain as they are placed, and the round sequence is not interrupted.

Q: If players have placed progress tokens on a quest equal to its quest points, but a game effect prevents them from advancing, can they continue to place progress tokens on the quest? 

A: Yes. There is no upper limit to how many progress tokens may be placed on a quest. 

Q: If there is an active location with a Response effect that triggers when it is explored and the players make enough progress to explore the location and advance to the next stage, when do the players resolve the location's Response effect? 

A: The players should advance to the next stage immediately and resolve any "˜when revealed' effects on the next stage, then resolve the Response effect on the active location.

See also

Home

Back

FAQ (1.05) Removing Progress Tokens From Quests

When a card effect removes progress tokens from a quest or quest card, the effect applies specifically to the quest card, and never to the active location. 

See also

Home

Back

FAQ (1.20) Engaged Enemies

During the quest phase, engaged enemies do not count their threat for the staging area. 

An enemy remains engaged with a player until it is defeated or until a card effect returns it to the staging area, engages it to another player, or removes it from play. 

See also

Home

Back

FAQ (1.24) Questing Successfully

Tom has just successfully quested during stage 1B of The Hunt Begins (SoM 11), and he will be placing enough progress to advance to the next stage. However, he must first resolve the Forced effect (which resolves immediately upon the occurence of "questing succesfully") before placing progress tokens on the quest.

Questing successfully and the physical placement of progress tokens are two separate game occurrences that happen in sequence during the Quest Resolution step. As soon as the players determine that the total committed Willpower is greater than the total Threat in the staging area, they are considered to have quested successfully. Any Forced or passive effects initiated by questing successfully resolve before physically placing progress tokens.  

See also

Home

Back

Side Quest

Side quests represent secondary adventures that the heroes may undertake while pursuing the main goals of the quest deck. There are two kinds of side quests: those with encounter card backs and those with player card backs. Side quests are never considered to be a part of the quest deck. The top card of the quest deck is called the "main quest."

  1. Encounter Side Quest
  2. Player Side Quest
  3. Side Quests in Play

See also

Home

Back

Encounter Side Quest

A side quest with an encounter card back is called an "encounter side quest." An encounter side quest is both a quest card and an encounter card. Each encounter side quest is part of an encounter set and it is shuffled into the encounter deck when setting up a scenario that uses its encounter set. When an encounter side quest is revealed from the encounter deck, it is added to the staging area. Because side quests are quest cards as well as encounter cards, the "when revealed" effects of side quests cannot be cancelled by player card effects. If a side quest is dealt to an enemy as a shadow card, it functions as any other encounter card without shadow text.

See also

Home

Back

Player Side Quest

A side quest with a player card back is called a "player side quest." A player side quest is both a quest card and a player card, and can be included in player decks. A player side quest can be played from a player's hand during the planning phase by paying its cost. When a player side quest is played or enters play, it is placed in the staging area. 

See also

Home

Back

Side Quests in Play

While any side quest is in the staging area, it functions like a quest card with the following exception: when a side quest is defeated, the players do not advance to the next stage of the quest deck. Instead, the side quest is added the victory display. 

At the beginning of each quest phase, if there are one or more side quests in the staging area, the first player may choose one to be the "current quest" until the end of the phase instead of the quest card that is currently active via the quest deck. While a side quest is the current quest, any progress that the players make is placed onto that side quest and any card effects that target the "current quest" target that side quest. Progress must still be placed on the active location before it can be placed on a side quest. Any progress that is made beyond the current quest's total quest points is discarded; do not place progress on any other quest card in play. 

See also

Home

Back

Multiple Quest Card in Play

While each quest card is in play, its game text is active.  

Q: If a side quest is the "current" quest, is the text on the main quest still active? 

A: Yes. The text on each quest card in play is active. 

See also

Home

Back

Travel Phase

During the travel phase, the players may travel as a group to any one location in the staging area by moving it from the staging area and placing it alongside the current quest card, causing it to become the active location. The players can only travel to one location at a time. The first player makes the final decision on whether and where to travel. 

While in the staging area, location cards add to the encounter deck's . Once the players have traveled to a location, that location no longer contributes its , as the players are considered to have traveled to the location and are confronting its threat. Instead, an active location acts as a buffer for the currently revealed quest card. Any progress tokens that would be placed on a quest card are instead placed on the active location. If a location ever has as many progress tokens as it has quest points, that location is considered explored and is discarded from play. 

Tom and Kris have just scored 3 progress tokens against the current quest card. The Enchanted Stream location, which has 2 quest points, is active. 2 progress tokens are placed on the Enchanted Stream card, discarding it from play. The other progress token is then placed on the current quest card.

Players cannot travel to a new location if another location card is active; the players must explore the active location before traveling elsewhere. Some locations have a travel effect, which is an additional cost that must be paid when the players travel there. 

  1. FAQ (1.18) Explored Locations Leaving Play
  2. FAQ (1.27) Bypass the Active Location
  3. FAQ (1.34) Two Active Locations

See also

Home

Back

FAQ (1.18) Explored Locations Leaving Play

A location card is immediately discarded from play any time it has as many progress tokens as it has quest points, whether it is active or not. 

See also

Home

Back

FAQ (1.27) Bypass the Active Location

The only time an active location does not act as a buffer for progress to be placed on a quest is when card text specifically instructs the players to "bypass" the active location. 

See also

Home

Back

FAQ (1.34) Two Active Locations

If a card effect causes two locations to be active at the same time, they are both considered to be the active location. However, when a card effect targets "the active location," it does not target both active locations at the same time. The first player must choose which of the active locations the effect will target. Both active locations serve as buffers for the quest stage and when placing progress on the active location, the players may divide that progress among both active locations however they choose. 

See also

Home

Back

Encounter Phase

The encounter phase consists of two steps: player engagement, and engagement checks. 

  1. Step 1: Player engagement
  2. Step 2: Engagement Checks
  3. FAQ (1.49) Engaging Enemies vs Being Engaged
  4. FAQ (1.50) 'Considered to Be Engaged' vs Actual Engagement

See also

Home

Back

Step 1: Player engagement

First, each player has the option to engage one enemy in the staging area. This is done by moving the enemy from the staging area and placing it in front of the engaging player. 

Each player has one chance to optionally engage one enemy during this step, and an enemy's engagement cost has no bearing on this procedure.

Q: In what order is players' optional engagement handled?

A: The first player has the first opportunity to optionally engage an enemy, or pass. After that, each player, moving clockwise, has the option to engage one enemy. Once each player has had this opportunity, this step is complete.

See also

Home

Back

Step 2: Engagement Checks

The first player, Tom, has a threat level of 24. The second player, Kris, has a threat level of 35. There are 4 enemies in the staging area: a King Spider (engagement cost of 20), a Forest Spider (engagement cost of 25), Ungoliant's Spawn (engagement cost of 32), and Hummerhorns (engagement cost of 40).

Tom and Kris both pass during the player engagement step, declining their opportunity to optionally engage enemies.

Since he is the first player, Tom makes the first engagement check. Tom's threat level of 24 is compared against each enemy in the staging area. The Hummerhorns (40), Ungoliant's Spawn (32), and the Forest Spider (25) each have an engagement cost that is higher than Tom's threat level, so none of these enemies engage Tom. The King Spider (20), however, has an engagement cost that is equal to or lower than Tom's threat level, so the King Spider engages Tom. This card is moved out of the staging area and placed in front of Tom's play area.

Next, Kris makes an engagement check, comparing his threat level of 34 against the remaining enemies in the staging area. The Hummerhorns (40) do not engage Kris. Ungoliant's Spawn, with an engagement cost of 32, is the enemy with the highest cost that is equal to or below Kris's threat level, so this card engages Kris.

Tom then makes another engagement check, and since his threat level and the enemies in the staging area have not changed, no further enemies engage him. Kris makes another engagement check, and this time the Forest Spider (25) engages him. Tom's next engagement check passes, and then Kris makes a final engagement check, in which nothing engages him.

The end result, then, leaves Tom engaged with the King Spider and Kris engaged with both Ungoliant's Spawn and the Forest Spider. The Hummerhorns remain in the staging area.

Second, the players must make a series of engagement checks, to see if any of the enemies remaining in the staging area engage them. The first player compares his threat level against the engagement cost of each of the enemy cards in the staging area. The enemy with the highest engagement cost that is equal to or lower than this player's threat level engages this player, and moves from the staging area to the space in front of him. This is called making an engagement check. After the first player makes an engagement check, the player to his left makes his own engagement check. This player compares his threat level against the engagement cost of each of the remaining enemy cards in the staging area, and engages the enemy with the highest engagement cost that is equal to or lower than his own threat level. 

This process continues through all the players, proceeding clockwise around the table. Once all players have made an engagement check, the first player makes a second engagement check. Players continue making engagement checks in this manner until there are no enemies remaining in the staging area that can engage any of the players. 

Whether an enemy is engaged through an engagement check, through a card effect, or through a player's choice, the end result is the same, with the enemy and the player engaging one another. In all cases, the player is considered to have engaged the enemy and the enemy is considered to have engaged the player. Note that during this phase enemies do not attack players, they merely engage players. Enemies attack the players with whom they are engaged during the combat phase.

See also

Home

Back

FAQ (1.49) Engaging Enemies vs Being Engaged

When a player engages an enemy, that enemy has also engaged him, and when an enemy engages a player, that player has also engaged that enemy. There is no difference between engaging an enemy and being engaged by an enemy. Effects that trigger "after an enemy engages you" will trigger at the same time as effects that trigger "after you engage an enemy." 

Q: If an enemy is put into play directly engaged with me, has that enemy "engaged" me for the purposes Forced effects or Responses that trigger from engaging an enemy? 

A: Yes. An enemy that enters play directly engaged with a player has engaged that player.

See also

Home

Back

FAQ (1.50) 'Considered to Be Engaged' vs Actual Engagement

Durin's Bane (D 150) cannot leave the staging area and is considered to be engaged with two players. Player 1 has Mablung (RM 84) and wishes to trigger his Response effect, but he cannot because he has not actually engaged Durin's Bane. Player 2 wishes to play Feint (CORE 34) to prevent Durin's Bane from attacking him. He can, because Durin's Bane is considered to be engaged with him.

An enemy that does not leave the staging area but is considered to be engaged with a player does not actually engage that player, nor does that player engage it. In order for a player to engage an enemy, the enemy card must physically enter his play area. 

See also

Home

Back

Combat Phase

In the combat phase, enemies attack first. All enemies that are engaged with the players attack each round, and the players resolve those attacks one at a time. At the beginning of the combat phase, the players deal 1 shadow card to each engaged enemy. Deal the top card of the encounter deck, face down, to each engaged enemy. When dealing cards to a single player's enemies, always deal to the enemy with the highest engagement cost first. Cards should first be dealt to the enemies attacking the first player, and then proceed around the board until all enemies have 1 card. 

If the encounter deck runs out of cards, any enemies that have not been dealt shadow cards are not dealt shadow cards this round. An empty encounter deck only resets during the quest phase. 

  1. Step 1: Resolving Enemy Attacks
  2. Step 2: Attacking Enemies
  3. Hit Points & Damage

See also

Home

Back

Step 1: Resolving Enemy Attacks

Kris is engaged with 2 enemies, the Forest Spider and Ungoliant's Spawn. One card from the encounter deck is dealt face down to each engaged enemy, first to Ungoliant's Spawn and second to the Forest Spider, as Ungoliant's Spawn has a higher engagement cost. These cards determine any shadow effects that might affect the resolution of the attack. Kris can resolve the attacks against him in any order; he decides to resolve the attack made by Ungoliant's Spawn first.

Kris first declares a defender for this attack. Kris exhausts his Silverlode Archer, declaring it as a defender against Ungoliant's Spawn. To resolve this attack, Kris flips the shadow card that was dealt to Ungoliant's Spawn faceup. The card is the East Bight Patrol, which has the shadow effect "Shadow: Attacking enemy gets +1 . (If this attack was undefended, also raise your threat by 3.)" Kris resolves this shadow effect first, increasing Ungoliant's Spawn's by 1. He then determines the attacking enemy's total (6) and subtracts the defender's (0), and the result is the number of damage tokens he must deal to the defender (6). Since the Silverlode Archer only has 1 hit point, it is immediately destroyed.

Kris now resolves the other attack being made against him. He declares this attack undefended. He flips the shadow card that was dealt to the Forest Spider faceup. This card is the Enchanted Stream, which does not have a shadow effect. The attack resolves normally, with no additional modifications or effects. Kris determines the attacking enemy's total (2), and since there is no defender, he must deal this much damage to one of his heroes. Kris's only hero is Aragorn, who has 5 hit points. Kris places 2 damage tokens on Aragorn, who survives the attack with 3 hit points remaining.

When resolving enemy attacks, the players follow these 4 steps, in order. Players may play event cards and take actions at the end of each step. 

  1. Choose an enemy. The first player chooses which attack (among the enemies to which he is engaged) to resolve first. 
  2. Declare defender. A character must exhaust to be declared as a defender. Only one character can be declared as a defender against each attacking enemy. A player also has the option to let an attack go undefended, and declare no defenders for that attack. Unless a card effect specifies otherwise, players can only declare defenders against enemies with whom they are engaged. 
  3. Resolve shadow effect. The active player flips that enemy's shadow card face-up and resolves any shadow effect that card might have. 
  4. Determine combat damage. This is done by subtracting the defense strength () of the defending character from the attack strength () of the attacking enemy. The remaining value is the amount of damage that must immediately be dealt to the defending character, possibly destroying that character. If a character is destroyed by an attack, additional damage is not assigned to another character. If the is equal to or higher than the , no damage is dealt. 

If an attack is undefended, all damage from the attack must be assigned to a single hero controlled by the active player. Allies cannot take damage from undefended attacks. If a defending character leaves play or is removed from combat before damage is assigned, the attack is considered undefended. A character's does not absorb damage from undefended attacks or from card effects. 

The first player then repeats these 4 steps for each enemy that he is engaged with. After the first player has resolved all enemy attacks against himself, the player to his left resolves the attacks his enemies are making against him, following steps 1-4 in turn for each enemy. If playing with more than 2 players, proceed clockwise around the table with each player resolving all of his enemies' attacks. 

Characters that are declared as defenders are only considered to be defending through the resolution of the attack. Once an attack has resolved, the characters are no longer considered "defenders," but they do remain exhausted. 

  1. FAQ (1.52) The Defending Player
  2. FAQ (1.04) Damage and Multiple Defenders
  3. Shadow Effects
  4. Shadow Cards Leaving Play
  5. Revealing Enemies as Shadow Cards
  6. FAQ (1.28) Enemy Attacks Outside of the Combat Phase
  7. FAQ (1.33) Attacks by Non-Engaged Enemies
  8. FAQ (1.32) Mid-Attack Control or Engagement Change
  9. FAQ (1.41) Attacks Against a Character
  10. FAQ (1.42) Additional Attacks by an Enemy

See also

Home

Back

FAQ (1.52) The Defending Player

When an enemy makes an attack against a player, or a character controlled by a player, that player is "the defending player" regardless of whose character is declared as a defender. Card effects, including shadow card effects, that target "the defending player" or "you" still target the player who the enemy is attacking even if another player declares one of his characters as a defender for that attack. 

Q: If a player does not declare any defenders against an attack, is he still considered the defending player? 

A: Yes, the player an enemy is attacking is considered to be the defending player. Whether or not he declares defenders, and whether or not any other player declares defenders for him, does not change his status as the defending player for the attack. 

See also

Home

Back

FAQ (1.04) Damage and Multiple Defenders

If a player uses card effects to declare multiple defenders against a single enemy attack, the defending player must assign all damage from that attack to a single defending character. 

See also

Home

Back

Shadow Effects

Some of the cards in the encounter deck have a secondary effect that is known as a shadow effect. Shadow effects only resolve when the card is dealt to an attacking enemy during combat.

Q: If an enemy does not attack or its attack is cancelled, what happens to its shadow card(s)?

A: At the end of the combat phase, discard each unresolved shadow card in play. (Do not resolve the effects on these shadow cards). 

See also

Home

Back

Shadow Cards Leaving Play

Shadow cards remain on the enemy to which they were dealt throughout the combat phase. If that enemy leaves play, discard its shadow card from play. At the end of the combat phase, discard all shadow cards that were dealt this round. 

See also

Home

Back

Revealing Enemies as Shadow Cards

Enemies that are dealt as shadow cards are not considered to be revealed from the encounter deck. 

See also

Home

Back

FAQ (1.28) Enemy Attacks Outside of the Combat Phase

If an enemy attacks outside of the combat phase, it is still dealt a shadow card at the beginning of the attack. Then follow the 4 steps under Phase 6 "Combat" in the rules. There is an action window after each step. Any shadow cards dealt to the attacking enemy are discarded after the attack resolves.

See also

Home

Back

FAQ (1.33) Attacks by Non-Engaged Enemies

When an enemy attacks a player, that player may declare 1 defender whether the enemy is engaged with him or not. Sentinel may also be used to defend against such attacks.

Q: When an enemy makes an attack against me from the staging area, can I declare a defender? 

A: Yes. If an enemy attacks you, you can exhaust 1 character you control to declare it as a defender against that attack, whether that enemy is engaged with you or not. 

Q: When an enemy makes an attack as part of its "when revealed" effect, is that enemy in the staging area? 

A: No. Enemies are added to the staging after resolving their "when revealed" effects. An enemy that makes an attack as part of its "when revealed" effect, is not in the staging area or engaged with the defending player unless a card effect says it is.  

See also

Home

Back

FAQ (1.32) Mid-Attack Control or Engagement Change

If a card involved in combat changes control, is returned to the staging area, or engages another player during the resolution of an attack, that attack still resolves with the card still participating from its new state.

Q: When an enemy that has already made an attack engages a new player during the combat phase, does it make another attack? 

A: Not unless it is directed to by card effect. 

See also

Home

Back

FAQ (1.41) Attacks Against a Character

Bilbo Baggins (OtD 1) has the most poison attached when Crazy Cob (OtD 29) is revealed from the encounter deck and its "When Revealed" effect triggers an attack against the character with the most poison attached. Even though the first player controls 3 other heroes, any undefended damage from this attack must be applied to Bilbo Baggins. Because Bilbo is already exhausted from committing to the quest, he cannot exhaust to defend himself and will be killed if the attack is undefended. Knowing this, the first player chooses to exhaust one of his ready characters, Bombur, to declare him as the defender for this attack. At this point, the attack resolves as normal and any damage from the attack is applied to Bombur.

An attack made against a character works the same as an attack made against a player with one exception: undefended damage from an attack against a character must be assigned to that character. 

See also

Home

Back

FAQ (1.42) Additional Attacks by an Enemy

When an enemy makes an additional attack, discard all of its previously dealt shadow cards before dealing it a new shadow card. 

See also

Home

Back

Step 2: Attacking Enemies

Once all players have resolved enemy attacks, each player (starting with the first player and proceeding clockwise) has the opportunity to strike back and declare attacks against his enemies. 

Tom is engaged with two enemies, the Dol Guldur Beastmaster and the Dol Guldur Orcs. He can declare one attack against each of these enemies this round, but he must declare and resolve these attacks one at a time.

Tom declares his first attack against the Dol Guldur Orcs, and exhausts Glorfindel to declare him as an attacker. Tom determines Glorfindel's (3) and then subtracts from it the Dol Guldur Orcs' (0), and gets a result of 3. Tom places 3 damage tokens from the token bank on the Dol Guldur Orcs. Since the Dol Guldur Orcs only have 3 hit points, they are destroyed, and the Dol Guldur Orcs card is placed in the encounter discard pile.

Next, Tom declares Legolas and the Gondorian Spearman as attackers against the Dol Guldur Beastmaster. Legolas (3 ) and the Gondorian Spearman (1 ) pool their attack strength together, for a total of 4. The Dol Guldur Beastmaster has a   of 1, so 3 points of the attack are dealt as damage. Tom places 3 damage tokens from the token bank on the Dol Guldur Beastmaster. Since this enemy started with 5 hit points, it survives the attack with 2 hit points remaining. The damage tokens remain on the Dol Guldur Beastmaster to indicate that it is damaged.

In order to declare an attack, a player must exhaust at least 1 ready character. A character must exhaust to be declared as an attacker. When declaring an attack, a - 40 - player must also declare which enemy is the target of the attack. A player may declare multiple characters as attackers against a single enemy, pooling their attack strength into a single value. A player has the opportunity to declare 1 attack against each enemy with which he is engaged. 

To resolve an attack against an enemy, a player follows these 3 steps, in order. Players may play event cards and take actions at the end of each step. 

  1. Declare target of attack, and declare attackers. A player does this by choosing 1 enemy with whom he is currently engaged, and exhausting any number of characters as attackers. 
  2. Determine attack strength. Add up the total attack strength () of the attacking characters that have been declared against that target. 
  3. Determine combat damage. This is done by subtracting the target enemy's defense strength () from the combined of all the attacking characters. The remaining value is the amount of damage that is immediately dealt to the target. If the is equal to or higher than the , no damage is dealt. 

Characters that are declared as attackers are only considered to be attacking through the resolution of the attack. Once an attack has resolved, the characters are no longer considered "attackers," but they do remain exhausted. 

After a player's first attack has resolved, he can declare another attack against any eligible enemy target that he has not yet attacked this round. Each player can declare an attack (with any number of eligible attackers he controls) against each enemy with which he is engaged once each round. Once all of a player's attacks resolve, play proceeds clockwise from the first player until all players have resolved all of their attacks. 

Q: Are there any player cards that allow me to attack an enemy in the staging area if it is immune to player card effects?

A: No. None.

  1. FAQ (1.11) Limitations on Attacks

See also

Home

Back

FAQ (1.11) Limitations on Attacks

When a player is the active attacker during the combat phase, the game rules grant him the option to declare 1 attack against each enemy with which he is engaged. If, through card effects such as ranged, a player is able to declare attacks against enemies with which he is not engaged, the game rules still only provide for a single attack against each of these enemies. 

However, if a player makes an attack against an enemy by a card effect such as Quick Strike (CS 35) or Hands Upon the Bow (D 131), that is an extra attack and does not count against the limit of 1 attack. 

See also

Home

Back

Hit Points & Damage

For each point of damage dealt to a character or enemy, one damage token is placed on the character or enemy card. Each damage token on a hero, ally, or enemy card reduces that card's hit points by 1. Damage tokens remain on a card until another effect heals or moves the damage off of the card, or until the card leaves play. 

Any time one of these cards has 0 hit points, it is immediately defeated. Defeated characters are placed in their owner's discard pile, and defeated enemies are placed in the encounter discard pile. Note that hero cards that are defeated are placed in their owner's discard pile. When resolving effects that move cards from a player's discard pile to his hand or deck, hero cards in the discard pile are ignored, as hero cards cannot move to a player's hand or deck. 

Any enemy cards that are not defeated remain engaged with a player until they are defeated or removed by a card effect, or until that player is eliminated from the game.

Q: What happens if an attacking enemy is destroyed before its attack resolves? 

A: When resolving an enemy attack, the defending player should check the status of the attacking enemy at end of each step: is there still an attacking enemy? If yes, proceed to next step. If no, end the attack. 

Q: When an enemy with the text "cannot leave play" has damage equal to or in excess of its hit points, what happens? 

A: Nothing. The enemy cannot leave play, and therefore will continue to function as an enemy in play

  1. Immune to Ranged Damage

See also

Home

Back

Immune to Ranged Damage

"Immune to ranged damage" means that characters participating in an attack via the ranged keyword are not able to deal damage to that enemy. (If a ranged character participates in an attack against such an enemy through another means than the ranged keyword, then it is able to damage it and will count its .) 

See also

Home

Back

Refresh Phase

During the refresh phase, all exhausted cards ready, each player increases his threat by 1, and the first player passes the first player token to the next player clockwise on his left. That player becomes the new first player. Play then proceeds to the resource phase of the next round. 

See also

Home

Back

Ending the Game

The game ends in one of two ways, with the players either winning or losing as a team. The players are considered to have lost if all players are eliminated before the completion of the final stage of the scenario deck. The players are considered to have won if at least one player survives through the completion of the final stage of the scenario. 

Turn over the campaign card and follow any resolution instructions. The players then record their results by entering all of the relevant information in the Campaign Log. After the players defeat a scenario and record their results in the Campaign Log, they must add any boons and/or burdens earned to the Campaign Pool. 

See also

Home

Back

Player Elimination & Defeat

A player is eliminated from the game if all of his heroes are killed, if his threat level reaches 50, or if a card effect forces his elimination. 

When a player is eliminated, his hand, all of the cards he controls, and his deck are placed in their owners' discard piles. Any encounter cards with which that player was engaged are returned to the staging area, retaining any wound tokens that have been placed on them. The remaining players continue to play the game. Note that after a player is eliminated, one less card is revealed from the encounter deck during the staging step of the quest phase, as there is now one less player involved in the game. 

If all players are eliminated, the game ends in a loss for the players. 

As players make their way through the scenarios in The Hobbit Saga Expansions, Bilbo Baggins will assist them in many ways, but the players must also take care to protect him. If Bilbo Baggins leaves play, for any reason, the players immediately lose the game. 

When playing The Lord of the Rings Saga Expansions, if the Ring-bearer or Aragorn leaves play, for any reason, the players immediately lose the game. 

  1. FAQ (1.57) Threat elimination

See also

Home

Back

FAQ (1.57) Threat elimination

A player who has played Vanish from Sight (DC 11) treats his threat as if it was 20 until the end of the phase, but if his threat dial reaches his threat elimination level, he is still immediately eliminated from the game.

A player is immediately eliminated from the game the moment his threat reaches his threat elimination level regardless of card effects in play.

See also

Home

Back

Winning the Game

If at least one player survives through the completion of the final stage of the scenario, the game ends in a victory for the players. 

See also

Home

Back

Other Game Modes

  1. Basic Mode
  2. Expert Mode
  3. Race Against the Shadow Tournament Rules
  4. A Long Extended Party
Home

Back

Basic Mode

Newer players or players who want a more basic experience can play and enjoy the game by not dealing shadow cards during the combat phase. This eliminates an element of surprise that could make the game too challenging for a beginner. Once players are comfortable with this experience, they can then add the shadow effects to make combat less predictable and more exciting.

See also

Home

Back

Expert Mode

For an expert level challenge, players can attempt to defeat all 3 scenarios using the same combination of players, decks, and heroes. The score from each scenario can then be added together to get a single score measuring overall success on the entire campaign. For a "nightmare" level challenge, do not reset threat, hit points, or player decks at the beginning of each scenario. When playing such a campaign, the players should start with the "Passage through Mirkwood" scenario, follow with the "Journey Down the Anduin" scenario, and finish with the "Escape from Dol Guldur" scenario. 

When playing the "expert game" variant each player's threat, wounds, and discard pile do not reset when setting up a new scenario. 

To reset the other game elements at the beginning of a new "expert game" scenario, perform the following steps in order: 

All non-hero cards in play and in hand are shuffled into their owner's decks. All encounter cards are returned to their encounter sets so they are available for the next scenario, if needed. This includes cards in players' victory display. 

  • All unspent resources are discarded from the heroes' resource pools. 
  • Each player draws a new starting hand per the regular setup rules of the game. A single mulligan may be taken by each player at this time. 
  • A player cannot start a scenario with a threat level that is lower than the combined threat cost of his heroes. If a player's threat is lower than the starting threat cost of his heroes, he must increase his threat to that value. 
  • Follow all setup instructions for the new scenario. Each scenario should be scored separately, and then all the scores added together at the end of the variant.  

See also

Home

Back

Race Against the Shadow Tournament Rules

In a Race Against the Shadow tournament, teams race one another and the clock to win a scenario. Two teams play simultaneously, switching off at set points in the round, and the team that finishes the scenario first within the allotted time wins the match. 

  1. Supplies
  2. Deckbuilding
  3. Match Format
  4. Match Scoring
  5. Tournament Format

See also

Home

Back

Supplies

Each table will need a two-player game clock with pause functionality, for example, a chess clock. There are several free clock apps that would also be appropriate. 

The Tournament Organizer (TO) may choose any set of scenarios, but due to their difficulty, Escape from Dol Guldur, The Battle of Laketown, The Massing at Osgiliath and Nightmare Decks are not recommended. The TO will advertise the selected pool of scenarios in advance of the event. Players are expected to provide their own quest and encounter cards. 

See also

Home

Back

Deckbuilding

Each player brings a legal The Lord of the Rings: The Card Game deck to the event. Legal decks contain a minimum of 50 cards and a maximum of 3 heroes. Players must select their heroes according to one of the following two formats. 

In the limited format, a player uses these same heroes each match. Limited format events place high emphasis on building a tight but balanced deck that can handle any challenge. 

In the extended format, at the beginning of each match each player may select his 3 heroes from a sideboard consisting of all heroes. Extended format events are slightly more casual, and allow players a chance to better adapt to the various scenarios with their selection of heroes. 

Tournament Organizers may choose to run their events as either limited or extended.  

See also

Home

Back

Match Format

Each match, each team will be paired against one other team. Each team will provide its own copy of the announced scenario, and their opponents may check the encounter deck for completeness. Randomly determine which team goes first. 

Each team will begin with 45 minutes on the clock for a match length of 90 minutes. At the TO's discretion, depending on the general amount of time it takes to complete a scenario, this number can be adjusted up to 60 minutes or down to 30 minutes. Any adjustment to the time controls should be announced when pairings are posted. 

In a Race Against the Shadow match, each round is broken into three phase groups. Teams alternate play through these phase groups, playing their cards and advancing through their quests, then observing their opponents' phase groups. The phase groups are:

  1. Resource, Planning 
  2. Quest, Travel 
  3. Encounter, Combat, Refresh 

The first team will begin by playing their Resource and Planning phases. Then they will start the other team's clock, and the second team will play its Resource and Planning phases. This process continues through the other two phase groups until the second team finishes its Refresh phase and the first team starts a new round.

Example round: Team 1 plays first. Team 1's players complete their Resource and Planning phases, then hit the clock. Team 2 then plays its Resource and Planning phases while Team 1 observes. After Team 2 hits the clock, Team 1 plays its Quest and Travel phases and hits the clock again. Team 2 then plays its Quest and Travel phases and hits the clock. Team 1 then plays its Encounter, Combat, and Refresh phases and hits the clock. Team 2 plays its Encounter, Combat, and Refresh phases, and the round is over. When Team 2 hits the clock again, Team 1 will begin the next round with its Resource and Planning phases. 

When they are not on the clock, players on one team should observe their opponents' turns to ensure that all rules and encounter cards are followed correctly. Additionally, players may discuss the actions of their next turn during their opponents' turn, so long as they do not distract their opponents in the process. If a player has a question or rules dispute, he pauses the clock while he interrupts the other team. When the issue has been resolved, the active team restarts the clock, and play continues. 

See also

Home

Back

Match Scoring

The team that finishes the scenario without the other team finishing in the same Phase Group is awarded a Match Win and 5 points. 

If the team that played first completes the scenario first, the other team has their next phase group to attempt to complete the scenario. 

If both teams complete the scenario in the same phase group, the team with the lower score wins. If the scores are also the same, the match is a Draw and each team is awarded 2 points. 

If both teams are eliminated in the same round, or if neither team completes the scenario, the match is a Modified Loss and each team is awarded 1 point. 

If a single team is eliminated, the other team is awarded a Match Win and 5 points. 

If a team exhausts its allotted time, it is eliminated and the opposing team is awarded a Match Win and 5 points. 

See also

Home

Back

Tournament Format

Standard Swiss Pairings are used. Random pairings are allowed for the first match. For future pairings, pair teams within the same score group as per Swiss style pairings. As teams are paired, the Tournament Organizer will announce the next scenario to be used. 

Tournament organizers should always pair teams within score groups. Rather than pairing randomly, sort the teams in each score group by team number, then pair the top number to the bottom, the second to the second to last and so on. This allows for the subtle adjustment of teams if one team has already played another and has the same effect as using brackets so that the top 2 teams do not meet until the last match. The "odd" team of a score group will be paired down to the next score group, playing the highest ranked team of that score group. 

If there is an odd number of teams in the tournament, the lowest-ranked team receives a bye, counting as a Match Win. When there is more than one lowest-ranked team, the lowest-ranked team with the lowest team number receives a bye. The team with the most points at the end of the Swiss rounds is the tournament champion.

See also

Home

Back

A Long Extended Party

A Long Extended Party collective suggests you use this FAQ when playing their expansions.
Home

Back

Deckbuilding

A tournament deck must contain a minimum of 50 cards. Additionally, no more than three copies of any card, by title, can be included in a player's deck. Within these guidelines any combination of allies, attachments, and events can be used in the player deck. 

Each player also starts the game with 1-3 heroes. Players may confer together before each game to select the heroes they would each like to use during that game. If more than one player desires to use the same hero, they must decide among themselves before the game begins, and the other player(s) must choose different heroes. In such situations, if the players cannot decide who will control a certain hero, a random method should be used to determine control of that hero. 

When building a deck, it is important for a player to consider how he intends to pay for the cards he is including in his deck. It may be tempting to use the most powerful trio of heroes available, but is it worth starting the game with the high threat level those heroes would bring? Similarly, a deck full of high cost cards and effects might look powerful on paper, but the time it takes to build up the resources to play those cards could become rather problematic as the enemies mount their assault. A player should also make sure that all the cards in his deck belong to a sphere that matches at least one of his heroes' resource icons, lest he find himself with a dead card he cannot hope to play. Each sphere of influence has a distinct flavor, which can be used to a player's advantage when building a deck around that sphere. For instance, a deck could be built around the sphere of tactics to support its heroes with an impressive array of armor and weaponry, and then take the fight directly to the enemies that emerge from the encounter deck. As the card pool grows with Adventure Pack expansions, each of the four basic starter decks in this core set can be developed into fully playable tournament decks. 

It is also possible to focus on multiple spheres when building a deck. A deck built around both the sphere of spirit and around the sphere of lore could focus on self-preservation, with numerous effects that heal hit points and reduce threat. The trick to building around multiple spheres is resource management; having the right type of resource available at the right time becomes more difficult when a deck is built around two or three different spheres. 

Another useful approach when building decks is to follow the cohesion that can be discovered by building around a trait. For instance, if a player wants to run a deck built around three different spheres, it might make sense to use Dwarf cards from all three spheres to take advantage of Dwarf synergies and card interactions. 

See also

Home

Back

Glossary

The following is an alphabetical list of entries for game rules, terms, and situations that may occur during play.

(Entries are drawn from the Rules Reference v1.0.)

  1. Ability, Card Ability
  2. Action, Action Ability
  3. Active Location
  4. Active Player
  5. After
  6. Ally Cards
  7. Attachment Cards
  8. Attack Strength
  9. Attacks Outside the Combat Phase
  10. Base Value
  11. Blank
  12. Cancel
  13. Cannot
  14. "Cannot be damaged"
  15. "Cannot have attachments"
  16. Cardtypes
  17. Character Cards
  18. The word "Choose"
  19. Combat Phase
  20. Constant Ability
  21. Copy (of a card)
  22. Cost
  23. Current Quest
  24. Damage
  25. Deckbuilding
  26. Defending Player
  27. Defense Strength
  28. Delayed Effects
  29. Destroy
  30. Discard Pile and Victory Display
  31. Doomed
  32. Drawing cards
  33. Effects
  34. Encounter Deck
  35. Encounter Phase
  36. Enemy Cards
  37. Engaged
  38. Engagement Check
  39. Enters Play
  40. Event Cards
  41. Exhausted
  42. Explored
  43. First Player / First Player Token
  44. Forced
  45. Framework Effects and Framework Steps
  46. Gains
  47. Guarded
  48. Hero Cards
  49. Hit Points
  50. Immune
  51. In Play and Out of Play
  52. Initial Threat Level
  53. Initiating Abilities / Playing Cards
  54. In Player Order
  55. Instead
  56. Keywords
  57. Lasting Effects
  58. Limits
  59. Location Cards
  60. May
  61. Modifiers
  62. Move
  63. Mulligan Draw
  64. Multiple Defenders
  65. Neutral Cards
  66. Next Player
  67. Objective Cards
  68. Optional Engagement
  69. Out of Play
  70. Ownership and Control
  71. Planning Phase
  72. Play and Put into Play
  73. Play Restrictions and Permissions
  74. Player Deck
  75. Player Elimination
  76. Playing a Card
  77. Printed
  78. Priority of Simultaneous Resolution
  79. Put into Play
  80. Qualifiers
  81. Quest Advancement
  82. Quest Cards / Quest Deck
  83. Quest Phase
  84. Ranged
  85. Ready
  86. Refresh Phase
  87. Removed from Game
  88. Replacement Effects
  89. Resources
  90. Resource Match
  91. Resource Phase
  92. Response
  93. Restricted
  94. Reveal
  95. Running out of Cards
  96. Running out of Tokens
  97. Scoring
  98. Search
  99. Self-referential Abilities
  100. Sentinel
  101. Setup
  102. Shadow Effects
  103. Spheres of Influence
  104. Staging
  105. Staging Area
  106. Surge
  107. Switch
  108. Table Talk
  109. Then
  110. Threat / Threat Dial
  111. Threat Elimination Level
  112. Timing of Ability Resolution
  113. To
  114. Traits
  115. Travel
  116. Travel Phase
  117. Treachery Cards
  118. Triggered Ability
  119. Triggering Condition
  120. Type, Types
  121. Unique Cards
  122. Victory
  123. When
  124. Willpower Strength
  125. Winning the Game
  126. The letter "X"

See also

Home

Back

Ability, Card Ability

An ability is the special game text that a card contributes to the game. Card abilities fall into one of the following types: action, forced, keyword, constant ability, response, or when revealed ability. 

  • The initiation of an action or response ability is optional. The word "may" also incorporates a player option into the resolution of an ability. The player who controls the card on which an optional ability exists determines whether or not he or she wishes to use that ability at the appropriate time. 
  • The application or initiation of the following types of abilities is mandatory: constant abilities, when revealed abilities, and forced abilities. 
  • The initiation of any keyword which uses the word "may" in its keyword description is optional. The application of all other keywords is mandatory. 
  • Card abilities only interact with, and can only target, cards that are in play, unless the ability specifically refers to an out-of-play area or element. Card abilities on characters and attachments can only be initiated or affect the game from an inplay area unless they specifically refer to being used from an out-of-play area, or require that the card be out of play for the ability to resolve. Event cards implicitly interact with the game from an out-of-play area, as established by the rules of the event cardtype. 
  • A card ability can only be initiated if its effect has the potential to change the game state. This potential is assessed without taking into account the consequences of the cost payment or any other ability interactions. 
  • A card ability can only be initiated if its cost (after modifiers) has the potential to be paid in full. 
  • When an ability has more than one sentence of text, the ability should be resolved one sentence at a time. 
  • An ability prefaced by a bold-face timing trigger followed by a colon is referred to as a "triggered ability."

See also

Home

Back

Action, Action Ability

Some abilities are labeled by the word "Action"followed by ability text. These abilities can only initiated by a player during an action window. Some action abilities have a phase name as a precursor to the word "Action." Such abilities are still considered action abilities, with the restriction that they can only be initiated during an action window in the specified phase. An action must be resolved as completely as possible before the next action can be initiated. A player may initiate an action ability from: 

  • A hero, ally, or attachment card that is in play and under his or her control. 
  • An event card in his or her hand. 
  • An out-of-play card he or she owns with an ability that specifies that it triggers from an out-of-play state, or requires the card to be out of play in order to resolve. 
  • An objective, quest, or location ability in play with the boldface "Action:" trigger.

See also

Home

Back

Active Location

When the players travel to a location, it is removed from the staging area and placed next to the quest deck, causing it to become the active location.

  • There can only be one active location at a time. The players cannot travel if another location card is active. 
  • The active location does not contribute its threat strength to the total threat strength in the staging area. 
  • The active location acts as a buffer for the current quest. Any progress tokens that would be placed on the current quest are instead placed on the active location, up to that location's quest points. 
  • If the active location becomes explored by a game or card effect that requires the placement of multiple progress on the quest (and the progress is instead being placed on the active location), the remaining progress created by the effect is placed on the current quest.

See also

Home

Back

Active Player

The phrase "active player" is used to refer to a player who is obligated to perform (or granted the option to perform) a specific game function during a framework step or special action window.

See also

Home

Back

After

The word "after" refers to a game occurrence that has just been concluded. Many response abilities use the term "after" to specify the timing of their triggering conditions.

See also

Home

Back

Ally Cards

Ally cards represent characters (friends, followers, creatures, and hirelings) that assist a player's heroes on the quest. Ally cards are played from a player's hand, and they remain in play until they are destroyed.

See also

Home

Back

Attachment Cards

Attachment cards represent weapons, armor, artifacts, equipment, skills, and conditions. When played, they are attached to (placed slightly overlapped by) another card or game element, and they tend to modify or influence the activity of the card or game element to which they are attached.

  • An attachment cannot enter play if there is no eligible card or game element to which it can attach. 
  • There is no limit to the number of attachments that can be attached to a card or game element. 
  • If the card to which an attachment is attached leaves play, simultaneously discard the attachment. 
  • Play restrictions, such as "attach to a Gondor hero" are checked only at the time the attachment enters play. 
  • A player has the option to play attachments by attaching them to another player's character. When an attachment enters play attached to a character under another player's control, that player gains control of the attachment. 
  • An attachment card readies and exhausts independently of the card to which it is attached.

See also

Home

Back

Attack Strength

Each character and enemy has an attack strength. This value is the amount of damage that character or enemy deals when it attacks.
  • Attack strength is denoted by the symbol.

See also

Home

Back

Attacks Outside the Combat Phase

If an enemy makes an attack outside of the combat phase, deal it a shadow card and follow each step of "Enemy Attack Resolution" found on page 27.

If a player makes an attack outside the combat phase, follow each step of "Player Attack Resolution" found on page 26.

See also

Home

Back

Base Value

The value of a quantity before other modifiers are applied. For most quantities, it is also the printed value.

See also

Home

Back

Blank

If an ability causes a card's printed text box to be considered "blank," that text box is treated as if it did not have any of its printed text. Text gained from another source is not blanked.
  • Included in a card's text box are its abilities, keywords, and traits.
  • A card with a blank text box retains its flavor and/or story text.

See also

Home

Back

Cancel

Some card abilities (usually response abilities) can "cancel" other card or game effects. Cancel abilities interrupt the initiation of an effect, and prevent the effect from initiating. Because of this, cancel abilities have timing priority over all other abilities.
  • If an effect is canceled, that effect is no longer imminent, and further abilities (including cancels) cannot be initiated in reference to the canceled effect.
  • When the effects of an ability are canceled, the ability is still considered to have been used, and any costs have still been paid.
  • If the effects of an event card are canceled, the card is still considered to have been played, and it is still placed in its owner's discard pile.
  • If the effects of a treachery card are canceled, the card is still considered to have been revealed, and it is still placed in the encounter discard pile.

See also

Home

Back

Cannot

The word "cannot" is absolute, and cannot be countermanded by other abilities or effects.

See also

Home

Back

"Cannot be damaged"

A card that "cannot be damaged" cannot have damage assigned, dealt, reassigned, or moved to it, and it cannot be chosen to take damage or be chosen as the target of an effect that would damage it.
  • Any pre-existing damage on a card that gains "cannot be damaged" remains on that card.
  • A card that "cannot be damaged" can still be driven from play by non-damaging effects, such as discard.

See also

Home

Back

"Cannot have attachments"

A card with the text "Cannot have attachments" cannot have attachment cards attached to it.
  • If a trait precedes the word "attachments," the card cannot have attachments of the specified trait, but it can have attachments that do not possess that trait.
  • If a character gains the text "cannot have attachments," any attachments on that character must immediately be discarded.

See also

Home

Back

Cardtypes

The game's cardtypes are: quest, enemy, location, treachery, objective, hero, ally, attachment, and event. Each of these card types, with a detailed card anatomy, is presented in Appendix I.
  • If an ability causes a cardtype to change (such as an ally card becoming an enemy card), it loses all other cardtypes it might possess and functions as would any card of the new type.

See also

Home

Back

Character Cards

Character cards represent the different companions who come together to complete each quest.

Character cards are divided into 2 types: heroes and allies. Any ability that refers to a "character" refers to both types.

Some abilities, however, may refer only to a particular type, or may exclude a type, based on the ability text.
  • Characters enter play ready, in a player's play area, and under their owner's control.
  • Characters remain in play unless they are destroyed or removed by a game step or ability.

See also

Home

Back

The word "Choose"

The word "choose" indicates that a game element (most often a card) must be chosen as the target of an effect.
  • The controller of an ability that uses the word "choose" chooses all targets for the effect unless otherwise specified by the card.
  • If there is no valid target for a targeting effect, the ability cannot be initiated.

See also

Home

Back

Combat Phase

The steps of this phase and how to resolve attacks are described in timing entries 6.1-6.11 on page 26.

See also

Home

Back

Constant Ability

A constant ability is any non-keyword ability whose text contains no boldface timing trigger defining its ability type. A constant ability becomes active as soon as its card enters play and remains active while the card is in play.
  • Some constant abilities continuously seek a specific condition (denoted by words such as "during," "if," or "while"). The effects of such abilities are active any time the specified condition is met.
  • If multiple instances of the same constant ability are in play, each instance affects the game state independently.

See also

Home

Back

Copy (of a card)

A copy of a card is defined by title: any other card that shares the same title is considered a copy, regardless of cardtype, text, artwork, or any other characteristic(s) of the card(s).

See also

Home

Back

Cost

A card's resource cost is the numerical value that must be paid to play the card.

Some abilities have a cost described in the ability text that must be paid in order to use the ability.
  • When a player is paying a cost, the payment must be made with cards and/or game elements that player controls.
  • If a cost requires a game element that is not in play, the player paying the cost may only use game elements that are in his or her out-of-play areas.
  • If multiple costs for a single card or ability require payment, those costs must be paid simultaneously.
  • An ability's cost cannot be paid if the resolution of its effect does not have the potential to change the game state.
  • The word "to" is used in ability text to distinguish a cost from an effect, in a "pay cost to resolve effect" format.

See also

Home

Back

Current Quest

The "current quest" refers to the quest stage that the players are currently attempting to defeat.

See also

Home

Back

Damage

Damage tokens can be placed on character cards and enemies by attacks and by various abilities.

If a character or enemy has as much (or more) damage on it as it has hit points, it is destroyed.

 The following process is used to deal damage:
  1. Determine the amount of damage to deal (including modifiers).
  2. Assign the damage to the target (character or enemy).
  3. Place the damage on the target (character or enemy).

See also

Home

Back

Deckbuilding

To build a custom player deck:
  • A player must choose 1 to 3 hero cards.
  • A player's deck must contain a minimum of 50 player cards.
  • There is no upper limit on a player's deck size.
  • A player's deck can only contain up to 3 copies (by title) of any given card.

See also

Home

Back

Defending Player

When an enemy makes an attack against a player, or against a character controlled by a player, that player is the defending player.
  • If another player declares a sentinel character as a defender, the player that the enemy is attacking is still the defending player. Card effects, including shadow card effects, that target "the defending player" or "you" still target the player who the enemy is attacking.
  • If an enemy is attacking a specific character, the player who controls that character is the defending player.

See also

Home

Back

Defense Strength

Each character and enemy has a defense strength. This value is the amount of damage a character reduces an attack by when it defends, or the amount of damage an enemy reduces an attack by when that enemy is attacked.
  • Defense strength is denoted by the symbol.

See also

Home

Back

Delayed Effects

Some abilities contain delayed effects. Such abilities specify a future timing point, or indicate a future condition that may arise, and dictate an effect that is to happen at that time.
  • Delayed effects resolve automatically and immediately after their specified timing point / future condition occurs or becomes true, before reactions to that moment may be used.
  • When a delayed effect resolves, it is not treated as a new triggered ability, even if the delayed effect was originally created by a triggered ability.

See also

Home

Back

Destroy

When a hero or ally is destroyed, it is placed faceup on top of its owner's discard pile. When an enemy is destroyed, it is placed faceup on top of the encounter discard pile.

Placing a hero, ally, or enemy in the discard pile as the result of being destroyed is not the same as "discarding" that card.

See also

Home

Back

Discard Pile and Victory Display

Many game effects place cards in a player's discard pile, the encounter discard pile, or the victory display.
  • Each player has his or her own discard pile, and the encounter deck also has its own discard pile.
  • When a card is discarded, it goes to the discard pile belonging to the card's originating deck.
  • The victory display and each discard pile is open information and may be looked at by any player at any time.
  • The order of cards in a discard pile may not be altered unless a player is instructed to do so by a card ability.
  • If multiple cards would enter a discard pile simultaneously, the owner of the cards chooses the order in which those cards are placed in the discard pile.

See also

Home

Back

Doomed

Doomed is a keyword ability. If an encounter card with the doomed keyword is revealed, each player must raise his or her threat by the specified value.

See also

Home

Back

Drawing cards

When a player is instructed to draw one or more cards, those cards are drawn from the top of his or her deck.

When a player draws two or more cards as the result of a single game step or card ability, those cards are drawn simultaneously.

Drawn cards are added to a player's hand.

There is no limit to the number of cards a player may draw each round.

There is no maximum hand size.

See also

Home

Back

Effects

A card effect is any effect that arises from the resolution of ability text printed on or gained by a card. A framework effect is any effect that arises from the resolution of a framework step.
  • Card effects might be preceded by costs, triggering conditions, play restrictions, play permissions, and/ or targeting requirements. Such elements are not considered effects.
  • Once an ability is initiated, players must resolve as much of each aspect of the effect as they are able, unless the effect uses the word "may."
  • When a non-targeting effect attempts to engage a number of entities (such as "draw 3 cards" or "search the top 10 cards of your deck") that exceeds the number of entities that currently exist in the specified game area, the effect engages as many entities as possible.
  • The expiration of a lasting effect (or the cessation of a constant ability) is not considered to be generating a game state change by card effect.
  • If an ability instructs a player to select among multiple effects, an effect that has the potential to change the game state must be selected.

See also

Home

Back

Encounter Deck

The encounter deck contains the villains, hazards, places, and circumstances that stand between the players and the successful completion of their quest.
  • An encounter deck consists of enemy, location, treachery, and objective cards.
  • The contents of the encounter deck are determined by the scenario the players are attempting.

See also

Home

Back

Encounter Phase

The steps of this phase and how to resolve engagement checks are described in timing entries 5.1-5.4 on page 24 [ed.: of the Rules Reference].

See also

Home

Back

Enemy Cards

Enemy cards represent the villains, creatures, monsters, and minions that attempt to capture, destroy, or mislead the heroes as they pursue their quest.
  • After an enemy card is revealed, it is added to the staging area.
  • Enemy cards remain in play until they are defeated or removed from play by a card ability.
  • If an enemy engages a player, it remains engaged with that player until it is defeated or removed from that player's play area by a card ability.

See also

Home

Back

Engaged

When an enemy enters a player's play area from another game location, that enemy has engaged that player, and that player has engaged that enemy.
  • An engaged enemy does not contribute its threat strength to the total threat strength of the staging area. Instead, each engaged enemy makes an attack during the combat phase.
  • An engaged enemy remains engaged with a player until it is destroyed, moved to another play area, or removed from play.

See also

Home

Back

Engagement Check

When a player is instructed to make an engagement check against an enemy in the staging area, compare the player's threat level to the engagement cost of the enemy. If the player's threat level is equal to or greater than that enemy's engagement cost, the enemy engages that player by moving it from the staging area to that player's play area.

See also

Home

Back

Enters Play

The phrase "enters play" refers to any time a card makes a transition from an out-of-play area or state into play. Playing a card and putting a card into play by using a card ability are two different means by which a card may enter play.

See also

Home

Back

Event Cards

Event cards represent actions, spells, and other unexpected twists that might occur during the game.
  • An event card's ability type, triggering condition (if any), and play permissions/restrictions (if any) define when and how the card can be played.
  • When a player plays an event card, its cost is paid, its ability is resolved, and the card is then placed in that player's discard pile.
  • Event cards engage the game state at the time they are played and resolve. If an event card creates a lasting effect on the game state, only cards that are in play (or in the affected game area or game state) at the time the event card is played are eligible to be affected. Cards that enter play after the resolution of the event are not affected by its lasting effect.
  • If the effects of an event card are canceled, the card is still considered to have been played, and its cost remains paid. Only the effects have been canceled.
  • Unless the ability that puts it into play also changes its cardtype to a cardtype that is permitted in play, an event card cannot enter play.

See also

Home

Back

Exhausted

Cards are often exhausted in order to make an attack or use certain abilities. When a card is exhausted, it is rotated 90 degrees.
  • An exhausted card cannot be exhausted again until it is ready. Cards are typically readied by a game step or card ability.
  • A card ability on an exhausted card is active and can still engage the game state. However, if an exhausted card must exhaust as part of the cost to use an ability, it cannot exhaust again, and therefore cannot be used to pay for the ability.

See also

Home

Back

Explored

If the number of progress tokens on a location is equal to or greater than its quest points, that location is considered explored and is placed in the discard pile.
  • Placing a location in the discard pile by exploring it is not the same as discarding it.
  • If the active location becomes explored during quest resolution, place any remaining progress tokens on to the current quest.

See also

Home

Back

First Player / First Player Token

A first player is determined by the players at the beginning of the game. The first player token is used to indicate which player is the first player. At the end of each refresh phase, this token passes to the next player (the player to the left of the current first player) and that player becomes the first player for the next round.

If the first player is eliminated, the first player token immediately passes clockwise to the next player.

The players as a group are encouraged to work together and discuss each course of action during the game, but the first player has the final say with the following matters:
  • During the travel phase, the first player decides which location the players travel to.
  • If an encounter or quest effect targets a single player or card, and there are multiple eligible targets, the first player selects the target of the effect from among the eligible options.
  • If two or more effects trigger simultaneously, the first player decides the order in which to resolve them.
The first player has timing priority in the following situations:
  • The first player has the first opportunity to initiate actions or act first in all standard action windows. Action opportunities then proceed among the remaining players in player order.
  • The first player has the first opportunity to initiate responses at each appropriate game moment. Response opportunities then proceed among the remaining players in player order.

See also

Home

Back

Forced

Forced is a bold trigger word. If the word "Forced" precedes a triggered ability, the ability's initiation is mandatory.
  • For any given triggering condition, forced responses take priority and initiate before non- forced responses of the same "when" or "after" type.
  • If two or more forced abilities would initiate at the same moment, the first player determines the order in which the abilities initiate, regardless of who controls the cards bearing those abilities.
  • Each forced ability must resolve as completely as possible before the next forced ability to the same triggering condition may initiate.

See also

Home

Back

Framework Effects and Framework Steps

A framework step is a mandatory occurrence, dictated by the structure of the game. A framework effect is any effect that arises from the resolution of a framework step.

See also

Home

Back

Gains

The word "gains" is used in multiple contexts.
  • If a player gains resources, those resources are taken from the token bank and added to the specified hero's resource pool.
  • If a card gains a characteristic (such as a trait, keyword, or ability text), the card functions as if it possesses the gained characteristic. Gained characteristics are not considered to be printed on the card.

See also

Home

Back

Guarded

Guarded is a keyword ability. When an objective with the guarded keyword is revealed, reveal the next card from the encounter deck and attach the card with the guarded keyword to it and place them both in the staging area.

If the next card also has the guarded keyword, use the next card of the encounter deck to fulfill the original keyword effect, and then resolve the guarded keyword on the second card.

Enemy and location cards attached to guarded objectives do count their threat while in the staging area.

While an objective has one or more encounter cards attached to it, it cannot be claimed. Once all attached encounter cards are dealt with, the objective remains in the staging area until it is claimed.

An unguarded objective can be claimed in the manner specified by its card text.

An encounter card attached to a guarded objective is dealt with in the following method, depending on its card type:
  • Enemy: The enemy leaves play, either by being defeated or as the result of a card effect.
  • Location: The location leaves play, either by being explored or as the result of a card effect.
  • Treachery: The treachery's effects resolve, or are canceled.


Ed.: Please note that this is somewhat different from how Guarded (X), introduced later, works!

See also

Home

Back

Hero Cards

Hero cards represent the main characters a player controls in an attempt to complete a scenario. Heroes start in play, and they provide the resources that are used to pay for the cards (allies, attachments, and events) in a player's deck.

Heroes can commit to quests, attack, defend, and in many cases they bring their own card abilities to the game.
  • Each player chooses 1-3 hero cards and starts the game with them in play.
  • Hero cards remain in play unless destroyed or otherwise removed from play by a card ability.

See also

Home

Back

Hit Points

Each character and enemy has a hit point value. If a character or enemy has as much or more damage on it as it has hit points, it is destroyed.

See also

Home

Back

Immune

If a card is immune to a specified set of effects, it cannot be chosen as the target for or affected by effects that belong to that set.
  • Immunity only protects the immune card itself. Peripheral entities (such as attachments, tokens on the card, and abilities that originate from the immune card) are not themselves immune.
  • If a card gains immunity, pre-existing lasting effects that have been applied to the card are recalculated to account for the immunity.

See also

Home

Back

In Play and Out of Play

Faceup cards in the staging area or a player's play area are considered "in play." Additionally, the top card of the quest deck and the active location are also in play.
"Out of play" refers to the cards in a player's hand, deck, and discard pile, the encounter deck, encounter discard pile, cards in the victory display, cards set aside, and cards removed from the game.
  • Card abilities only interact with, and can only target, cards that are in play, unless the ability text specifically refers to an out-of-play area.
  • Card abilities can only be initiated or affect the game from an in-play area unless they specifically refer to being used from an out-of-play area, or require that the card be out of play for the ability to resolve. Play restrictions and permissions are an exception that may affect how a card may or may not be deployed or used.
  • A card enters play when it moves from an out-of- play origin to a play area.
  • A card leaves play when it moves from a play area to an out-of-play destination.

See also

Home

Back

Initial Threat Level

A player's initial threat level is the combined threat cost of each hero under that player's control.

See also

Home

Back

Initiating Abilities / Playing Cards

When a player wishes to play a card, or initiate a triggered ability, that player first declares his or her intent. The following steps are then observed, in order:
  1. Check play restrictions: can the card be played, or the ability initiated, at this time?
  2. Determine the cost (or costs, if multiple costs are required) to play the card or initiate the ability.
  3. Apply any modifiers to the cost(s).
  4. Pay the cost(s).
  5. Choose target(s), if applicable.
  6. The card is played, or the ability resolves.
If any of the above steps would make the triggering condition of a response ability true, that ability may be initiated when that triggering condition becomes true.

See also

Home

Back

In Player Order

If players are instructed to perform a sequence "in player order," the first player performs his or her part of the sequence first, followed by the other players in clockwise order.
  • If a sequence performed in player order does not conclude after each player has performed his or her aspect of the sequence once, the sequence of opportunities continues to proceed in a clockwise manner until it is complete.
  • The phrase "next player" always refers to the next (clockwise) player in player order.

See also

Home

Back

Instead

See: Replacement Effects

See also

Home

Back

Keywords

A keyword is an attribute which conveys specific rules to its card. The keywords are: Doomed, Guarded, Ranged, Restricted, Sentinel, Surge, and Victory.
  • Some keywords are followed by reminder text, which is presented in italics. Reminder text is a shorthand explanation of how a keyword works, but it is not rules text and does not replace the rules for that keyword in this glossary.
  • If a card gains multiple instances of a numerative keyword, each instance stacks. For example, if a treachery card with Doomed 2 gains Doomed 1 from another source when it is revealed, it will have a total of Doomed 3.

See also

Home

Back

Lasting Effects

Some card abilities create effects or conditions that affect the game state for a specified duration (such as "until the end of the phase" or "until the end of this attack"). Such effects are known as lasting effects.
  • A lasting effect persists beyond the resolution of the ability that created it, for a duration specified by the effect. The effect continues to affect the game state for the specified duration whether or not the card that created the lasting effect is or remains in play.
  • If a lasting effect generated by a player card affects in-play cards (or a specified set of cards), it is only applied to cards that are in play (or that meet the specifications of the set) at the time the lasting effect is established. Cards that enter play (or change status to meet the criteria of the specified set) after a lasting effect's establishment are not subsequently affected by that lasting effect.
  • If a lasting effect generated by an encounter card or quest card affects in-play cards (or a specified set of cards), it is applied to all cards that meet its criteria regardless of their play-state at the time the lasting effect is established. Cards that enter play (or change status to meet the criteria of the specified set) after a lasting effect's establishment are subsequently affected by that lasting effect the same as cards that are in-play at the time of its establishment. This aids the encounter deck's ability to create effective card combinations.
  • A lasting effect expires as soon as the timing point specified by its duration is reached. This means that an "until the end of the round" lasting effect expires just before an "at the end of the round" ability or delayed effect may initiate.
  • A lasting effect that expires at the end of a specified time period can only be initiated during that time period.

See also

Home

Back

Limits

"Limit X per phase" is a limit that appears on some player cards. These limits are card specific. Each copy of an ability with such a limit may be used X times per phase, per instance of that ability.

"Limit X per game" is a limit that appears on some player cards. These limits are player specific. Each copy of an ability with such a limit may only be used X times per game by a player, regardless of which card is used to trigger that effect.
  • If an effect with a limit is canceled, the card is still considered to have been played or the ability initiated, and it counts towards the limit.

See also

Home

Back

Location Cards

Location cards represent the perilous places to which the player may travel during a scenario.
  • After a location is revealed, it is added to the staging area.
  • Location cards remain in play until they are explored.
  • If the players travel to a location, it becomes the active location.

See also

Home

Back

May

The word "may" indicates that a specified player has the option to do that which follows. If no player is specified, the option is granted to the controller of the card with the ability in question.

See also

Home

Back

Modifiers

The game state constantly checks and (if necessary) updates the count of any variable quantity that is being modified.

Any time a new modifier is applied (or removed), the entire quantity is recalculated from the start, considering the unmodified base value and all active modifiers.
  • The calculation of a value treats all modifiers as being applied simultaneously. However, while performing the calculation, all additive and subtractive modifiers should be calculated before doubling and/or halving modifiers are calculated.
  • If a value is "set" to a specific number, the set modifier overrides all non-set modifiers. If multiple set modifiers are in conflict, the most recently resolved set modifier takes precedence.
  • After all active modifiers have been taken into account, if a value is below 0, it is treated as 0: a card cannot have "negative" icons, attributes, traits, cost, or keywords.
  • Fractional values are rounded up after all modifiers have been applied.

See also

Home

Back

Move

Some abilities allow players to move game elements, such as damage, cards, or tokens.
  • When an entity "moves," it cannot move to its same (current) placement. If there is no valid destination for a move, the move attempt cannot initiate.

See also

Home

Back

Mulligan Draw

After a player draws their starting hand during setup, that player has the option to declare a mulligan draw. After doing so, the player reshuffles the starting hand into his or her deck and draws a new starting hand. The player must keep this second hand.

See also

Home

Back

Multiple Defenders

Some card abilities allow players to declare multiple defenders for an attack.
  • Pool the defense strength of each defender while resolving the attack.
  • The defending player must assign all damage from the attack to a single character that was involved in defending.

See also

Home

Back

Neutral Cards

Neutral cards do not belong to a sphere of influence.
  • A player may pay for neutral cards with resources from any of his or her heroes' pools.
  • A player may combine resources from heroes that belong to different spheres of influence to pay for a neutral card.

See also

Home

Back

Next Player

The term "next player" always refers to the next clockwise player (from the current active player, or from the player who most recently performed a game function or passed) in player order.

In a single-player game there is no next player and card effects that target the next player will not trigger.

See also

Home

Back

Objective Cards

Objective cards represent a range of different elements from the goal of a scenario, from allies who assist the players, to keys that allow the players to advance to the next stage of the quest, to artifacts that are necessary to overcome a particular challenge.
  • After an objective is revealed, it is added to the staging area.
  • Objective cards remain in play unless the game instructs the players to remove them from play.
  • The encounter deck has control of the objective. If a player claims an objective, then that player gains control of that objective.

See also

Home

Back

Optional Engagement

During the optional engagement step of the encounter phase (framework step 5.2), each player has the option to engage one enemy in the staging area. This is called "optionally engaging an enemy."
  • Each player has one chance to optionally engage an enemy during the optional engagement step.
  • An enemy's engagement cost has no bearing on optional engagements.

See also

Home

Back

Out of Play

See: In Play and Out of Play

See also

Home

Back

Ownership and Control

A card's owner is the player whose deck held the card at the start of the game. The scenario is considered to be the owner of the encounter deck and each encounter card.
  • By default, cards enter play under their owner's control. Encounter cards are considered to be under the control of the scenario.
  • A card's controller is the player who currently controls the card. Some abilities may cause cards to change control during a game.
  • A player controls the cards in his or her out-of-play game areas (such as the hand, the deck, and the discard pile).
  • If a card that has changed control leaves play, after the resolution of the game occurrence that drives it from play, the card is physically placed in its owner's equivalent out of play area (hand, deck, or discard pile). Other card abilities cannot interact with this secondary physical placement.
  • When a character changes control while it is in play, it remains in the same state it was in before (i.e., readied or exhausted, damaged or not, etc.) and is moved to its new controller's play area.
  • Attachments on a card that changes control also change control to the same new controller.
  • Unless a duration is specified, a control change persists as long as the card remains in play.

See also

Home

Back

Planning Phase

The steps of this phase and how to play cards are described in timing entries 2.1-2.4 on page 22 [ed: of the Rules Reference].

See also

Home

Back

Play and Put into Play

Playing a card involves paying the card's resource cost and placing the card in the play area. This causes the card to enter play (or, in the case of an event card, to resolve its ability and be placed in the discard pile). Cards are played from a player's hand.

Some abilities cause cards to be put into play. This bypasses the need to pay the card's cost, as well as any restrictions or prohibitions regarding the potential of playing that card. A card that is put into play enters play in its controller's play area.
  • A card that is put into play is not considered to have been played.
  • In order to play a card, its cost (after modifiers) must be paid.
  • When a card is put into play, its resource cost is ignored.
  • Unless otherwise instructed by the put into play effect, cards that enter play in this manner must do so in a play area or state that matches the rules of playing the card.
  • When an event card is played, place it on the table, resolve its ability, and place the card in its owner's discard pile.

See also

Home

Back

Play Restrictions and Permissions

Many cards or abilities contain specific instructions pertaining to when or how they may or may not be used, or to specific conditions that must be true in order to use them.
  • In order to use an ability or play a card, all of its play restrictions must be observed.
  • A permission is an optional play restriction, which allows a player to play a card or use an ability outside the timing or specifications generally provided by the game rules.

See also

Home

Back

Player Deck

The player deck includes a combination of ally, attachment, and event cards shuffled into a deck from which a player draws his or her cards throughout the game.

See also

Home

Back

Player Elimination

A player is eliminated from the game if all of his or her heroes are killed, if his or her threat level reaches 50, of if a card effect forces his or her elimination.
  • When a player is eliminated, that player's hand, all of the cards he or she controls, and his or her deck are placed in their owners' discard piles. Any enemies engaged with that player are returned to the staging area, retaining any damage tokens that are on them.
  • When a player is eliminated, the remaining players continue to play the game, revealing one less encounter card during the quest phase now that there is one less player in the game.
  • If all players are eliminated, the game ends in a loss for the players.

See also

Home

Back

Playing a Card

See: Initiating Abilities / Playing Cards

See also

Home

Back

Printed

The word "printed" refers to the text, characteristic, or value that is physically printed on the card.

See also

Home

Back

Priority of Simultaneous Resolution

If two or more effects with the same bold timing trigger would resolve simultaneously, the first player determines the order in which the effects resolve.

See also

Home

Back

Put into Play

See: Play and Put into Play

See also

Home

Back

Qualifiers

If card text includes a qualifier followed by multiple terms, the qualifier applies to each item in the list, if it is applicable. For example, in the phrase "each ready character and attachment" the word "ready" applies to both "character" and "attachment."

See also

Home

Back

Quest Advancement

Players immediately advance to the next stage of a quest as soon as they place a number of progress tokens equal to or greater than the number of quest points the current quest card has.
  • Additional progress tokens earned against the quest do not carry over to the next stage.

See also

Home

Back

Quest Cards / Quest Deck

Each quest card represents one of the various stages of the quest the players are pursuing in a scenario. Each quest card is a numbered step in a fixed, sequential order, arranged in a stack called "the quest deck."

See also

Home

Back

Quest Phase

The steps of this phase and how to resolve the quest are described in timing entries 3.1-3.5 on page 21-23 [ed: of the Rules Reference].

See also

Home

Back

Ranged

Ranged is a keyword ability. A character with the ranged keyword can be declared by its controller as an attacker against enemies that are engaged with another player.

A character can declare ranged attacks against these targets while its owner is declaring attacks, or it can participate in attacks that are declared by other players. In either case, the character must exhaust and meet any other requirements necessary to make the attack.

See also

Home

Back

Ready

Cards enter play in a ready state, positioned so that their controller can read their text from left to right.
  • If a player is instructed to ready an exhausted card, the card is returned to this ready state.

See also

Home

Back

Refresh Phase

The steps of this phase are described in timing entries 7.1-7.5 on page 25 [ed: of the Rules Reference].

See also

Home

Back

Removed from Game

"Removed from the game" is an out-of-play state. A card that has been removed from the game is set aside and has no further interaction with the game in any manner for the duration of its removal. If there is no specified duration, a card that has been removed from the game is considered removed until the end of the game.

See also

Home

Back

Replacement Effects

A replacement effect is an effect that replaces the handling of one resolution with a different means of handling that resolution. Most replacement effects are response abilities in the format of "when triggering condition would happen, do [replacement effect] instead." After all responses to the original triggering condition have resolved and it is time to resolve the triggering condition itself, the replacement effect resolves instead.
  • If multiple replacement effects are initiated against the same triggering condition, the most recent replacement effect is the one that is used for the resolution of the triggering condition.

See also

Home

Back

Resources

Resources are the game's currency and are used to pay for cards and card abilities.

Resource tokens begin the game in the token bank. When a hero gains resources transfer them from the token bank to the hero's resource pool. When a player spends resources from a hero's pool, transfer them from the hero's resource pool back to the token bank.

See also

Home

Back

Resource Match

In order for a player to play a card, he or she must pay for it by spending resource tokens from the resource pool of a hero who has a resource icon that matches that card's sphere of influence.
  • If a card is 0 cost and belongs to a sphere of influence, a resource match is still required to play that card.
  • Neutral cards do not require a resource match to play.

See also

Home

Back

Resource Phase

The steps of this phase and how to collect resources are described in timing entries 1.1-1.4 on page 22 [ed: of the Rules Reference].

See also

Home

Back

Response

Response abilities are labeled by the word "Response" followed by ability text. Unlike action abilities, which are resolved during action windows, response abilities may be executed after the specified triggering condition occurs, as described in the response's ability text.
  • It is possible for multiple responses to be executed from the same triggering condition.
  • When two or more response abilities share the same trigger, resolve all response effects that use the word "when" before resolving response effects that use the word "after."
  • A response ability is always used immediately after its triggering condition has occurred and has been resolved. The first player always has the first opportunity to use an ability in response to a given triggering condition, followed by the next player, and so forth. Response opportunities for that triggering condition alternate between between players in this manner until all players have
  • Once the opportunity to react to a triggering condition has been passed by all players, further responses to that specific triggering condition cannot be used.

See also

Home

Back

Restricted

Restricted is a keyword ability. Each character cannot have more than 2 attachments with the restricted keyword.

If a third restricted attachment is ever attached to a character, one of the restricted attachments must immediately be moved to its owner's discard pile.

See also

Home

Back

Reveal

When a player is instructed to reveal an encounter card, the player takes the top card of the encounter deck, turns it faceup, and resolves the staging of that card, including any keywords and "when revealed" effects.

See also

Home

Back

Running out of Cards

If a player runs out of cards in his or her player deck, that player continues to play the game with the cards he or she has in play and in his or her hand. The player does not reshuffle his or her discard pile.

If the encounter deck is ever out of cards during the quest phase, the encounter discard pile is shuffled and reset back into the encounter deck.

See also

Home

Back

Running out of Tokens

There is no limit to the number of resource, damage, or progress tokens which can be in the play area at a given time.

If players run out of the provided resource, damage, or progress tokens, other tokens or coins may be used to track the current game state.

See also

Home

Back

Scoring

Scoring is a useful tool in evaluating the performance of a deck or a party over time, or in comparing one deck or group of decks to another. This enables players to play the same scenario multiple times with different hero and deck combinations, evaluating their effectiveness in each game.

If the players win the game, use this process to determine their group's score for the game.
  1. Add together three undesirable elements: the final threat level of each player, the threat penalty on all dead heroes, and the number of damage tokens on all surviving heroes.
  2. Add 10 for each completed round of the game.
  3. Subtract any victory points that have been collected.
When a player is eliminated, his or her threat is considered to be 50, and all of that player's heroes are considered to be dead.

With this scoring system, victory with a low score is more desirable than victory with a high score.

See also

Home

Back

Search

When a player is instructed to search for a card, the player is permitted to look at each of the cards in the searched area.

If the player finds a card that meets the eligibility requirements being searched for, the player may add that card to the game area indicated by the instructions on the search effect.
  • Cards in the process of being searched are not considered to leave the searched area.

See also

Home

Back

Self-referential Abilities

Self-referential abilities refer only to the card on which the ability is located, and not to other copies of that card.

See also

Home

Back

Sentinel

Sentinel is a keyword ability. A character with the sentinel keyword may be declared as a defender during enemy attacks that are made against other players.

A character may declare sentinel defense after the player engaged with the enemy making the attack declares no defenders.

The defending sentinel character must exhaust and meet any other requirements necessary to defend the attack.

See also

Home

Back

Setup

Setup occurs before the game begins.

Card effects triggered during Setup are fully resolved.

In order to setup the game, follow these 7 steps:
  1. Shuffle Decks - Shuffle all player decks and the encounter deck. Do not shuffle the quest deck.
  2. Place Heroes and Set Initial Threat Levels - Each player places their heroes in his or her play area, adds up the threat cost of the heroes he or she controls, and sets his or her threat dial at the same value. This value is that player's initial threat level for the game.
  3. Setup Token Bank - Place the damage tokens, progress tokens, and resources tokens in a pile next to the encounter deck. All players take tokens from this bank as needed throughout the game.
  4. Determine First Player - The players determine a first player based on a majority group decision. If this proves impossible, determine a first player at random. Once determined, the first player takes the first player token and places it in front of him or her as reference.
  5. Draw Setup Hand - Each player draws 6 cards from the top of his or her player deck. If a player does not wish to keep this starting hand, that player may take a single mulligan.
  6. Set Quest Cards - Arrange the quest cards in sequential order, based off the numbers on the back of each card. Stage 1A should be on top, with the numbers increasing in sequence moving down the stack. Place the quest deck near the encounter deck, in the center of the play area.
  7. Follow Scenario Setup Instructions - The back of the first quest card typically provides setup instructions for a scenario. Follow these instructions before flipping the quest card.
After completing these steps, players begin the game starting with the first game round.

See also

Home

Back

Shadow Effects

Some encounter cards have a secondary effect known as a shadow effect. These effects are offset from a card's non-shadow text by the "shadow bar" graphic. They are also denoted by the bold italic "Shadow:" trigger on the card.
  • Shadow effects only resolve when dealt as a shadow card during an enemy attack.

See also

Home

Back

Spheres of Influence

There are four different spheres of influence, as depicted in the diagram below.

If a player card has a sphere of influence icon, then it belongs to that sphere of influence.
  • Leadership
  • Lore
  • Spirit
  • Tactics

See also

Home

Back

Staging

Staging is the term used to describe the process of revealing an encounter card from the encounter deck, resolving its effects, and placing that card.

The staging of each encounter card follows these steps:
  1. Reveal the encounter card by turning it faceup so that its game text is visible.
  2. Resolve any keywords and/or when revealed effects on the encounter card.
  3. Place the encounter card in the appropriate game area. If the revealed encounter card is an enemy, location, or objective it is placed in the staging area. If the revealed encounter card is a treachery card, it is placed in the encounter discard pile. 

See also

Home

Back

Staging Area

The staging area is a unique element of the game's playing field. It represents the potential dangers the players might face as they progress on their quest.
  • When an enemy, location, or objective is revealed, it is added to the staging area.
  • While a location is in the staging area, the players are not at that location. Each location in the staging area contributes its threat strength to the total threat strength in the staging area.
  • While an enemy is in the staging area, it is not engaged with a player. Each enemy in the staging area contributes its threat strength to the total threat strength in the staging area.

See also

Home

Back

Surge

Surge is a keyword ability. When an encounter card with the surge keyword is revealed, reveal 1 additional encounter card.

If an encounter card has more than 1 instance of surge, reveal 1 additional encounter card for each separate instance.

Resolve the surge keyword immediately after resolving the staging of the encounter card.

See also

Home

Back

Switch

Some effects use the word "switch." In order to resolve such an effect, switched items must exist on each side of the switch.
  • When switching values, a value of "0" may be switched, but a null entry for the pertinent value field cannot be switched.

See also

Home

Back

Table Talk

Players are permitted and encouraged to talk to one another during play, and to work as a team to plan and execute the best course of action. Players can discuss anything they would like, including cards in play and cards in their hand, but each player cannot look at cards in another player's hand or tell other players what to do.

See also

Home

Back

Then

If the effect text of an ability includes the word "then," the text preceding the word "then" must be successfully resolved (or be true) in full before the remainder of the effect described after the word "then" can be resolved.
  • If the pre-then aspect of an effect does successfully resolve, the resolution of the post-then aspect of the effect must also attempt to resolve.
  • If the pre-then aspect of an effect does not successfully resolve in full, the post-then aspect does not attempt to resolve.

See also

Home

Back

Threat / Threat Dial

Threat represents the level of risk a player has taken on during a scenario. The threat dial is used to track a player's threat level throughout the game.
  • A player's threat cannot be reduced below 0.

See also

Home

Back

Threat Elimination Level

The threat elimination level is the threat level at which a player is eliminated from the game.

If a player's threat level reaches 50, that player is immediately eliminated from the game.

See also

Home

Back

Timing of Ability Resolution

When multiple triggered abilities share the same trigger, they are resolved in the following order:
  1. Constant abilities
  2. Forced abilities
  3. Response abilities
When determining the order of effect resolution among abilities within those categories, abilities that use the word "when" are resolved before abilities that use the word "after."
  • If two or more effects would occur simultaneously, the first player decides the order in which the effects resolve.
  • Cancel abilities interrupt this timing structure and may only be played immediately whenever their trigger condition would be met.

See also

Home

Back

To

Many card abilities are presented in a "do X to do Y" construct. In such a construct, the "do X" aspect (preceding the word "to") is considered a cost, and the "do Y" aspect (following the word "to") is considered an effect.
  • If an ability's cost is not paid, its effect cannot be resolved.

See also

Home

Back

Traits

Most cards have one or more traits listed at the top of the text box and printed in Bold Italics.
  • Traits have no inherent effects on the game. Instead, some card abilities reference cards that possess or lack specific traits.

See also

Home

Back

Travel

Some locations have a bold Travel cost. In order to travel to such a location, its Travel cost must first be paid.

If the players cannot pay the Travel cost, then they cannot travel to that location.

See also

Home

Back

Travel Phase

The steps of this phase and how to travel to locations are described in timing entries 4.1-4.3 on page 23 [ed: in the Rules Reference].

See also

Home

Back

Treachery Cards

Treachery cards represent traps, curses, maneuvers, pitfalls, and other surprises the players might confront during a scenario.

When a treachery cards is revealed, its abilities are resolved immediately. After its abilities are resolved, it is placed in the encounter discard pile.

See also

Home

Back

Triggered Ability

A bold timing command, followed by a colon and the rest of the ability, is indicative of a triggered ability.
  • Action, response, forced, and when revealed abilities are triggered abilities.
  • A triggered ability on a player card can only be initiated if its effect has the potential to change the game state on its own. This potential is assessed without taking into account the consequences of the cost payment or future responses to the effect.
  • Unless prefaced by the word forced, all action and response abilities are optional.
  • Forced abilities and when revealed abilities are triggered automatically by the game at the ability's appropriate timing point.

See also

Home

Back

Triggering Condition

A triggering condition is specific occurrence that takes place in the game. On card abilities, the triggering condition is the element of the ability that references such an occurrence, indicating the timing point at which the ability may be used. The description of an ability's triggering condition usually follows the word "when" or "after."
  • If a single game occurrence creates multiple triggering conditions (such as a single attack causing a character to both take damage and be defeated), those triggering conditions are handled with a single response window in which abilities that refer to any of the triggering conditions created by the occurrence may be used in any order.

See also

Home

Back

Type, Types

See: Cardtypes

See also

Home

Back

Unique Cards

The symbol before a card's title indicates the card is "unique." The players as a group may have only one copy of each unique card, by title, in play.
  • A player cannot play or put into play a unique card if a copy of that card is already in play.
  • If a unique version of a character enters play from the encounter deck and there is already a copy of that character under a player's control, that player must discard the version he or she controls.

See also

Home

Back

Victory

Victory is a keyword ability. When an enemy or location with the victory keyword is defeated or explored, it is placed in the victory display instead of the encounter discard pile.

The victory keyword appears on the lower right portion of a card and is not considered to be part of the card's text box. Card effects that blank a card's text box do not blank the victory keyword.

At the end of the game, victory points in the victory display are applied to the group's score.

See also

Home

Back

When

The word "when" refers to a game occurrence that is underway but not yet concluded. Some response abilities use the word "when" to specify the timing of their triggering condition.

See also

Home

Back

Willpower Strength

Each character has a willpower strength. This value indicates the contribution the character makes towards successfully questing while it is committed to a quest.
  • Willpower strength is denoted by the symbol.

See also

Home

Back

Winning the Game

If at least one player survives through the completion of the final stage of the scenario, the game ends in a victory for the players.
  • Some card abilities can introduce additional victory conditions to the game. Such a condition immediately ends the game if it is met.

See also

Home

Back

The letter "X"

Unless specified by a card ability or granted player choice, the letter X is always equal to 0.
  • For costs involving the letter X, the value of X is defined by card ability or player choice, after which the amount paid may be modified by effects without altering the functional value of X.

See also

Home

Back

Passage Through Mirkwood

Official difficulty (1)

User rating (2.4)

rated by 473 players

Rate this Quest!

Keywords

Surge

When an encounter card with the surge keyword is revealed during the staging step of the quest phase or in setup, reveal 1 additional card from the encounter deck. Resolve the surge keyword immediately after resolving any when revealed effects on the card.

FAQ & Errata

Chieftan Ufthak

Q: When do "after this enemy attacks" Forced effects like those on Chieftan Ufthak (CORE 90) and Wargs (CORE 85) resolve?

A: These effects resolve immediately after step 4 of enemy attack resolution.

Dol Guldur Beastmaster

Should read: "Forced: When Dol Guldur Beastmaster attacks..."

The additional shadow card is dealt when the Dol Guldur Beastmaster is chosen during step 1 of enemy attack resolution.

Caught in a Web

Q: How does a player resolve the situation in which a single hero has multiple copies of Caught in a Web (CORE 80) attached?

A: The player must pay for each copy of Caught in a Web before the hero can ready. Each copy of the card creates an independent condition that must be fulfilled before readying the attached hero, so if each condition is not fulfilled the hero cannot ready. End result, if a hero has two copies of Caught in a Web attached, the player will have to pay 4 resources from that hero's resource pool in order to ready the card.

Difficulty level

Easy Mode

During step 2 of Setup, "Place Heroes and Set Initial Threat Levels", add one resource to each hero's resource pool. Then remove the following cards:

  • Dol Guldur Orcs
    • 1x Chieftain Ufthak
    • 1x Dol Guldur Beast Master
    • 1x Necromancer's Pass
    • 2x Necromancer's Reach
  • Spiders of Mirkwood
    • 2x Caught in the Web
    • 1x Eyes of the Forest
    • 1x Hummerthorns

Related Quests

Home

Back

Journey Down the Anduin

Official difficulty (4)

User rating (5.4)

rated by 326 players

Rate this Quest!

Keywords

Doomed X

If an encounter card with the doomed keyword is revealed during the staging step of the quest phase or in setup, each player must raise his threat level by the specified value.

Surge

When an encounter card with the surge keyword is revealed during the staging step of the quest phase or in setup, reveal 1 additional card from the encounter deck. Resolve the surge keyword immediately after resolving any when revealed effects on the card.

FAQ & Errata

Chieftan Ufthak

Q: When do "after this enemy attacks" Forced effects like those on Chieftan Ufthak (CORE 90) and Wargs (CORE 85) resolve?

A: These effects resolve immediately after step 4 of enemy attack resolution.

Dol Guldur Beastmaster

Should read: "Forced: When Dol Guldur Beastmaster attacks..."

The additional shadow card is dealt when the Dol Guldur Beastmaster is chosen during step 1 of enemy attack resolution.

Treacherous Fog

Q: If a location is revealed after Treacherous Fog (CORE 118) was revealed during the same quest phase, does the revealed location get +1 from the "When Revealed" effect on Treacherous Fog?

A: Yes. The "When Revealed" effect on Treacherous Fog creates a lasting effect until the end of the phase that affects each location in the staging area. This is different from Driven by Shadow (CORE 92) which uses the language "currently in the staging area" when it is revealed and only affects enemies and locations in the staging area at the time it is revealed.

Wargs

Q: When do "after this enemy attacks" Forced effects like those on Chieftan Ufthak (CORE 90) and Wargs (CORE 85) resolve?

A: These effects resolve immediately after step 4 of enemy attack resolution.

Banks of the Anduin

Q: What happens to Banks of the Anduin (CORE 113) if it is drawn as a Shadow card?

A: It will be discarded from play at the end of the combat phase, like other Shadow cards. When a card is drawn as a Shadow card, only its Shadow text is considered to be active.

Difficulty level

Easy Mode

During step 2 of Setup, "Place Heroes and Set Initial Threat Levels", add one resource to each hero's resource pool. Then remove the following cards:

  • Dol Guldur Orcs
    • 1x Chieftain Ufthak
    • 1x Dol Guldur Beast Master
    • 1x Necromancer's Pass
    • 2x Necromancer's Reach
  • Sauron's Reach
    • 2x Eastern Crows
    • 1x Evil Storm
  • Wilderlands
    • 1x Hill Troll
    • 1x Marsh Adder
    • 2x Despair
  • Journey Down the Anduin
    • 1x Massing at Night
    • 2x Gladden Fields

Related Quests

Home

Back

Escape from Dol Guldur

Official difficulty (7)

User rating (7.7)

rated by 296 players

Rate this Quest!

Keywords

Doomed X

If an encounter card with the doomed keyword is revealed during the staging step of the quest phase or in setup, each player must raise his threat level by the specified value.

Surge

When an encounter card with the surge keyword is revealed during the staging step of the quest phase or in setup, reveal 1 additional card from the encounter deck. Resolve the surge keyword immediately after resolving any when revealed effects on the card.

Guarded

The guarded keyword is a reminder on some objective cards to reveal and attach the next card of the encounter deck to the objective when it enters the staging area from the encounter deck, and place them both in the staging area. The objective cannot be claimed as long as any encounter card is attached. Once that encounter is dealt with, the objective remains in the staging area until it is claimed. If another objective card comes up while attaching a card for the guarded keyword, place the second objective in the staging area, and use the next card of the encounter deck to fulfil the original keyword effect. Enemy and location cards attached to guarded objectives do still count their threat while the enemy or location is in the staging area. An encounter card attached to a guarded objective is dealt with in the following method, depending on its card type:

Once all encounter cards attached to a guarded objective are dealt with, the players can claim the objective in the manner specified by its card text.

FAQ & Errata

Chieftan Ufthak

Q: When do "after this enemy attacks" Forced effects like those on Chieftan Ufthak (CORE 90) and Wargs (CORE 85) resolve?

A: These effects resolve immediately after step 4 of enemy attack resolution.

Dol Guldur Beastmaster

Should read: "Forced: When Dol Guldur Beastmaster attacks..."

The additional shadow card is dealt when the Dol Guldur Beastmaster is chosen during step 1 of enemy attack resolution.

Caught in a Web

Q: How does a player resolve the situation in which a single hero has multiple copies of Caught in a Web (CORE 80) attached?

A: The player must pay for each copy of Caught in a Web before the hero can ready. Each copy of the card creates an independent condition that must be fulfilled before readying the attached hero, so if each condition is not fulfilled the hero cannot ready. End result, if a hero has two copies of Caught in a Web attached, the player will have to pay 4 resources from that hero's resource pool in order to ready the card.

Dungeon Jailor

Q: Does Dungeon Jailer (CORE 101) shuffle guarded objectives back into the encounter deck?

A: Yes. Dungeon Jailer will shuffle any unclaimed objective, whether or not it is guarded.

Nazgûl of Dol Guldur

Should have the text: "No attachments can be played on Nazgúl of Dol Guldur."

Q: If I cancel the Shadow effect on a card dealt to the Nazgúl of Dol Guldur (CORE 102), is the effect still considered to have resolved, making me discard a character?

A: No. Resolving an effect means that the effect triggered and resolved to the fullest extent possible. Canceling the effect will prevent the Nazgúl of Dol Guldur's ability from triggering, just as if the card had no Shadow effect to begin with.

Tower Gate

Q: Do the Orc Guards generated by the effects of the Tower Gate location card and the Out of the Dungeons quest card have the Orc Trait?

A: No. Face down cards do not have traits unless the trait is gained through a card effect.

Dungeon Torch

Q. Does a player with the Dungeon Torch (CORE 109) raise his threat by 2 or 3 during the refresh phase?

A: Dungeon Torch's effect does not replace the regular 1 threat raise, but adds to it. So the player with the Dungeon Torch raises his threat by 3.

The Necromancer's Tower

Should read: "... reveal and place them in the staging area."

Q: During the Setup for stage 1A of The Necromancer's Tower (Core 123), should each objective have one encounter card attached to it, or two?

A: One. When you reveal a Guarded objective, you must reveal the top card of the encounter deck and attach it to that objective, guarding it. The additional instruction on The Necromancer's Tower to "... attach 1 encounter to each objective card" is there as a reminder, so that players know to attach 1 encounter card to each Guarded objective.

Out of the Dungeons

If a facedown Orc Guard would be returned to the staging area, it is instead placed in its owner's discard pile.

Q: If all of a player's heroes (except for the captured hero) are destroyed during the Escape from Dol Guldur scenario, is that player eliminated from the game?

A: Yes, the player is eliminated, and the players (as a group) have lost.

Difficulty level

Easy Mode

During step 2 of Setup, "Place Heroes and Set Initial Threat Levels", add one resource to each hero's resource pool. Then remove the following cards:

  • Dol Guldur Orcs
    • 1x Chieftain Ufthak
    • 1x Dol Guldur Beast Master
    • 1x Necromancer's Pass
    • 2x Necromancer's Reach
  • Spiders of Mirkwood
    • 2x Caught in the Web
    • 1x Eyes of the Forest
    • 1x Hummerthorns
  • Escape from Dol Guldur
    • 2x Dungeon Jailor

Related Quests

Home

Back

The Hunt for Gollum

Official difficulty (4)

User rating (4.2)

rated by 209 players

Rate this Quest!

Keywords

Surge

When an encounter card with the surge keyword is revealed during the staging step of the quest phase or in setup, reveal 1 additional card from the encounter deck. Resolve the surge keyword immediately after resolving any when revealed effects on the card.

Doomed X

If an encounter card with the doomed keyword is revealed during the staging step of the quest phase or in setup, each player must raise his threat level by the specified value.

Guarded

The guarded keyword is a reminder on some objective cards to reveal and attach the next card of the encounter deck to the objective when it enters the staging area from the encounter deck, and place them both in the staging area. The objective cannot be claimed as long as any encounter card is attached. Once that encounter is dealt with, the objective remains in the staging area until it is claimed. If another objective card comes up while attaching a card for the guarded keyword, place the second objective in the staging area, and use the next card of the encounter deck to fulfil the original keyword effect. Enemy and location cards attached to guarded objectives do still count their threat while the enemy or location is in the staging area. An encounter card attached to a guarded objective is dealt with in the following method, depending on its card type:

Once all encounter cards attached to a guarded objective are dealt with, the players can claim the objective in the manner specified by its card text.

Rulings

The "Signs of Gollum" Objective Cards

In this scenario, players are searching for Clue objective cards titled "Signs of Gollum." There are four copies of this card in the encounter deck; players should try to fin d and claim as many copies of this card as they can while playing the scenario. When one of these cards is claimed, its card text transforms it into a Condition attachment, and it is attached to a hero committed to the quest, with text that returns the card to the top of the encounter deck if the attached hero is damaged. Additionally, if the attached hero is destroyed or leaves play for any other reason, the Signs of Gollum objective card is returned to the top of the encounter deck.

Reset the Quest Deck

While playing this scenario, players might be instructed to "reset the quest deck to stage 2B." To do this, the players take the previously defeated stage 2 quest card, and return it to the quest deck as if they are just beginning that stage. Any progress tokens that were on the current quest are removed before the quest deck resets. Progress tokens that were on the active location, however, remain on that location. All other cards , including those in the staging area, remain unchanged.

FAQ & Errata

Treacherous Fog

Q: If a location is revealed after Treacherous Fog (CORE 118) was revealed during the same quest phase, does the revealed location get +1 from the "When Revealed" effect on Treacherous Fog?

A: Yes. The "When Revealed" effect on Treacherous Fog creates a lasting effect until the end of the phase that affects each location in the staging area. This is different from Driven by Shadow (CORE 92) which uses the language "currently in the staging area" when it is revealed and only affects enemies and locations in the staging area at the time it is revealed.

Banks of the Anduin

Q: What happens to Banks of the Anduin (CORE 113) if it is drawn as a Shadow card?

A: It will be discarded from play at the end of the combat phase, like other Shadow cards. When a card is drawn as a Shadow card, only its Shadow text is considered to be active.

Difficulty level

Easy Mode

During step 2 of Setup, "Place Heroes and Set Initial Threat Levels", add one resource to each hero's resource pool. Then remove the following cards:

  • Sauron's Reach
    • 2x Eastern Crows
    • 1x Evil Storm
  • Journey Down the Anduin
    • 1x Massing at Night
    • 2x Gladden Fields
  • The Hunt for Gollum
    • 2x The Old Ford
    • 1x Goblintown Scavengers
    • 3x Hunters From Mordor
    • 2x Old Wives' Tales

Related Quests

Home

Back

Conflict At The Carrock

Official difficulty (7)

User rating (6.2)

rated by 196 players

Rate this Quest!

Keywords

Surge

When an encounter card with the surge keyword is revealed during the staging step of the quest phase or in setup, reveal 1 additional card from the encounter deck. Resolve the surge keyword immediately after resolving any when revealed effects on the card.

Doomed X

If an encounter card with the doomed keyword is revealed during the staging step of the quest phase or in setup, each player must raise his threat level by the specified value.

Rulings

Setup

When setting up Conflict at the Carrock, players are instructed to remove some cards from the encounter deck, and set them aside, out of play. These cards are placed away from the playing area and do not interact with the game until instructed by the cards of the scenario. After removing these cards, players are also instructed to immediately shuffle some of them back into the encounter deck. This may seem confusing at first; it is simply to ensure the proper number of cards are in the encounter deck for the number of players in the game. After being instructed to remove 4 copies of the 'Sacked!' card from the encounter deck, players are asked to shuffle 1 copy of the 'Sacked!' card per player back into the deck. Since there are 5 total copies of 'Sacked!' in the deck, the end result of this is that the game begins with 1 more 'Sacked!' card in the encounter deck than the number of players in the game.

Immune to Player Card Effects

The Carrock, a location card in the encounter deck, has the text "Immune to player card effects." This text means that players cannot select The Carrock as the target of any card effect, and that The Carrock ignores the effect of any player card that would directly interact with it.

Ally Objective Card: Grimbeorn the Old

In this scenario, players may encounter an "ally objective" card, Grimbeorn the Old. If Grimbeorn is revealed from the encounter deck during the quest phase, he enters the staging area as an objective. If the players claim Grimbeorn the Old (as instructed by his card text), he becomes an ally under the control of the first player. The first player may then use Grimbeorn in the same manner he would use any ally he controls. If Grimbeorn the Old leaves play for any reason, the card is placed in the encounter discard pile.

FAQ & Errata

Wargs

Q: When do "after this enemy attacks" Forced effects like those on Chieftan Ufthak (CORE 90) and Wargs (CORE 85) resolve?

A: These effects resolve immediately after step 4 of enemy attack resolution.

Banks of the Anduin

Q: What happens to Banks of the Anduin (CORE 113) if it is drawn as a Shadow card?

A: It will be discarded from play at the end of the combat phase, like other Shadow cards. When a card is drawn as a Shadow card, only its Shadow text is considered to be active.

Against the Trolls

Q: Is Against the Trolls (SoM 32) the final stage of Conflict at the Carrock?

A: Yes.

Sacked!

Q: If a Sacked! (SoM 48) card is placed on a hero while that hero is questing is that hero removed from the quest?

A: No. Sacked! specifies only that the hero cannot commit to the quest, and the hero is already committed. However, the hero cannot commit to quests on future rounds while Sacked! is attached.

Difficulty level

Easy Mode

During step 2 of Setup, "Place Heroes and Set Initial Threat Levels", add one resource to each hero's resource pool. Then remove the following cards:

  • Wilderlands
    • 1x Hill Troll
    • 1x Marsh Adder
    • 2x Despair
  • Journey Down the Anduin
    • 1x Massing at Night
    • 2x Gladden Fields
  • Conflict at the Carrock
    • 2x Muck Adder
    • 2x River Langflood
    • 2x A Frightened Beast
    • 1x Sacked
    • 2x Roasted Slowly

Related Quests

Home

Back

A Journey to Rhosgobel

Official difficulty (6)

User rating (5.8)

rated by 160 players

Rate this Quest!

Keywords

Doomed X

If an encounter card with the doomed keyword is revealed during the staging step of the quest phase or in setup, each player must raise his threat level by the specified value.

Surge

When an encounter card with the surge keyword is revealed during the staging step of the quest phase or in setup, reveal 1 additional card from the encounter deck. Resolve the surge keyword immediately after resolving any when revealed effects on the card.

Guarded

The guarded keyword is a reminder on some objective cards to reveal and attach the next card of the encounter deck to the objective when it enters the staging area from the encounter deck, and place them both in the staging area. The objective cannot be claimed as long as any encounter card is attached. Once that encounter is dealt with, the objective remains in the staging area until it is claimed. If another objective card comes up while attaching a card for the guarded keyword, place the second objective in the staging area, and use the next card of the encounter deck to fulfil the original keyword effect. Enemy and location cards attached to guarded objectives do still count their threat while the enemy or location is in the staging area. An encounter card attached to a guarded objective is dealt with in the following method, depending on its card type:

Once all encounter cards attached to a guarded objective are dealt with, the players can claim the objective in the manner specified by its card text.

Rulings

Ally Objective Card: Wilyador

In this scenario, the players encounter an "ally objective" card, Wilyador, the Eagle. This card has a constant effect that reads, "The first player gains control of Wilyador, as an ally." This means that the first player takes control of Wilyador, and can use him in the same manner he would use any ally he controls. At the end of each round, when the first player token passes to a new player, the new first player also gains control of Wilyador. Wilyador also has the text "no attachments." This means that players cannot play or move attachment cards onto Wilyador. If Wilyador leaves play for any reason, the players have lost the game. Additionally, if the player who controls Wilyador is eliminated, the players have lost the game.

Removed from Game

Players may be instructed to remove cards from the game during this scenario. When a card is removed from the game, it should be set aside and ignored for the rest of the game. Do not place any "removed from game" cards in the discard pile, as effects that bring cards back from the discard pile no longer interact with these cards.

FAQ & Errata

Chieftan Ufthak

Q: When do "after this enemy attacks" Forced effects like those on Chieftan Ufthak (CORE 90) and Wargs (CORE 85) resolve?

A: These effects resolve immediately after step 4 of enemy attack resolution.

Dol Guldur Beastmaster

Should read: "Forced: When Dol Guldur Beastmaster attacks..."

The additional shadow card is dealt when the Dol Guldur Beastmaster is chosen during step 1 of enemy attack resolution.

Caught in a Web

Q: How does a player resolve the situation in which a single hero has multiple copies of Caught in a Web (CORE 80) attached?

A: The player must pay for each copy of Caught in a Web before the hero can ready. Each copy of the card creates an independent condition that must be fulfilled before readying the attached hero, so if each condition is not fulfilled the hero cannot ready. End result, if a hero has two copies of Caught in a Web attached, the player will have to pay 4 resources from that hero's resource pool in order to ready the card.

Return to Rhosgobel

Q: Wilyador (SoM 64) cannot be healed of more than 5 wounds by a single effect, so how do I resolve the "when revealed" text on Return to Rhosgobel 3B (SoM62)?

A: Heal 5 wounds from Wilyador for each Athelas objective card as its own separate action.

Difficulty level

Easy Mode

During step 2 of Setup, "Place Heroes and Set Initial Threat Levels", add one resource to each hero's resource pool. Then remove the following cards:

  • Dol Guldur Orcs
    • 1x Chieftain Ufthak
    • 1x Dol Guldur Beast Master
    • 1x Necromancer's Pass
    • 2x Necromancer's Reach
  • Spiders of Mirkwood
    • 2x Caught in the Web
    • 1x Eyes of the Forest
    • 1x Hummerthorns
  • A Journey to Rhosgobel
    • 3x Exhaustion
    • 3x Swarming Insects
    • 1x Festering Wounds

Related Quests

Home

Back

The Hills of Emyn Muil

Official difficulty (4)

User rating (2.8)

rated by 166 players

Rate this Quest!

Keywords

Doomed X

If an encounter card with the doomed keyword is revealed during the staging step of the quest phase or in setup, each player must raise his threat level by the specified value.

Surge

When an encounter card with the surge keyword is revealed during the staging step of the quest phase or in setup, reveal 1 additional card from the encounter deck. Resolve the surge keyword immediately after resolving any when revealed effects on the card.

Strategy Tip

The Hills of Emyn Muil is played with an extremely location heavy encounter deck, and its single quest card reads "Players cannot defeat this stage unless there are no Emyn Muil locations in play, and they have collected at least 20 victory points." This means that both of these conditions must be met before the players can win the game. (They must also place the single progress token on the quest card itself to do so.)

This may seem to be an impossible task for some players, but the Emyn Muil locations in the encounter deck have victory points, and this allows the players to collect these locations as they are explored. Because of this, the locations will not be going to the encounter discard pile, from which they might resurface later in the game. So remember to collect the victory points, and eventually, the entire Emyn Muil region can be explored!

FAQ & Errata

Chieftan Ufthak

Q: When do "after this enemy attacks" Forced effects like those on Chieftan Ufthak (CORE 90) and Wargs (CORE 85) resolve?

A: These effects resolve immediately after step 4 of enemy attack resolution.

Dol Guldur Beastmaster

Should read: "Forced: When Dol Guldur Beastmaster attacks..."

The additional shadow card is dealt when the Dol Guldur Beastmaster is chosen during step 1 of enemy attack resolution.

Treacherous Fog

Q: If a location is revealed after Treacherous Fog (CORE 118) was revealed during the same quest phase, does the revealed location get +1 from the "When Revealed" effect on Treacherous Fog?

A: Yes. The "When Revealed" effect on Treacherous Fog creates a lasting effect until the end of the phase that affects each location in the staging area. This is different from Driven by Shadow (CORE 92) which uses the language "currently in the staging area" when it is revealed and only affects enemies and locations in the staging area at the time it is revealed.

Amon Lhaw

Q: Are attachments already in play discarded when Amon Lhaw (SoM 84) becomes the active location?

A: No. Attachments only check play restrictions when entering play. Attachments already in play will stay attached.

Difficulty level

Easy Mode

During step 2 of Setup, "Place Heroes and Set Initial Threat Levels", add one resource to each hero's resource pool. Then remove the following cards:

  • Dol Guldur Orcs
    • 1x Chieftain Ufthak
    • 1x Dol Guldur Beast Master
    • 1x Necromancer's Pass
    • 2x Necromancer's Reach
  • Sauron's Reach
    • 2x Eastern Crows
    • 1x Evil Storm
  • The Hills of Emyn Muil
    • 2x The East Wall of Rohan
    • 2x Impassable Chasm
    • 2x Rockslide
    • 1x Orc Horse Thieves

Related Quests

Home

Back

The Dead Marshes

Official difficulty (5)

User rating (4.1)

rated by 154 players

Rate this Quest!

Keywords

Doomed X

If an encounter card with the doomed keyword is revealed during the staging step of the quest phase or in setup, each player must raise his threat level by the specified value.

Surge

When an encounter card with the surge keyword is revealed during the staging step of the quest phase or in setup, reveal 1 additional card from the encounter deck. Resolve the surge keyword immediately after resolving any when revealed effects on the card.

Rulings

Escape Test

The card "Nightfall" reads: "When Revealed: The first player makes an escape test, dealing 2 cards from the encounter deck. If this test is failed, place 1 resource token on Gollum and raise each player's threat by 2."

When this card is revealed, Tom, the first player, decides to commit Éowyn (4 ) to the escape test. Tom has the option of committing more than 1 character, but he does not wish to do so. After committing Éowyn, Tom deals 2 cards from the top of the encounter deck. These cards are the Giant Marsh Worm (which has an escape score of 2, and Through the Mist, which has an escape score of 3). Since the committed of 4 is lower than the total escape score of 5, Tom has failed this escape test. He follows the instructions on the Nightfall card, and places 1 resource token on Gollum and each player's threat raises by 2. Finally, the cards dealt for the escape test are placed in the encounter discard pile.

To make an escape test, a player first commits characters to the test. A character must exhaust to commit to an escape test. Each committed character counts its strength for the test. After committing characters to the test, the players may take actions or play event cards. If a single player is required to make an escape test, only that player may commit characters he controls to the test. If the party is required to make an escape test, all players have the option of committing characters they control to the test. Once the characters are committed, a number of cards (as instructed by the card text dictating the escape test) are dealt from the encounter deck. Many of the cards in this encounter deck have a bold Escape value. Any card that does not have a printed escape value is considered to have a base escape value of zero. When dealing cards for an escape test, ignore all other effects on the dealt cards. Once these cards are dealt, the total committed is compared to the total dealt escape value to determine if the escape test is passed or failed. If the total committed is higher than the total dealt escape value, the escape test is passed, and nothing happens. If the total committed is equal to or lower than the total dealt escape value, the escape test is failed, and the players follow the instructions for failing the escape test from the card that required the test be made. After an escape test, all cards dealt for that test are placed in the encounter discard pile.

Reset the Quest Deck

While playing this scenario, players might be instructed to "reset the quest deck to stage 1B." To do this, the players take the previously defeated stage 1 quest card, and return it to the quest deck as if they are just beginning that stage. Since the quest deck is resetting to stage 1B, the setup instructions on side 1A should not be followed again. Any progress tokens that were on the current quest are removed before the quest deck resets. Progress tokens that were on the active location, however, remain on that location. All other cards, including those in the staging area, remain unchanged.

FAQ & Errata

Treacherous Fog

Q: If a location is revealed after Treacherous Fog (CORE 118) was revealed during the same quest phase, does the revealed location get +1 from the "When Revealed" effect on Treacherous Fog?

A: Yes. The "When Revealed" effect on Treacherous Fog creates a lasting effect until the end of the phase that affects each location in the staging area. This is different from Driven by Shadow (CORE 92) which uses the language "currently in the staging area" when it is revealed and only affects enemies and locations in the staging area at the time it is revealed.

Wargs

Q: When do "after this enemy attacks" Forced effects like those on Chieftan Ufthak (CORE 90) and Wargs (CORE 85) resolve?

A: These effects resolve immediately after step 4 of enemy attack resolution.

Difficulty level

Easy Mode

During step 2 of Setup, "Place Heroes and Set Initial Threat Levels", add one resource to each hero's resource pool. Then remove the following cards:

  • Sauron's Reach
    • 2x Eastern Crows
    • 1x Evil Storm
  • Wilderlands
    • 1x Hill Troll
    • 1x Marsh Adder
    • 2x Despair
  • The Dead Marshes
    • 2x A Wisp of Pale Sheen
    • 2x The Lights of the Dead
    • 2x Giant Marsh Worm
    • 2x Impassable Bog
    • 2x The Heart of the Marshes

Related Quests

Home

Back

Return to Mirkwood

Official difficulty (7)

User rating (7.1)

rated by 135 players

Rate this Quest!

Keywords

Doomed X

If an encounter card with the doomed keyword is revealed during the staging step of the quest phase or in setup, each player must raise his threat level by the specified value.

Surge

When an encounter card with the surge keyword is revealed during the staging step of the quest phase or in setup, reveal 1 additional card from the encounter deck. Resolve the surge keyword immediately after resolving any when revealed effects on the card.

Rulings

Guarding Gollum

During this quest, players are instructed to guard the Gollum objective card. At the beginning of the game, the players choose one player to guard Gollum. This player places the Gollum objective card in front of him to represent that he is guarding it. Various effects in the encounter and quest deck, as well as the effect on Gollum itself, interact with the player who is guarding Gollum.

Once a player is guarding Gollum, that player cannot relinquish the responsibility to another player unless card text allows, or" in some cases" mandates a change. The text on the Gollum objective itself allows the players to choose a new guard at the end of each game round.

The Gollum objective has hit points, and it is possible that he will be destroyed during the quest. If Gollum is destroyed, or leaves play for any reason, the players have lost the game. Gollum cannot be used to attack, defend, or commit to a quest. Otherwise, Gollum is considered an ally character under the control of the player guarding him. Card effects that affect allies do affect him, and any attachment that can be played on an ally can be played on Gollum.

FAQ & Errata

Caught in a Web

Q: How does a player resolve the situation in which a single hero has multiple copies of Caught in a Web (CORE 80) attached?

A: The player must pay for each copy of Caught in a Web before the hero can ready. Each copy of the card creates an independent condition that must be fulfilled before readying the attached hero, so if each condition is not fulfilled the hero cannot ready. End result, if a hero has two copies of Caught in a Web attached, the player will have to pay 4 resources from that hero's resource pool in order to ready the card.

Wargs

Q: When do "after this enemy attacks" Forced effects like those on Chieftan Ufthak (CORE 90) and Wargs (CORE 85) resolve?

A: These effects resolve immediately after step 4 of enemy attack resolution.

Difficulty level

Easy Mode

During step 2 of Setup, "Place Heroes and Set Initial Threat Levels", add one resource to each hero's resource pool. Then remove the following cards:

  • Spiders of Mirkwood
    • 2x Caught in the Web
    • 1x Eyes of the Forest
    • 1x Hummerthorns
  • Wilderlands
    • 1x Hill Troll
    • 1x Marsh Adder
    • 2x Despair
  • Return to Mirkwood
    • 2x The Spider's Ring
    • 1x Gollum's Anguish
    • 1x Gollum's Bite
    • 1x Wasted Provisions
    • 2x Mirkwood Bats
    • 3x Attercop, Attercop

Related Quests

Home

Back

Peril In Pelargir

Official difficulty (5)

User rating (6.5)

rated by 121 players

Rate this Quest!

Keywords

Doomed X

If an encounter card with the doomed keyword is revealed during the staging step of the quest phase or in setup, each player must raise his threat level by the specified value.

Surge

When an encounter card with the surge keyword is revealed during the staging step of the quest phase or in setup, reveal 1 additional card from the encounter deck. Resolve the surge keyword immediately after resolving any when revealed effects on the card.

Archery X

Tom and Kris are playing the scenario "Into Ithilien," and two copies of Southron Mercenaries are in play. Southron Mercenaries has the keyword archery X, where X is the number of players in the game. This gives a cumulative archery value of 4. At the beginning of the combat phase, the players decide to deal 2 damage to Kris' ally Gandalf, and 2 damage to Tom's hero Denethor.

While a card with the archery keyword is in play, players must deal damage to character cards in play equal to the specified archery value at the beginning of each combat phase. This damage can be dealt to characters under any player's control, and it can be divided among the players as they see fit. If there is disagreement as to where to assign archery damage, the first player makes the final decision. If multiple cards with the archery keyword are in play, the effects are cumulative. Remember that does not block archery damage.

Battle

Tom has committed the characters Gandalf and an Ithilien Tracker to the quest card Ambush in Ithilien (1B), which has the battle keyword. When resolving this quest, instead of using his characters' , Tom counts their total . Gandalf has an of 4, and the Ithilien Tracker has an of 1, for a total of 5. Tom compares this total against the in the staging area, which is currently a 3. Tom therefore quests successfully, and makes 2 progress on the quest.

If a quest card has the battle keyword, when characters are committed to that quest, they count their total instead of their total when resolving the quest. Enemies and locations in the staging area still use their in opposition to this quest attempt.

Difficulty level

Easy Mode

During step 2 of Setup, "Place Heroes and Set Initial Threat Levels", add one resource to each hero's resource pool. Then remove the following cards:

  • Streets of Gondor
    • 1x Lost in the City
    • 1x Local Trouble
  • Brigands
    • 1x Umbar Assassin
  • Peril in Pelargir
    • 2x Pelargir Dock

Related Quests

Home

Back

Into the Pit

Official difficulty (5)

User rating (4.8)

rated by 128 players

Rate this Quest!

Keywords

Doomed X

If an encounter card with the doomed keyword is revealed during the staging step of the quest phase or in setup, each player must raise his threat level by the specified value.

Surge

When an encounter card with the surge keyword is revealed during the staging step of the quest phase or in setup, reveal 1 additional card from the encounter deck. Resolve the surge keyword immediately after resolving any when revealed effects on the card.

Rulings

Setup

When setting up "Into the Pit," players are instructed to remove First Hall and Bridge of Khazad-dúm from the encounter deck, and set them aside, out of play. These cards are placed away from the playing area and do not interact with the game until East-gate is explored, which will add First Hall to the staging area. Exploring First Hall will then add Bridge of Khazad-dúm to the staging area.

Cave Torch

This scenario uses the Cave Torch objective card. The first player selects any hero to attach it to, and that hero will bear the Cave Torch for the rest of the game. If Cave Torch would leave play, either through a card effect or due to the hero it is attached to leaving play itself, then it is removed from the game. When a card is removed from the game, it should be set aside and ignored for the rest of the game. Do not place any "removed from game" cards in the discard pile, as effects that bring cards back from the discard pile no longer interact with these cards.

Immune to Card Effects

The location East-gate has the text, "Immune to card effects." This means that East-gate cannot be selected as the target of any card effect, and it ignores the effect of any card that would directlyinteract with it. The only way to place progress tokens on it is by questing, and once East-gate is the active location it remains the active location until it is fully explored (even cards like Dreadful Gap or Strider's Path would not be able to move it to the staging area).

Revealing Enemies

Enemies that are dealt as shadow cards are not considered to be revealed from the encounter deck, and do not trigger the forced response on side 2B of the quest card The Fate of Balin.

Encounter Cards with Actions

An "Action:" on an encounter card in play can be triggered by any player, following normal restrictions on triggering abilities.

Last Player

Some cards refer to the "last player." The last player is considered to be the player sitting directly to the right of the first player. If there is only one player playing, then that player is considered to be both the first and last player.

Difficulty level

Easy Mode

During step 2 of Setup, "Place Heroes and Set Initial Threat Levels", add one resource to each hero's resource pool. Then remove the following cards:

  • Hazards of the Pit
    • 2x Crumbling Ruin
    • 1x Dark and Dreadful
    • 1x Sudden Pitfall
    • 1x Dreadful Gap
  • Goblins of the Deep
    • 3x Watchful Eyes
  • Twists and Turns
    • 2x Branching Paths
    • 2x Zigil Mineshaft
    • 1x Lightless Passage
  • Into The Pit
    • 1x Patrol Leader
    • 3x Signs of Conflict

Related Quests

Home

Back

The Seventh Level

Official difficulty (3)

User rating (4.2)

rated by 117 players

Rate this Quest!

Keywords

Doomed X

If an encounter card with the doomed keyword is revealed during the staging step of the quest phase or in setup, each player must raise his threat level by the specified value.

Surge

When an encounter card with the surge keyword is revealed during the staging step of the quest phase or in setup, reveal 1 additional card from the encounter deck. Resolve the surge keyword immediately after resolving any when revealed effects on the card.

Rulings

Book of Mazarbul

This scenario uses the Book of Mazarbul objective card. If Book of Mazarbul is detached from a hero, either through a card effect or due to the hero it is attached to leaving play, then it returns to the staging area, and can be claimed by any player who triggers its action. A hero can also exhaust to claim Book of Mazarbul even if it is attached to another hero. If Book of Mazarbul is removed from the game, it should be set aside and ignored for the rest of the game.

Last Player

Some cards refer to the "last player." The last player is considered to be the player sitting directly to the right of the first player. If there is only one player playing, then that player is considered to be both the first and last player.

Difficulty level

Easy Mode

During step 2 of Setup, "Place Heroes and Set Initial Threat Levels", add one resource to each hero's resource pool. Then remove the following cards:

  • Goblins of the Deep
    • 3x Watchful Eyes
  • Plundering Goblins
    • 1x Chieftain of the Pit
    • 2x Undisturbed Bones
  • The Seventh Level
    • 1x Cave-troll
    • 1x Orc Horn Blower

Related Quests

Home

Back

Flight from Moria

Official difficulty (7)

User rating (6)

rated by 110 players

Rate this Quest!

Keywords

Doomed X

If an encounter card with the doomed keyword is revealed during the staging step of the quest phase or in setup, each player must raise his threat level by the specified value.

Surge

When an encounter card with the surge keyword is revealed during the staging step of the quest phase or in setup, reveal 1 additional card from the encounter deck. Resolve the surge keyword immediately after resolving any when revealed effects on the card.

Guarded

The guarded keyword is a reminder on some objective cards to reveal and attach the next card of the encounter deck to the objective when it enters the staging area from the encounter deck, and place them both in the staging area. The objective cannot be claimed as long as any encounter card is attached. Once that encounter is dealt with, the objective remains in the staging area until it is claimed. If another objective card comes up while attaching a card for the guarded keyword, place the second objective in the staging area, and use the next card of the encounter deck to fulfil the original keyword effect. Enemy and location cards attached to guarded objectives do still count their threat while the enemy or location is in the staging area. An encounter card attached to a guarded objective is dealt with in the following method, depending on its card type:

Once all encounter cards attached to a guarded objective are dealt with, the players can claim the objective in the manner specified by its card text.

Rulings

Creating the Quest Deck

This scenario uses multiple stage 2 quest cards. When setup instructs players to "Prepare the quest deck," players must shuffle all stage 2 quest cards together randomly, with side 2A face-up, and place them beneath stage 1. These shuffled stage 2 quest cards are considered to be the "quest deck". Players will progress through stage 2 quest cards until they have won the game; there is no stage 3. Quest cards are not flipped to side B immediately when revealed. Rather, the current quest card is revealed only at the beginning of the staging step of the quest phase. The only exception to this are card effects that reveal and flip a new quest card, such as on Hasty Council.

Bypassing a Quest Card

Players are given the option to bypass some of the quest cards at the end of the combat phase. Bypassing the current quest removes all progress tokens on it, and moves it to the bottom of the quest deck with side 2B face down. Bypassing a quest is optional, and players may choose to stay on each quest card instead of bypassing it.When a quest is completed, players will either add it to their victory display or win the game.

The Nameless Fear

The Nameless Fear is an enemy that cannot engage or be engaged by players. The Nameless Fear is also immune to card effects, which means that it cannot be selected as the target of any card effect, and ignores the effect of any card that would directly interact with it. The value "X" as its , and is a constant variable that is immediately recalculated whenever victory points are added or removed from the players' victory display.

Last Player

Some cards refer to the "last player." The last player is considered to be the player sitting directly to the right of the first player. If there is only one player playing, then that player is considered to be both the first and last player.

Immune to Ranged Damage

Great Cave-troll has the text, "Immune to ranged damage." "Immune to ranged damage" means that characters participating in an attack via the ranged keyword are not able to deal damage to that enemy. (If a ranged character participates in an attack against Great Cave-troll through another means than the ranged keyword, then it is able to damage it and will count its .)

Difficulty level

Easy Mode

During step 2 of Setup, "Place Heroes and Set Initial Threat Levels", add one resource to each hero's resource pool. Then remove the following cards:

  • Deeps of Moria
    • 2x Great Cave-troll
    • 1x Orc Drummer
    • 2x Massing in the Deep
  • Hazards of the Pit
    • 2x Crumbling Ruin
    • 1x Dark and Dreadful
    • 1x Sudden Pitfall
    • 1x Dreadful Gap
  • Plundering Goblins
    • 1x Chieftain of the Pit
    • 2x Undisturbed Bones
  • Flight from Moria
    • 2x Shadow of Fear
    • 3x A Foe Beyond

Related Quests

Home

Back

The Redhorn Gate

Official difficulty (6)

User rating (5.4)

rated by 97 players

Rate this Quest!

Keywords

Doomed X

If an encounter card with the doomed keyword is revealed during the staging step of the quest phase or in setup, each player must raise his threat level by the specified value.

Surge

When an encounter card with the surge keyword is revealed during the staging step of the quest phase or in setup, reveal 1 additional card from the encounter deck. Resolve the surge keyword immediately after resolving any when revealed effects on the card.

Rulings

Setup

When setting up "The Redhorn Gate," remove all copies of Snowstorm from the encounter deck, and set them aside, out of play. These cards are placed away from the playing area and do not interact with the game until instructed by the cards of the scenario.

Ally Objective: Arwen Undómiel

In this scenario, the players must guard an "ally objective" card, Arwen Undómiel. This card has a constant effect that reads, "The first player gains control of Arwen Undómiel, as an ally." This means that the first player takes control of Arwen Undómiel, and can use her in the same manner he would use any ally he controls. Other copies of a card titled Arwen Undómiel cannot enter play by any means. At the end of each round, when the first player token passes to a new player, the new first player takes control of Arwen Undómiel.If Arwen Undómiel leaves play for any reason, the players have lost the game. Additionally, if the player who controls Arwen Undómiel is eliminated, the players have lost the game.

Caradhras

Caradhras has the text, "Players cannot travel to Caradhras except by quest card effects." This means that no card effect, other than one on a quest card, can make Caradhras the active location.

FAQ & Errata

Bitter Wind

Q: If I can't discard 3 resources from all of my heroes due to Bitter Wind (KD 56), do I have to partially fulfill the effect?

A: Yes, players should resolve as much of any "discard" effect as they are able to.

Caradhras

Q: If Caradhras (DD 15) is in my victory display when I complete stage 2 of The Redhorn Gate, will it become the active location even though it is not in play?

A: Yes. You will remove Caradhras from your victory display and put it back into play as the active location. Cards in the victory display are not removed from the game and can still be referenced by effects. If players get too far ahead of themselves via card effects, they'll find a return journey is necessary!

Snow Warg

Should read: "Forced: After a character is declared as a defender against Snow Warg..."

Difficulty level

Easy Mode

During step 2 of Setup, "Place Heroes and Set Initial Threat Levels", add one resource to each hero's resource pool. Then remove the following cards:

  • Misty Mountains
    • 1x Mountain Warg
    • 1x Turbulent Waters
  • The Redhorn Gate
    • 2x Rocky Crags
    • 2x Freezing Cold
    • 1x Avalanche
    • 2x Mountain Troll

Related Quests

Home

Back

Road to Rivendell

Official difficulty (4)

User rating (5.2)

rated by 103 players

Rate this Quest!

Keywords

Doomed X

If an encounter card with the doomed keyword is revealed during the staging step of the quest phase or in setup, each player must raise his threat level by the specified value.

Surge

When an encounter card with the surge keyword is revealed during the staging step of the quest phase or in setup, reveal 1 additional card from the encounter deck. Resolve the surge keyword immediately after resolving any when revealed effects on the card.

Ambush

When an enemy with the ambush keyword enters play, each player, starting with the first player and proceeding clockwise, must make an engagement check. The engagement check is only made against the enemy that just entered play, and not other enemies that are in the staging area. If the enemy engages a player as the result of this effect, then no further engagement checks are made against it.

Rulings

Ally Objective: Arwen Undómiel

In this scenario, the players must guard an "ally objective" card, Arwen Undómiel. This card has a constant effect that reads, "The first player gains control of Arwen Undómiel, as an ally." This means that the first player takes control of Arwen Undómiel, and can use her in the same manner he would use any ally he controls. Other copies of a card titled Arwen Undómiel cannot enter play by any means. At the end of each round, when the first player token passes to a new player, the new first player also gains control of Arwen Undómiel.If Arwen Undómiel leaves play for any reason, the players have lost the game. Additionally, if the player who controls Arwen Undómiel is eliminated, the players have lost the game.

FAQ & Errata

Bitter Wind

Q: If I can't discard 3 resources from all of my heroes due to Bitter Wind (KD 56), do I have to partially fulfill the effect?

A: Yes, players should resolve as much of any "discard" effect as they are able to.

Difficulty level

Easy Mode

During step 2 of Setup, "Place Heroes and Set Initial Threat Levels", add one resource to each hero's resource pool. Then remove the following cards:

  • Misty Mountains
    • 1x Mountain Warg
    • 1x Turbulent Waters
  • Plundering Goblins
    • 1x Chieftain of the Pit
    • 2x Undisturbed Bones
  • Road to Rivendell
    • 2x Sleeping Sentry
    • 2x Followed by Night
    • 2x Orc Ambush

Related Quests

Home

Back

The Watcher in the Water

Official difficulty (7)

User rating (6.1)

rated by 93 players

Rate this Quest!

Keywords

Doomed X

If an encounter card with the doomed keyword is revealed during the staging step of the quest phase or in setup, each player must raise his threat level by the specified value.

Surge

When an encounter card with the surge keyword is revealed during the staging step of the quest phase or in setup, reveal 1 additional card from the encounter deck. Resolve the surge keyword immediately after resolving any when revealed effects on the card.

Regenerate X

An enemy with the Regenerate keyword heals damage from itself equal to the specified amount each round. This takes place immediately following the passing of the first player token during the Refresh Phase, and occurs before player actions.

Rulings

Setup

When setting up "The Watcher in the Water," remove The Watcher in the Water and Doors of Durin from the en-counter deck, and set them aside, out of play. These cards are placed away from the playing area and do not interact with the game until instructed by the cards of the scenario.

Doors of Durin

Doors of Durin has the text, "Progress tokens that would be placed on Doors of Durin are instead placed on the current quest card." This means that Doors of Durin can never leave play as an explored location, and in order to collect its victory points players must fulfill the requirement on the card itself.

FAQ & Errata

Bitter Wind

Q: If I can't discard 3 resources from all of my heroes due to Bitter Wind (KD 56), do I have to partially fulfill the effect?

A: Yes, players should resolve as much of any "discard" effect as they are able to.

The Watcher

Q: Can I use Son of Arnor (SoM 15) to engage The Watcher (DD 72), even though The Watcher reads "...cannot be optionally engaged"?

A: Yes. The ability on Son of Arnor does not count as optionally engaging The Watcher. Optional engagement only occurs during step 1 of the Encounter phase

Difficulty level

Easy Mode

During step 2 of Setup, "Place Heroes and Set Initial Threat Levels", add one resource to each hero's resource pool. Then remove the following cards:

  • Misty Mountains
    • 1x Mountain Warg
    • 1x Turbulent Waters
  • The Watcher in the Water
    • 2x Stagnant Creek
    • 1x Ill Purpose
    • 2x Wrapped!
    • 1x Grasping Tentacle
    • 1x Thrashing Tentacle
    • 1x Striking Tentacle

Related Quests

Home

Back

The Long Dark

Official difficulty (7)

User rating (3.7)

rated by 101 players

Rate this Quest!

Keywords

Doomed X

If an encounter card with the doomed keyword is revealed during the staging step of the quest phase or in setup, each player must raise his threat level by the specified value.

Surge

When an encounter card with the surge keyword is revealed during the staging step of the quest phase or in setup, reveal 1 additional card from the encounter deck. Resolve the surge keyword immediately after resolving any when revealed effects on the card.

Rulings

Locate Test

The card "Vast and Intricate" reads: " When Revealed: The first player makes a locate test. If this test is failed, raise each player's threat by 7, remove all progress tokens from play, and trigger all "Lost:" effects in play."

When this card is revealed, Eric, the first player, must make a locate test. He can choose to fail the test immediately by not discarding any cards from his hand, but decides to try and beat it. He discards 1 card from his hand and discards the top card of the encounter deck. It did not have a bold " PASS " printed in its text box, and so he did not pass the locate test. He decides to try again, discarding another card from his hand. This time the discarded encounter card does have " PASS "printed in its text box, and so Eric has passed the test. He ignores the "If" statement on "Vast and Intricate" and the card is discarded with no further effect.

While playing this scenario, players are at times instructed to make a "Locate Test". These tests represent the heroes' attempts to maintain a sense of direction in the mines. A locate test is made by a single player, as specified by the card initiating the test. The player making the locate test may choose and discard 1 card from his hand to discard the top card of the encounter deck. Many of the cards in The Long Dark encounter deck have a bold "PASS" printed in the bottom right hand corner of their text box. If the discarded encounter card has "PASS" printed in its text box, then the test succeeds, and no ill effects trigger. If the card does not have "PASS" printed in its text box, then the player has not succeeded, but may attempt the test again, repeating this action until either the test is successful or he no longer wishes (or is able to) discard more cards. If a player runs out of cards or declares that he is not willing to discard any more cards to the test, then the test is considered a failure, and players should follow the rest of the instructions on the card that initiated the test.

Cave Torch

This scenario uses the Cave Torch objective card. During setup the first player selects any hero to attach it to, and that hero bears the Cave Torch for the rest of the game. If Cave Torch would leave play, then it is removed from the game. Do not place any "removed from game" cards in the discard pile, as effects that bring cards back from the discard pile no longer interact with these cards.

Next Player

The next player is the player sitting directly to the left of the player referenced by the card effect. If there are no other players in the game, there is no next player.

"Lost:" Effects

Some cards have "Lost:" effects on them. These effects are only triggered by other card effects, and are not tied to any timing structure or phase of the game.

Immune to Ranged Damage

Great Cave-troll has the text, "Immune to ranged damage." "Immune to ranged damage" means that characters participating in an attack via the ranged keyword are not able to deal damage to that enemy. (If a ranged character participates in an attack against Great Cave-troll through another means than the ranged keyword, then it is able to damage it and will count its .)

Difficulty level

Easy Mode

During step 2 of Setup, "Place Heroes and Set Initial Threat Levels", add one resource to each hero's resource pool. Then remove the following cards:

  • Deeps of Moria
    • 2x Great Cave-troll
    • 1x Orc Drummer
    • 2x Massing in the Deep
  • Twists and Turns
    • 2x Branching Paths
    • 2x Zigil Mineshaft
    • 1x Lightless Passage
  • The Long Dark
    • 3x Foul Air
    • 1x Gathering Ground
    • 1x Vast and Intricate
    • 1x Goblin Warlord

Related Quests

Home

Back

Foundations of Stone

Official difficulty (6)

User rating (5.9)

rated by 89 players

Rate this Quest!

Keywords

Doomed X

If an encounter card with the doomed keyword is revealed during the staging step of the quest phase or in setup, each player must raise his threat level by the specified value.

Surge

When an encounter card with the surge keyword is revealed during the staging step of the quest phase or in setup, reveal 1 additional card from the encounter deck. Resolve the surge keyword immediately after resolving any when revealed effects on the card.

Rulings

Setup

This scenario uses the Cave Torch objective card. During setup the first player selects any hero to attach it to, and that hero bears the Cave Torch for the rest of the game. If the Cave Torch would leave play, then it is removed from the game. During setup players should not shuffle the Foundations of Stone encounter set into the encounter deck, but set it aside, out of play. This encounter set will be shuffled into the encounter deck at a later point in the scenario.

Creating a Staging Area

When instructed to "Create your own staging area," each player sets aside an area in front of himself to serve as his own private staging area. Only players that share a common staging area can interact with each other in any way. Players continue to resolve each phase of the game in turn order, starting with the First Player (which continues to move), but the resolution of each phase occurs as if only the player or players that share any given staging area are currently present in the game.

Joining Another Player

On stage 4B players are instructed to "join another player" after completing their current quest card. Joining another player happens at the beginning of the travel phase. The joining player(s) must add any encounter cards in his own staging area to the staging area of the player(s) he is joining with, keeping any enemies engaged with him and discarding any active location in the staging area being left. If multiple players complete their current quest card during the same phase, they join quests starting with the First Player and proceeding clockwise around the table. If there is no player to join, then players must continue to stage 5.

Encounter Cards with Actions

An "Action:" on an encounter card in play can be triggered by any player, following normal restrictions on triggering abilities.

FAQ & Errata

Below the Mines/Sheltered Rocks

Q: When players have separate staging areas at stage 4 of Foundations of Stone, can there be multiple copies of unique cards in play?

A: No. Players must still respect the rules for playing unique cards when they are split up. For example, if a player has Gandalf (CORE 73) in play, then no other player can play Gandalf.

Lost and Alone

Q: How does the card Lost and Alone (DD 124) work? What if the hero gets attached to a Nameless Thing (DD 125) or was my last hero in play?

A: You only put the lost hero back into play if you draw the hero, whether during the resource phase or through a card effect. If the hero is discarded or attached to a card like a Nameless Thing, then treat it like any other card. In the latter situation, the value of the hero would be null, since it has no printed cost. If your last hero gets shuffled into your deck you are not eliminated from the game; heroes are not considered to be killed unless they are in your discard pile. You will continue playing until you either draw the hero, are eliminated through other means, or the game ends.

Nameless Thing

Q: If a card is attached to Nameless Thing (D 125) as part of the resolution of its Forced effect, is that card's game text active?

A: No. Cards that are attached to Nameless Thing (or Elder Nameless Thing) as a result of triggering its Forced effect are considered attachments with no card title or game text. The only active part of the attached card is its cost.

Difficulty level

Easy Mode

During step 2 of Setup, "Place Heroes and Set Initial Threat Levels", add one resource to each hero's resource pool. Then remove the following cards:

  • Hazards of the Pit
    • 2x Crumbling Ruin
    • 1x Dark and Dreadful
    • 1x Sudden Pitfall
    • 1x Dreadful Gap
  • Goblins of the Deep
    • 3x Watchful Eyes
  • Twists and Turns
    • 2x Branching Paths
    • 2x Zigil Mineshaft
    • 1x Lightless Passage
  • Foundations of Stone
    • 2x Lost and Alone
    • 2x Nameless Thing
    • 2x Elder Nameless Thing

Related Quests

Home

Back

Shadow and Flame

Official difficulty (8)

User rating (7.6)

rated by 98 players

Rate this Quest!

Keywords

Doomed X

If an encounter card with the doomed keyword is revealed during the staging step of the quest phase or in setup, each player must raise his threat level by the specified value.

Surge

When an encounter card with the surge keyword is revealed during the staging step of the quest phase or in setup, reveal 1 additional card from the encounter deck. Resolve the surge keyword immediately after resolving any when revealed effects on the card.

Indestructible

An enemy with the Indestructible keyword cannot be destroyed by damage, even when it has damage on it equal to its hit points.

Rulings

Durin's Bane

Durin's Bane stays in the staging area and is considered to be engaged with all players whose threat is 1 or greater, allowing it to both add its threat to the staging area and attack. Durin's Bane attacks each player it is engaged with once during that player's normal enemy attack resolution step. (One shadow card per engaged player should be dealt to Durin's Bane at the beginning of combat.) Each shadow card is only be used once, and is immediately discarded after that attack is completed (so Durin's Bane does not receive benefits from more than one shadow card at a time). If a player whose threat is not 1 or greater has his threat raised during combat, then Durin's Bane attacks him if he has not completed the attack resolution step (but Durin's Bane is not dealt a shadow card).Players can attack Durin's Bane following the normal combat rules. Players cannot pool their attacks together against Durin's Bane without the use of the ranged keyword or a similar card effect.

Unique Encounter Cards

A unique encounter card (such as "Fiery Sword" and "Whip of Many Thongs") cannot enter play if there is another copy of that card already in play. If this is the case, the card's effects are ignored and the encounter card is placed in the encounter discard pile.

Immune to Ranged Damage

Great Cave-troll has the text, "Immune to ranged damage." "Immune to ranged damage" means that characters participating in an attack via the ranged keyword are not able to deal damage to that enemy. (If a ranged character participates in an attack against Great Cave-troll through another means than the ranged keyword, then it is able to damage it and will count its .)

Difficulty level

Easy Mode

During step 2 of Setup, "Place Heroes and Set Initial Threat Levels", add one resource to each hero's resource pool. Then remove the following cards:

  • Deeps of Moria
    • 2x Great Cave-troll
    • 1x Orc Drummer
    • 2x Massing in the Deep
  • Goblins of the Deep
    • 3x Watchful Eyes
  • Shadow and Flame
    • 2x Fires in the Deep
    • 2x Counter-Spell
    • 2x Leaping Flame

Related Quests

Home

Back

Into Ithilien

Official difficulty (4)

User rating (7.8)

rated by 142 players

Rate this Quest!

Keywords

Doomed X

If an encounter card with the doomed keyword is revealed during the staging step of the quest phase or in setup, each player must raise his threat level by the specified value.

Surge

When an encounter card with the surge keyword is revealed during the staging step of the quest phase or in setup, reveal 1 additional card from the encounter deck. Resolve the surge keyword immediately after resolving any when revealed effects on the card.

Archery X

Tom and Kris are playing the scenario "Into Ithilien," and two copies of Southron Mercenaries are in play. Southron Mercenaries has the keyword archery X, where X is the number of players in the game. This gives a cumulative archery value of 4. At the beginning of the combat phase, the players decide to deal 2 damage to Kris' ally Gandalf, and 2 damage to Tom's hero Denethor.

While a card with the archery keyword is in play, players must deal damage to character cards in play equal to the specified archery value at the beginning of each combat phase. This damage can be dealt to characters under any player's control, and it can be divided among the players as they see fit. If there is disagreement as to where to assign archery damage, the first player makes the final decision. If multiple cards with the archery keyword are in play, the effects are cumulative. Remember that does not block archery damage.

Battle

Tom has committed the characters Gandalf and an Ithilien Tracker to the quest card Ambush in Ithilien (1B), which has the battle keyword. When resolving this quest, instead of using his characters' , Tom counts their total . Gandalf has an of 4, and the Ithilien Tracker has an of 1, for a total of 5. Tom compares this total against the in the staging area, which is currently a 3. Tom therefore quests successfully, and makes 2 progress on the quest.

If a quest card has the battle keyword, when characters are committed to that quest, they count their total instead of their total when resolving the quest. Enemies and locations in the staging area still use their in opposition to this quest attempt.

Siege

If a quest card has the siege keyword, when characters are committed to that quest, they count their total instead of their total when resolving the quest. Enemies and locations in the staging area still use their in opposition to this quest attempt.

Rulings

Ally Objective Cards

Players may encounter up to 3 ally objective cards in this scenario, Celador and the 2 copies of Ithilien Guardian. An ally objective card is considered to be both an objective and an ally. The text effects of each of these cards commits it to the quest when it is in the staging area. This means that these cards count their stats and assist the players when resolving a quest. Any card effect that affects characters committed to the quest can also affect these ally objective cards.If an effect allows the players to take control of any of these objective ally cards, it is moved into the controlling player's play area. Once there, they can use it the same as any other ally. When this occurs, the card is no longer considered to be in the staging area, and is no longer committed to the quest (unless its controller commits it during the quest phase).

FAQ & Errata

Blocking Wargs

Should read: "Surge. When Revealed: Deal 1 damage to each character committed to the quest."

Omit the parenthetical.

Difficulty level

Easy Mode

During step 2 of Setup, "Place Heroes and Set Initial Threat Levels", add one resource to each hero's resource pool. Then remove the following cards:

  • Brooding Forest
    • 2x Overgrown Trail
    • 2x Lost Companion
  • Creatures of the Forest
    • 2x Watcher in the Wood
    • 2x Morgul Spider
  • Southrons
    • 2x Southron Support
    • 1x Múmak
  • Into Ithilien
    • 2x Blocking Wargs

Related Quests

Home

Back

The Siege of Cair Andros

Official difficulty (7)

User rating (8.1)

rated by 126 players

Rate this Quest!

Keywords

Doomed X

If an encounter card with the doomed keyword is revealed during the staging step of the quest phase or in setup, each player must raise his threat level by the specified value.

Surge

When an encounter card with the surge keyword is revealed during the staging step of the quest phase or in setup, reveal 1 additional card from the encounter deck. Resolve the surge keyword immediately after resolving any when revealed effects on the card.

Archery X

Tom and Kris are playing the scenario "Into Ithilien," and two copies of Southron Mercenaries are in play. Southron Mercenaries has the keyword archery X, where X is the number of players in the game. This gives a cumulative archery value of 4. At the beginning of the combat phase, the players decide to deal 2 damage to Kris' ally Gandalf, and 2 damage to Tom's hero Denethor.

While a card with the archery keyword is in play, players must deal damage to character cards in play equal to the specified archery value at the beginning of each combat phase. This damage can be dealt to characters under any player's control, and it can be divided among the players as they see fit. If there is disagreement as to where to assign archery damage, the first player makes the final decision. If multiple cards with the archery keyword are in play, the effects are cumulative. Remember that does not block archery damage.

Siege

If a quest card has the siege keyword, when characters are committed to that quest, they count their total instead of their total when resolving the quest. Enemies and locations in the staging area still use their in opposition to this quest attempt.

Battle

Tom has committed the characters Gandalf and an Ithilien Tracker to the quest card Ambush in Ithilien (1B), which has the battle keyword. When resolving this quest, instead of using his characters' , Tom counts their total . Gandalf has an of 4, and the Ithilien Tracker has an of 1, for a total of 5. Tom compares this total against the in the staging area, which is currently a 3. Tom therefore quests successfully, and makes 2 progress on the quest.

If a quest card has the battle keyword, when characters are committed to that quest, they count their total instead of their total when resolving the quest. Enemies and locations in the staging area still use their in opposition to this quest attempt.

Rulings

Damage on Locations

Some effects in this scenario instruct players to place damage on specific locations. Such damage is separate from any progress placed on the location, and does not count toward the amount of progress necessary to explore the location. (Likewise, progress placed on a location is not considered damage.) The damage does nothing in and of itself, but is referenced by card effects. When quest stage 1, The Defense, is active, damage dealt to the lowest threat location from an undefended attack does not carry-over to the next Battleground location.

Removing Quest Stages

Tom and Kris have just defeated stage 2, Reinforcing the Banks. Stage 3, Breakthrough at the Approach, has previously been removed from the quest deck. Tom and Kris advance to stage 4, Breakthrough at the Citadel.

In this scenario, players may be instructed to remove a stage from the quest deck. This is done by taking the stage out of the quest deck and setting it aside, away from the play area. The removed stage is no longer considered a part of the scenario deck, and the players are that much closer to completing the scenario. If the players defeat a stage of the quest and the following stage has been removed, they advance to the next numerically sequential stage that remains in the quest deck.

FAQ & Errata

The Power of Mordor

Should read: "...Reveal an equal number of cards from the encounter deck..." Omit the word "Then"

Difficulty level

Easy Mode

During step 2 of Setup, "Place Heroes and Set Initial Threat Levels", add one resource to each hero's resource pool. Then remove the following cards:

  • Southrons
    • 2x Southron Support
    • 1x Múmak
  • Ravaging Orcs
    • 3x Orc Rabble
  • Mordor Elite
    • 2x The Master's Malice
    • 2x Orc War Camp
    • 2x Orc Vanguard
  • The Siege of Cair Andros
    • 1x Siege Raft
    • 1x Battering Ram
    • 1x Orc Scramblers

Related Quests

Home

Back

We Must Away, Ere Break of Day

User rating (6.4)

rated by 108 players

Rate this Quest!

Keywords

Doomed X

If an encounter card with the doomed keyword is revealed during the staging step of the quest phase or in setup, each player must raise his threat level by the specified value.

Surge

When an encounter card with the surge keyword is revealed during the staging step of the quest phase or in setup, reveal 1 additional card from the encounter deck. Resolve the surge keyword immediately after resolving any when revealed effects on the card.

Sack X

Jennifer has just engaged the enemy card, Bert, triggering its Sack 1 keyword. She draws the top card of the sack deck and reveals A Strong Sack. Its text reads:

"When Sacked: Attach to the character (excluding Gandalf) with the highest printed without a Sack attached."

The character with the highest is Beorn. However, Beorn's game text says: "Cannot have attachments." Therefore, he is not an eligible target. So Jennifer must find an eligible target.

The next highest printed is a tie between Gimli and Thalin who both have 2 . Because Jennifer is the first player, she must decide which character to be the target. So she chooses to attach A Strong Sack to Thalin.

The keyword "Sack X" is a new keyword in this quest that instructs the players to draw cards from the sack deck. When the keyword Sack Xis triggered by the encounter deck, the first player draws the top X cards from the sack deck and resolves the "When Sacked" effects on those cards. If players are instructed to draw multiple cards from the sack deck, those cards are drawn and resolved one at a time.

If the Sack X keyword is triggered and there are no cards remaining in the sack deck, the Sack X effect is ignored. If a Sack card leaves play for any reason, shuffle it back into the sack deck.When resolving the "when sacked" text on a sack card, if there are two or more eligible targets for that card the first player must choose one.

If a sack card instructs players to select a target that is not eligible, the first player must choose an eligible target. If there are no eligible targets, shuffle the Sack card back into the sack deck.

Rulings

The Sack Deck

This scenario is played with a separate deck called the "sack deck." During setup, remove the seven Sack objectives (card numbers 44-50) from the encounter deck and shuffle them to create this deck.

FAQ & Errata

Troll Purse

Should read: "If Troll Purse is discarded, add it to the staging area. If Troll Purse is unattached and in the staging area, attach it to a Troll enemy, if able."

Troll Key

Should read: "If Troll Key is discarded, add it to the staging area. If Troll Key is unattached and in the staging area, attach it to a Troll enemy, if able."

Difficulty level

Easy Mode

During step 2 of Setup, "Place Heroes and Set Initial Threat Levels", add one resource to each hero's resource pool. Then remove the following cards:

  • Western Lands
    • 2x No Campfire
    • 1x Wind-whipped Rain
    • 1x Dreary Hills
  • We Must Away, Ere Break of Day
    • 2x Troll Camp
    • 2x Lots or None at All
    • 3x Hungry Troll
    • 1x Roast 'Em or Boil 'Em?

Related Quests

Home

Back

Over the Misty Mountains Grim

User rating (5.5)

rated by 89 players

Rate this Quest!

Keywords

Doomed X

If an encounter card with the doomed keyword is revealed during the staging step of the quest phase or in setup, each player must raise his threat level by the specified value.

Surge

When an encounter card with the surge keyword is revealed during the staging step of the quest phase or in setup, reveal 1 additional card from the encounter deck. Resolve the surge keyword immediately after resolving any when revealed effects on the card.

Rulings

Active and Inactive Encounter Decks

Unlike most scenarios that use a single encounter deck, this scenario uses twoencounter decks. At the beginning of the game, players shuffle the Over the Misty Mountains Grim and Western Lands cards into one deck and the Misty Mountain Goblins andThe Great Goblin cards into a second deck. This second deck is set aside, inactive. Players cannot interact with the inactive encounter deck unless they are instructed to make it the active encounter deck by a quest effect. The active encounter deck is the encounter deck that is in play. Cards and game effects that interact with the encounter deck only affect the active encounter deck.If a quest card effect causes the second encounter deck to become the active encounter deck, all encounter cards currently in play and in the encounter discard pile are also removed from the game along with the first encounter deck. These cards have become inactive and are set aside.

Difficulty level

Easy Mode

During step 2 of Setup, "Place Heroes and Set Initial Threat Levels", add one resource to each hero's resource pool. Then remove the following cards:

  • Western Lands
    • 2x No Campfire
    • 1x Wind-whipped Rain
    • 1x Dreary Hills
  • Misty Mountain Goblins
    • 2x Goblin Runners
    • 3x Grip, grab! Pinch, nab!
    • 1x The Goblins' Caves
  • The Great Goblin
    • 1x Front Porch
    • 2x Chaos in the Cavern
  • Over the Misty Mountains Grim
    • 2x Stone-giant
    • 3x Galloping Boulders

Related Quests

Home

Back

Dungeons Deep and Caverns Dim

User rating (6.3)

rated by 70 players

Rate this Quest!

Keywords

Doomed X

If an encounter card with the doomed keyword is revealed during the staging step of the quest phase or in setup, each player must raise his threat level by the specified value.

Surge

When an encounter card with the surge keyword is revealed during the staging step of the quest phase or in setup, reveal 1 additional card from the encounter deck. Resolve the surge keyword immediately after resolving any when revealed effects on the card.

Rulings

Setup

At the beginning of the Dungeons Deep and Caverns Dimscenario, players are instructed to create a "riddle area" with stage 2A of the quest deck. Both quest cards are in play simultaneously as explained below.

The Riddle Area

Stage 1A instructs players to create a riddle area. The riddle area is a play area, separate from the staging area, that represents Bilbo's riddling contest against Gollum. The riddle area consists of stage 2 of the quest deck, Riddles in the Dark, as well as the Gollum enemy card and the Bilbo's Magic Ring objective card. Bilbo Baggins is also placed in the riddle area when setting up this scenario.

Cards in the riddle area (including Bilbo Baggins) are immune to player card effects and cannot leave the riddle area except through specific quest card effects. While Gollum is in the riddle area, he does not contribute his threat during the quest phase and cannot be engaged by the players. While Bilbo Baggins is in the riddle area, the first player still controls him; however, he cannot quest, attack, take damage from cards other than Gollum, have attachments played on him by the players, or defend (except against Gollum).

Riddles

Tom has committed his heroes to the quest Out of the Frying Pan. The first encounter card he reveals is Wild Wargs which has a riddle effect. Tom is the first player so he has to choose between adding Wild Wargs to the staging area or answering the riddle on the card. He chooses to answer the riddle which reads: "Riddle: The first player names a card type, shuffles his deck, and discards the top 2 cards. For each of those cards that matches, place 1 progress on stage 2."

Tom names the ally card type, shuffles his deck, and discards 2 cards from the top of his deck. He discards the cards: Sneak Attack (event) and Cram (attachment). Since he did not discard an ally card, he does not have any matches. This would trigger Gollum's game text which reads:"Forced: After the first player answers a riddle and fails to find at least 1 match, Gollum attacks Bilbo Baggins."However, Tom decides to use the text on Bilbo's Magic Ring, which reads: "Action: When attempting to answer a riddle, spend 1 resource to discard an additional card."

Bilbo Baggins has 2 resources in his resource pool, so Tom spends 1 to discard an additional card from his deck, which is A Test of Will (event). Tom still has not met the requirements of the riddle, so he spends the last resource from Bilbo Baggins' resource pool to discard yet another card from his deck, which is Erebor Hammersmith (ally). Now Tom has 1 match, so he places 1 progress token on Riddles in the Dark. After answering the riddle, Tom places the Wild Wargs card in the encounter discard pile. Since Tom did find a match, Gollum does not attack Bilbo Baggins at this time.

"Riddle" is a new game effect featured on some encounter cards. When an encounter card with a riddle effect is revealed from the encounter deck, the first player must choose between resolving that card normally or answering the riddle on that card. The first player can only choose to answer a riddle if it is revealed from the encounter deck. If a card with riddle is dealt as a shadow card, the first player cannot choose to answer it at that time.

To answer a riddle,the first player must follow the directions printed on the riddle, in the following steps:

Step 1- Each riddle effect begins with the text, "The first player names a ___." The first player makes a guess based on the item(s) he is instructed (by the riddle) to name: card type, sphere, or cost. Card types that can be named are ally, event, attachment, or treasure. The spheres that can be named are leadership, spirit, lore, tactics, and Baggins. Cost can be any number.

Step 2- The second part of a riddle is presented by the text, "shuffles his deck and discards the top X cards of his deck." The first player shuffles his deck and then discards X cards from the top of his deck, as determined by the riddle.

Step 3- The final part of a riddle effect is presented by the text, "For each of those cards that matches, place 1 progress on stage 2." The first player places 1 progress on stage 2 for each card discarded by the riddle effect that matches the named card type / sphere / cost from step 1. When instructed to name multiple items, a "match" is defined by a card that features each of the named items.

FAQ & Errata

Riddles in the Dark

Q: While attempting to answer a Riddle in the scenario Dungeons Deep and Caverns Dim, when can players take actions?

A: Players can take actions after step 2, before step 3.

Difficulty level

Easy Mode

During step 2 of Setup, "Place Heroes and Set Initial Threat Levels", add one resource to each hero's resource pool. Then remove the following cards:

  • Misty Mountain Goblins
    • 2x Goblin Runners
    • 3x Grip, grab! Pinch, nab!
    • 1x The Goblins' Caves
  • Dungeons Deep and Caverns Dim
    • 1x Great Gray Wolf
    • 1x Hiding in the Trees
    • 1x Come down little bird

Related Quests

Home

Back

Flies and Spiders

User rating (6.1)

rated by 55 players

Rate this Quest!

Keywords

Doomed X

If an encounter card with the doomed keyword is revealed during the staging step of the quest phase or in setup, each player must raise his threat level by the specified value.

Surge

When an encounter card with the surge keyword is revealed during the staging step of the quest phase or in setup, reveal 1 additional card from the encounter deck. Resolve the surge keyword immediately after resolving any when revealed effects on the card.

Venom

Bombur already has 4 poison cards attached when he is exhausted to defend the Wicked Spider, and takes 1 damage. Because Wicked Spider has the Venom keyword, Bombur's controller must give him 1 poison. Bombur now has 5 poison which is equal to his printed hit points. So, his controller rotates Bombur 180 degrees and places all 5 poison cards that were attached to him face-up in his discard pile.

When an enemy with the Venom keyword damages a character, that character's controller must give it 1 poison. This is done by taking the top card of his deck and attaching it facedown to that character. Facedown cards attached to characters are considered "poison." Poison cards are Condition attachments, and characters with any number of poison attached are considered "poisoned."

Rulings

Unconscious Characters

In this scenario, when a character has a number of poison attached equal to its printed hit points, that character is immediately made unconscious. This is done by rotating the character card 180 degrees. After a character is made unconscious, the attached poison cards are placed in their owner's discard pile. Each stage of the Flies and Spiders scenario includes the following game text: "Unconscious characters cannot quest, attack, defend, collect resources, trigger abilities, be poisoned, or ready (except by effects that target unconscious characters)." These characters have been incapacitated by the spiders.

If any number of poison is removed from a character, or that character leaves play, then those poison cards are placed in their owner's discard pile.

Ready an Unconscious Character

When a card effect instructs a player to "ready an unconscious character," that player chooses an unconscious character and rotates that character 180 degrees so that it appears in its ready position. That character is now ready and is no longer considered to be unconscious.

Creating a Staging Area

On stage 2B the players are instructed to "Reveal stage 3 and create a separate staging area for the first player using that stage." To do this the first player sets aside an area in front of himself to serve as his own private staging area. The rest of the players continue to share the original staging area. Only players that share a common staging area can interact with each other in any way. Players continue to resolve each phase of the game in turn order, starting with the first player, but the resolution of each phase occurs as if only the player or players that share any given staging area are currently present in the game.

Combining Staging Areas

Stage 3B reads: "When this stage is complete, do not advance to stage 4 until the end of the quest phase. (Combine staging areas if necessary.)" When the first player places the final progress on this stage he must wait until the end of the quest phase to advance in order to allow the other players to resolve their quest phase. Then, the first player joins the other players at stage 4. Any enemy or location cards in the first player's staging area are added to the original staging area. Any enemies engaged with the first player remain engaged with that player when the staging areas are combined.

FAQ & Errata

Crazy Cob

Q: If there are no characters with poison attached when Crazy Cob (OtD 29) is revealed from the encounter deck, does it still make an attack?

A: Yes. Since each character has 0 poison, the first player will choose which character Crazy Cob attacks.

Lost in the Dark

Should read: "When Revealed: Reveal stage 3 and create a separate staging area for the first player using that stage. If there are no other players in the game, discard this stage and each card in its staging area. All other players advance to stage 4."

Difficulty level

Easy Mode

During step 2 of Setup, "Place Heroes and Set Initial Threat Levels", add one resource to each hero's resource pool. Then remove the following cards:

  • Wilderland
    • 2x Fighting Among Friends
    • 1x Weighed Down
  • Flies and Spiders
    • 1x Giant Web
    • 2x Old Tomnoddy
    • 1x Fat Spider
    • 2x Lazy Lob
    • 1x Crazy Cob
    • 2x Poisoned by Spiders

Related Quests

Home

Back

The Lonely Mountain

User rating (7)

rated by 61 players

Rate this Quest!

Keywords

Doomed X

If an encounter card with the doomed keyword is revealed during the staging step of the quest phase or in setup, each player must raise his threat level by the specified value.

Surge

When an encounter card with the surge keyword is revealed during the staging step of the quest phase or in setup, reveal 1 additional card from the encounter deck. Resolve the surge keyword immediately after resolving any when revealed effects on the card.

Indestructible

An enemy with the Indestructible keyword cannot be destroyed by damage, even when it has damage on it equal to its hit points.

Rulings

Burgle

Karl is first player when he quests successfully at stage 2B, whcih reads: "Forced: After questing successfully, place 1 progress on Smaug the Golden. Then, the first player makes a burgle attempt. If successful, the first player takes the top treasure card from under The Lonely Mountain into his hand. Then, the players may advance to stage 3." So, Karl discards the top card of the encounter deck: Dark Bats. It has no burgle effect, so again he discards the top card of the encounter deck: Desolation of Smaug. It has a burgle effect that reads: "Burgle: The first player shuffles his deck and reveals the top card. He may discard 2 cards from his hand that match the revealed card's cost." Karl reveals Great Yew Bow, with a cost of 2. He only has 1 card in his hand with a cost of 2, so he decides to use the text on The Lonely Mountain: " Action: When making a burgle attempt, the first player may spend 2 resources to take the revealed card into hand and reveal the next card." Karl removes 2 resources from Bilbo Baggins' resource pool to take Great Yew Bow into his hand and reveals the next card of his deck: King Under the Mountain, with cost of 2. (This is now the revealed card.) He now has 2 cards in his hand that match the revealed card's cost, so he discards them both to burgle successfully and take the topmost treasure card from under The Lonely Mountain into his hand.

"Burgle" is a new game effect featured on some encounter cards in The Lonely Mountain. Burgle effects are ignored except while making a "burgle attempt." Burgle attempts represent Bilbo Baggins' efforts to sneak past Smaug in order to steal treasure from the dragon's lair without waking him. To make a burgle attempt, the first player must follow these steps:

Step 1 - When a card instructs the first player to make a burgle attempt, he must discard cards from the top of the encounter deck until a card with a burgle effect is discarded. Read and resolve the burgle effect as outlined in steps 2 and 3.

Step 2 - The first player shuffles his deck and reveals the top card. If the first player has no cards left in his deck, then the burgle attempt automatically fails.

Step 3 - Each burgle effect instructs the first player to discard a number of cards that match either the revealed card's sphere, type, cost, or a combination of those things. If the first player discards the required cards from his hand, the burgle attempt is successful. If he cannot, the burgle attempt fails.

FAQ & Errata

Secret Entrance

Should read: "Then, look at the top card of the encounter deck. If the looked at card is not..."

The Burglar's Turn

Q: While making a Burgle attempt in The Lonely Mountain scenario, when can players take actions?

A: Players can take actions after step 2, before step 3.

Difficulty level

Easy Mode

During step 2 of Setup, "Place Heroes and Set Initial Threat Levels", add one resource to each hero's resource pool. Then remove the following cards:

  • Wilderland
    • 2x Fighting Among Friends
    • 1x Weighed Down
  • The Lonely Mountain
    • 3x Great Hall
    • 3x Pretending to Sleep
    • 2x Dragon-Spell

Related Quests

Home

Back

The Battle of Five Armies

User rating (7.2)

rated by 58 players

Rate this Quest!

Keywords

Doomed X

If an encounter card with the doomed keyword is revealed during the staging step of the quest phase or in setup, each player must raise his threat level by the specified value.

Surge

When an encounter card with the surge keyword is revealed during the staging step of the quest phase or in setup, reveal 1 additional card from the encounter deck. Resolve the surge keyword immediately after resolving any when revealed effects on the card.

Battle

Tom has committed the characters Gandalf and an Ithilien Tracker to the quest card Ambush in Ithilien (1B), which has the battle keyword. When resolving this quest, instead of using his characters' , Tom counts their total . Gandalf has an of 4, and the Ithilien Tracker has an of 1, for a total of 5. Tom compares this total against the in the staging area, which is currently a 3. Tom therefore quests successfully, and makes 2 progress on the quest.

If a quest card has the battle keyword, when characters are committed to that quest, they count their total instead of their total when resolving the quest. Enemies and locations in the staging area still use their in opposition to this quest attempt.

Siege

If a quest card has the siege keyword, when characters are committed to that quest, they count their total instead of their total when resolving the quest. Enemies and locations in the staging area still use their in opposition to this quest attempt.

Rulings

Multiple Stages in Play

When playing The Battle of Five Armies, stages 2, 3, and 4 will be in play at the same time. While each stage is in play, its game text is active.

Current Quest Stage

At the beginning of each round, before players have collected resources, the first player must decide which stage will be the current quest stage for that round. Progress cannot be placed on any quest stage except for the current quest stage, and any card effects that affect the current quest can only affect the quest stage chosen for that round.

Difficulty level

Easy Mode

During step 2 of Setup, "Place Heroes and Set Initial Threat Levels", add one resource to each hero's resource pool. Then remove the following cards:

  • Wilderland
    • 2x Fighting Among Friends
    • 1x Weighed Down
  • The Battle of Five Armies
    • 1x Vanguard of Bolg
    • 2x Ravenous Warg
    • 1x Hatred Rekindled
    • 2x Goblins are Upon You!
    • 1x Northern Slopes

Related Quests

Home

Back

The Massing at Osgiliath

User rating (7.3)

rated by 79 players

Rate this Quest!

Keywords

Doomed X

If an encounter card with the doomed keyword is revealed during the staging step of the quest phase or in setup, each player must raise his threat level by the specified value.

Surge

When an encounter card with the surge keyword is revealed during the staging step of the quest phase or in setup, reveal 1 additional card from the encounter deck. Resolve the surge keyword immediately after resolving any when revealed effects on the card.

Rulings

"Crossing the Anduin"

Some cards refer to crossing the Anduin. Players are not considered to have crossed the Anduin until they reach stage 4 of the scenario.

FAQ & Errata

Pelennor Fields

Q: If there are two copies of Pelennor Fields (MaO 10) in the staging area and I travel to one of them, do I still have to raise my threat by 3? What if I have the opportunity to travel and travel to neither of them?

A: If a card is self-referential, it refers only to that copy of itself. So if you travel to one copy of the pelennor Fields, the other copy will raise your threat by 3 because it only takes into account whether you traveled to that particular copy of the Pelennor Fields. So if you travel to neither copy, they both resolve and you must raise your threat by 6.

Difficulty level

Related Quests

Home

Back

The Battle of Laketown

User rating (8.9)

rated by 75 players

Rate this Quest!

Keywords

Doomed X

If an encounter card with the doomed keyword is revealed during the staging step of the quest phase or in setup, each player must raise his threat level by the specified value.

Surge

When an encounter card with the surge keyword is revealed during the staging step of the quest phase or in setup, reveal 1 additional card from the encounter deck. Resolve the surge keyword immediately after resolving any when revealed effects on the card.

Burn X

The Burn X keyword represents Smaug's devastating attack against Lake-town. When instructed to resolve Burn damage, total the amount of all Burn X on locations in play and assign it to the Lake-town objective. When assigning Burn damage, each player may exhaust any number of his characters to assign any number of Burn damage to those characters (up to their remaining hit points). Any damage not assigned to characters must be assigned to Lake-town.

Guarded

The guarded keyword is a reminder on some objective cards to reveal and attach the next card of the encounter deck to the objective when it enters the staging area from the encounter deck, and place them both in the staging area. The objective cannot be claimed as long as any encounter card is attached. Once that encounter is dealt with, the objective remains in the staging area until it is claimed. If another objective card comes up while attaching a card for the guarded keyword, place the second objective in the staging area, and use the next card of the encounter deck to fulfil the original keyword effect. Enemy and location cards attached to guarded objectives do still count their threat while the enemy or location is in the staging area. An encounter card attached to a guarded objective is dealt with in the following method, depending on its card type:

Once all encounter cards attached to a guarded objective are dealt with, the players can claim the objective in the manner specified by its card text.

Rulings

The Smaug Deck

During setup, stage 1A instructs players to build a Smaug deck. The Smaug deck includes all copies of Smaug and has its own discard pile. Effects that interact with the encounter deck/discard pile do not interact with the Smaug deck/discard pile. When Smaug is discarded, place it in the Smaug discard pile. If the Smaug deck is empty, shuffle the Smaug discard pile back into the Smaug deck.

At the beginning of each Quest phase, the first player must choose either his play area or the staging area as a destination for Smaug. He then reveals the top card of the Smaug deck, and puts it into play int the chosen area. If he chooses his play area, he immediately engages Smaug. If another version of the Smaug was already in play, move all damage tokens on that version to the new Smaug as it is revealed and discard the previous Smaug. Smaug is only defeated when he has 0 hit points remaining.

Difficulty level

Related Quests

Home

Back

The Steward's Fear

Official difficulty (5)

User rating (6.4)

rated by 96 players

Rate this Quest!

Keywords

Surge

When an encounter card with the surge keyword is revealed during the staging step of the quest phase or in setup, reveal 1 additional card from the encounter deck. Resolve the surge keyword immediately after resolving any when revealed effects on the card.

Doomed X

If an encounter card with the doomed keyword is revealed during the staging step of the quest phase or in setup, each player must raise his threat level by the specified value.

Battle

Tom has committed the characters Gandalf and an Ithilien Tracker to the quest card Ambush in Ithilien (1B), which has the battle keyword. When resolving this quest, instead of using his characters' , Tom counts their total . Gandalf has an of 4, and the Ithilien Tracker has an of 1, for a total of 5. Tom compares this total against the in the staging area, which is currently a 3. Tom therefore quests successfully, and makes 2 progress on the quest.

If a quest card has the battle keyword, when characters are committed to that quest, they count their total instead of their total when resolving the quest. Enemies and locations in the staging area still use their in opposition to this quest attempt.

Underworld X

Houses of the Dead is revealed from the encounter deck with Underworld 2 so the first player adds it to the staging area, takes the top 2 cards of the Underworld deck, and stacks them facedown underneath it.

When a location with the underworld keyword enters play, take cards from the top underworld deck equal to the specified value and stack them facedown underneath that location. When a location leaves play, any facedown cards stacked underneath that location are revealed one at a time, and added to the staging area. If a card from the underworld deck would be discarded, it is placed in the encounter deck discard pile. If a location with underworld is revealed from the encounter deck and there are no cards left in the underworld deck, then the underworld keyword has no effect.

Archery X

Tom and Kris are playing the scenario "Into Ithilien," and two copies of Southron Mercenaries are in play. Southron Mercenaries has the keyword archery X, where X is the number of players in the game. This gives a cumulative archery value of 4. At the beginning of the combat phase, the players decide to deal 2 damage to Kris' ally Gandalf, and 2 damage to Tom's hero Denethor.

While a card with the archery keyword is in play, players must deal damage to character cards in play equal to the specified archery value at the beginning of each combat phase. This damage can be dealt to characters under any player's control, and it can be divided among the players as they see fit. If there is disagreement as to where to assign archery damage, the first player makes the final decision. If multiple cards with the archery keyword are in play, the effects are cumulative. Remember that does not block archery damage.

Rulings

Setup

When setting up "The Steward's Fear," remove all the enemy cards from the Streets of Gondor and Brigands encounter sets, along with the 3 Clue objective cards found in The Steward's Fear encounter set, and shuffle them into a separate deck. This is the "Underworld" deck and it should be set apart from the encounter deck. Next, remove the 3 Villain enemy cards and the 3 Plot objective cards from the encounter deck. Shuffle the Villain enemy cards together and randomly choose one of them to set aside facedown. This is the "hidden" enemy card. Remove the other 2 Villain cards from the game (without looking at the cards). Repeat this process with the Plot cards. The set aside Plot is the "hidden" plot card.

FAQ & Errata

False Lead

Q: After False Lead (SF 25) is revealed and its effect resolves, do the players continue staging?

A: No. The quest phase ends immediately and the players do not continue staging.

Difficulty level

Easy Mode

During step 2 of Setup, "Place Heroes and Set Initial Threat Levels", add one resource to each hero's resource pool. Then remove the following cards:

  • Streets of Gondor
    • 1x Lost in the City
    • 1x Local Trouble
  • Brigands
    • 1x Umbar Assassin
  • The Steward's Fear
    • 1x Houses of the Dead
    • 2x Knife in the Back

Related Quests

Home

Back

The Drúadan Forest

Official difficulty (6)

User rating (5.4)

rated by 83 players

Rate this Quest!

Keywords

Surge

When an encounter card with the surge keyword is revealed during the staging step of the quest phase or in setup, reveal 1 additional card from the encounter deck. Resolve the surge keyword immediately after resolving any when revealed effects on the card.

Archery X

Tom and Kris are playing the scenario "Into Ithilien," and two copies of Southron Mercenaries are in play. Southron Mercenaries has the keyword archery X, where X is the number of players in the game. This gives a cumulative archery value of 4. At the beginning of the combat phase, the players decide to deal 2 damage to Kris' ally Gandalf, and 2 damage to Tom's hero Denethor.

While a card with the archery keyword is in play, players must deal damage to character cards in play equal to the specified archery value at the beginning of each combat phase. This damage can be dealt to characters under any player's control, and it can be divided among the players as they see fit. If there is disagreement as to where to assign archery damage, the first player makes the final decision. If multiple cards with the archery keyword are in play, the effects are cumulative. Remember that does not block archery damage.

Siege

If a quest card has the siege keyword, when characters are committed to that quest, they count their total instead of their total when resolving the quest. Enemies and locations in the staging area still use their in opposition to this quest attempt.

Prowl X

Druadan Elite is revealed from the encounter deck with Prowl X. Its game text reads: "X is equal to the number of players in the game." There are 3 players in the game, so the players (as a group) must discard a total of 3 resources from their heroes' resource pools. Player 1 decides to discard 1 resource from Aragorn's resource pool, Player 2 decides not to discard any resources, so Player 3 discards 2 resource from Gimli's pool for a total of 3.

When an encounter card with the prowl keyword is revealed from the encounter deck, the players (as a group) must discard the specified number of resources from their heroes' resource pools. If the players do not have enough resources to match the specified value, then they must discard as many resources as they can.

Difficulty level

Easy Mode

During step 2 of Setup, "Place Heroes and Set Initial Threat Levels", add one resource to each hero's resource pool. Then remove the following cards:

  • Brooding Forest
    • 2x Overgrown Trail
    • 2x Lost Companion
  • The Drúadan Forest
    • 2x Glade of Cleansing
    • 2x Drúadan Drummer
    • 2x Drúadan Hunter
    • 1x Ancestral Clearing

Related Quests

Home

Back

Encounter at Amon-Dín

Official difficulty (5)

User rating (3)

rated by 99 players

Rate this Quest!

Keywords

Doomed X

If an encounter card with the doomed keyword is revealed during the staging step of the quest phase or in setup, each player must raise his threat level by the specified value.

Surge

When an encounter card with the surge keyword is revealed during the staging step of the quest phase or in setup, reveal 1 additional card from the encounter deck. Resolve the surge keyword immediately after resolving any when revealed effects on the card.

Villagers X

Burning Farmhouse is revealed from the encounter deck with Villager 4 so the first player adds it to the staging area with 4 resource tokens on it.

When a location with the villagers keyword enters play, or a quest card with villagers is revealed, place resource tokens on it equal to the specified value. Resource tokens placed on a location or quest this way are villager tokens. Villager tokens do not count as resources. When a villager token is discarded, return that token to the token bank.

Rulings

Rescued Villagers and Dead Villagers

When setting up the Encounter at Amon Dín scenario, stage 1A instructs the players to put both the Rescued Villagers and Dead Villagers objective cards into the staging area. These cards represent the ultimate fate of the villagers being attacked by Ghulat and his orcs. During the game scenario effects will place villager tokens on Rescued Villagers and damage tokens on Dead Villagers. In order to win the game, the players will need to collect more villager tokens on Rescued Villagers than damage tokens on Dead Villagers.

Difficulty level

Easy Mode

During step 2 of Setup, "Place Heroes and Set Initial Threat Levels", add one resource to each hero's resource pool. Then remove the following cards:

  • Ravaging Orcs
    • 3x Orc Rabble
  • Encounter at Amon Dín
    • 2x Craven Eagle
    • 2x Burnt Homestead

Related Quests

Home

Back

Assault on Osgiliath

Official difficulty (8)

User rating (5)

rated by 73 players

Rate this Quest!

Keywords

Doomed X

If an encounter card with the doomed keyword is revealed during the staging step of the quest phase or in setup, each player must raise his threat level by the specified value.

Surge

When an encounter card with the surge keyword is revealed during the staging step of the quest phase or in setup, reveal 1 additional card from the encounter deck. Resolve the surge keyword immediately after resolving any when revealed effects on the card.

Archery X

Tom and Kris are playing the scenario "Into Ithilien," and two copies of Southron Mercenaries are in play. Southron Mercenaries has the keyword archery X, where X is the number of players in the game. This gives a cumulative archery value of 4. At the beginning of the combat phase, the players decide to deal 2 damage to Kris' ally Gandalf, and 2 damage to Tom's hero Denethor.

While a card with the archery keyword is in play, players must deal damage to character cards in play equal to the specified archery value at the beginning of each combat phase. This damage can be dealt to characters under any player's control, and it can be divided among the players as they see fit. If there is disagreement as to where to assign archery damage, the first player makes the final decision. If multiple cards with the archery keyword are in play, the effects are cumulative. Remember that does not block archery damage.

Battle

Tom has committed the characters Gandalf and an Ithilien Tracker to the quest card Ambush in Ithilien (1B), which has the battle keyword. When resolving this quest, instead of using his characters' , Tom counts their total . Gandalf has an of 4, and the Ithilien Tracker has an of 1, for a total of 5. Tom compares this total against the in the staging area, which is currently a 3. Tom therefore quests successfully, and makes 2 progress on the quest.

If a quest card has the battle keyword, when characters are committed to that quest, they count their total instead of their total when resolving the quest. Enemies and locations in the staging area still use their in opposition to this quest attempt.

Siege

If a quest card has the siege keyword, when characters are committed to that quest, they count their total instead of their total when resolving the quest. Enemies and locations in the staging area still use their in opposition to this quest attempt.

Rulings

Controlling Locations

The Assault on Osgiliath is a battle to liberate the ancient capital of Gondor from the forces of Mordor. To represent Gondor's struggle to drive the enemy from every last corner of the ruined city, the players are instructed to take control of Osgiliath locations when they leave play.

Stage 1B reads: "Forced: When an Osgiliath location leaves play as an explored location, the first player takes control of that location." To take control of a location, the first player removes all progress from the just explored location and places it in front of him in his play area instead of discarding it. Locations under any player's control are still in play. Their game text is active and they can be affected by card effects.

Losing Control of Locations

The more Osgiliath locations the players control, the harder the encounter deck will fight back. There are many encounter card effects that force players to return locations they control to the staging area. Also, many of the Osgiliath locations have triggered effects that will cause players to return them to the staging area. When a player returns a location he controls to the staging area, he loses control of that location and removes all progress from it. If a player is eliminated from the game, each Osgiliath location controlled by that player is returned to the staging area.

FAQ & Errata

The Power of Mordor

Should read: "...Reveal an equal number of cards from the encounter deck..." Omit the word "Then"

Counter-attack

Should read: "When Revealed: Each player must either return the location he controls..."

Difficulty level

Easy Mode

During step 2 of Setup, "Place Heroes and Set Initial Threat Levels", add one resource to each hero's resource pool. Then remove the following cards:

  • Southrons
    • 2x Southron Support
    • 1x Múmak
  • Mordor Elite
    • 2x The Master's Malice
    • 2x Orc War Camp
    • 2x Orc Vanguard
  • Assault on Osgiliath
    • 2x Uruk Lieutenant
    • 2x Southron Commander
    • 1x West Quarter
    • 1x East Quarter
    • 1x Counter-attack

Related Quests

Home

Back

The Blood of Gondor

Official difficulty (7)

User rating (5.9)

rated by 73 players

Rate this Quest!

Keywords

Doomed X

If an encounter card with the doomed keyword is revealed during the staging step of the quest phase or in setup, each player must raise his threat level by the specified value.

Surge

When an encounter card with the surge keyword is revealed during the staging step of the quest phase or in setup, reveal 1 additional card from the encounter deck. Resolve the surge keyword immediately after resolving any when revealed effects on the card.

Archery X

Tom and Kris are playing the scenario "Into Ithilien," and two copies of Southron Mercenaries are in play. Southron Mercenaries has the keyword archery X, where X is the number of players in the game. This gives a cumulative archery value of 4. At the beginning of the combat phase, the players decide to deal 2 damage to Kris' ally Gandalf, and 2 damage to Tom's hero Denethor.

While a card with the archery keyword is in play, players must deal damage to character cards in play equal to the specified archery value at the beginning of each combat phase. This damage can be dealt to characters under any player's control, and it can be divided among the players as they see fit. If there is disagreement as to where to assign archery damage, the first player makes the final decision. If multiple cards with the archery keyword are in play, the effects are cumulative. Remember that does not block archery damage.

Battle

Tom has committed the characters Gandalf and an Ithilien Tracker to the quest card Ambush in Ithilien (1B), which has the battle keyword. When resolving this quest, instead of using his characters' , Tom counts their total . Gandalf has an of 4, and the Ithilien Tracker has an of 1, for a total of 5. Tom compares this total against the in the staging area, which is currently a 3. Tom therefore quests successfully, and makes 2 progress on the quest.

If a quest card has the battle keyword, when characters are committed to that quest, they count their total instead of their total when resolving the quest. Enemies and locations in the staging area still use their in opposition to this quest attempt.

Siege

If a quest card has the siege keyword, when characters are committed to that quest, they count their total instead of their total when resolving the quest. Enemies and locations in the staging area still use their in opposition to this quest attempt.

Rulings

Hidden Cards

The Blood of Gondor is a two stage scenario that puts the players in the middle of an ambush at the Crossroads of Ithilien. Hidden cards are encounter cards placed facedown in a player's play area that represent the forces of Mordor waiting to attack the heroes. To this effect, both stage 1B and 2B have the same line of text: "At the beginning of the quest phase, each player takes 1 hidden card."

When a player is instructed to take 1 hidden card, he takes the top card of the encounter deck and places it facedown in his play area without looking at it. If there are no cards in the encounter deck when a player is instructed to take 1 hidden card, then he must shuffle the encounter discard pile back into the encounter deck and place the top card of the encounter deck facedown in his play area.

If a player is eliminated, any hidden cards in his play area are discarded.

Turning Hidden Card Face-Up

When a player is instructed to turn his hidden cards faceup, he turns each hidden card in his play area faceup one at a time. If a player turns a hidden card faceup and it is an enemy, he immediately engages that enemy. If a player turns a hidden card faceup and it is a treachery or a location, he immediately discards that card.

FAQ & Errata

The Ambush

Should read: "At the beginning of the combat phase, each player must either turn each of his hidden cards faceup, or take 1 hidden card."

Q: When playing The Blood of Gondor, if a card effect such as stage 1b of The Ambush (AtS 117) or Lying in Wait (AtS 129) turns each of my hidden cards faceup, and one of those cards forces me to take another hidden card, do I have to turn that card faceup as well?

A: No. When you are instructed to turn each of your hidden cards faceup, only the hidden cards that are currently in front of you at that time are turned faceup; any hidden cards you are forced to take as part of that effect, such as from Evil Crow (AtS 122), remain facedown in front of you.

The Cross-roads

Should read: "The current quest card gains siege (and loses battle)."

Difficulty level

Easy Mode

During step 2 of Setup, "Place Heroes and Set Initial Threat Levels", add one resource to each hero's resource pool. Then remove the following cards:

  • Ravaging Orcs
    • 3x Orc Rabble
  • The Blood of Gondor
    • 2x Conflict at the Crossroads
    • 2x Orc Ambusher
    • 2x Brutal Uruk

Related Quests

Home

Back

A Shadow of the Past

User rating (6.1)

rated by 106 players

Rate this Quest!

Keywords

Doomed X

If an encounter card with the doomed keyword is revealed during the staging step of the quest phase or in setup, each player must raise his threat level by the specified value.

Surge

When an encounter card with the surge keyword is revealed during the staging step of the quest phase or in setup, reveal 1 additional card from the encounter deck. Resolve the surge keyword immediately after resolving any when revealed effects on the card.

Peril

When a player reveals an encounter card with the Peril keyword, he must resolve the staging of that card on his own without conferring with the other players. The other players cannot take any actions or trigger any responses during the resolution of that card's staging.

Hide X

While questing for the first time at stage 1B, Three is Company, Tristan reveals Crawling Towards Him which reads: "Peril. Hide 2. When Revealed: If you have failed a Hide test this phase, remove each character you control from the quest." He exhausts Merry to commit him to the Hide test for a total of 2 . Then, he discards the top 2 cards of the encounter deck: Hunting for the Ring and The Marish for a total of 3 . At that moment he is about fail the hide test because the total of the discarded cards is greater than the total of the characters committed to the test. If he fails the test, the "When Revealed" effect on Crawling Towards Him will force him to remove his committed characters from the quest. Furthermore, there is a Black Rider in the staging area which reads: "Forced: After engaged player fails a Hide test, Black Rider makes an immediate attack." At first Tristan isn't concerned, but then he reads the text on stage 1B: "When a player fails a Hide test, each Nazgúl enemy in the staging area engages that player."This effect will cause the Black Rider to engage him, and then its "Forced" effect will trigger an attack. Tristan doesn't want that to happen, so he plays Halfling Determination from his hand to give Merry a +2 for a total of 4 . As a result, the total committed to the test is greater than the total and Tristan succeeds at the hide test.

Hide X is a new keyword in this scenario. When an encounter card with the Hide X keyword is revealed, the player who revealed the card must make a Hide test. If the encounter card with the Hide X keyword also has a "When Revealed" or "Forced" effect, the Hide test must be resolved before resolving the rest of the card.

Hide Tests

When a player is instructed to make a Hide test, that player may exhaust any number of characters he controls to commit those characters to the Hide test. Then, that player discards the top X cards of the encounter deck where X is equal to the Hide X value. Add the total of the discarded cards and compare it to the total of the characters committed to the Hide test. If the total of the discarded cards is greater than the total of all characters committed to the Hide test, then that player fails the Hide test. If the total of the characters committed to the Hide test is greater than or equal to the total of the discarded cards, then the Hide test is successful. After the Hide test resolves, characters are no longer committed to the test.

Player Actions During Hide Tests

Hide tests interrupt the regular turn sequence and create a new action window. After the total of the discarded cards has been determined, players are allowed to take actions. Once the Hide test is resolved, play continues as normal and player actions are restricted to regular action windows.

Difficulty level

Easy Mode

easymode

During step 2 of Setup, "Place Heroes and Set Initial Threat Levels", add one resource to each hero's resource pool. When building the encounter deck, remove any card with the "difficulty" indicator around its encounter set icon (a gold border) from the current scenario's encounter deck.

Related Quests

Home

Back

The Morgul Vale

Official difficulty (7)

User rating (7.8)

rated by 82 players

Rate this Quest!

Keywords

Doomed X

If an encounter card with the doomed keyword is revealed during the staging step of the quest phase or in setup, each player must raise his threat level by the specified value.

Surge

When an encounter card with the surge keyword is revealed during the staging step of the quest phase or in setup, reveal 1 additional card from the encounter deck. Resolve the surge keyword immediately after resolving any when revealed effects on the card.

Archery X

Tom and Kris are playing the scenario "Into Ithilien," and two copies of Southron Mercenaries are in play. Southron Mercenaries has the keyword archery X, where X is the number of players in the game. This gives a cumulative archery value of 4. At the beginning of the combat phase, the players decide to deal 2 damage to Kris' ally Gandalf, and 2 damage to Tom's hero Denethor.

While a card with the archery keyword is in play, players must deal damage to character cards in play equal to the specified archery value at the beginning of each combat phase. This damage can be dealt to characters under any player's control, and it can be divided among the players as they see fit. If there is disagreement as to where to assign archery damage, the first player makes the final decision. If multiple cards with the archery keyword are in play, the effects are cumulative. Remember that does not block archery damage.

Rulings

Setup

When setting up The Morgul Vale, stage 1A instructs the players to search the encounter deck for the To the Tower objective card and add it to the staging area. This card represents the Mordor troop escorting Faramir to the tower of Minas Morgul. Since the players are trying to rescue Faramir in this scenario, the objective reads: "Remove Faramir from the game." This means that no version of Faramir can be used by the players when playing this scenario.

"Captain" Enemies

The Morgul Vale scenario has 3 stages, and a corresponding Captain enemy for each stage: Murzag, Lord Alcaron, and Nazgúl of Minas Morgul. To advance from each stage and win the game, the players must defeat each Captain. These tenacious enemies will stop at nothing to prevent the heroes from rescuing Faramir, and to that end each stage includes a line of text that prevents that stage's Captain from leaving play unless it is destroyed. This means that card effects that would otherwise shuffle that enemy into the encounter deck or remove it from play will have no effect on the Captain at that stage. 

FAQ & Errata

The Power of Mordor

Should read: "...Reveal an equal number of cards from the encounter deck..." Omit the word "Then"

Impenetrable Fog

Should read: "When Revealed: The first player either places 3 progress tokens on To the Tower, or..."

Difficulty level

Easy Mode

During step 2 of Setup, "Place Heroes and Set Initial Threat Levels", add one resource to each hero's resource pool. Then remove the following cards:

  • Creatures of the Forest
    • 2x Watcher in the Wood
    • 2x Morgul Spider
  • Mordor Elite
    • 2x The Master's Malice
    • 2x Orc War Camp
    • 2x Orc Vanguard
  • The Morgul Vale
    • 1x The Dead City Looms
    • 2x Impenetrable Fog

Related Quests

Home

Back

A Knife in the Dark

User rating (6.8)

rated by 94 players

Rate this Quest!

Keywords

Doomed X

If an encounter card with the doomed keyword is revealed during the staging step of the quest phase or in setup, each player must raise his threat level by the specified value.

Surge

When an encounter card with the surge keyword is revealed during the staging step of the quest phase or in setup, reveal 1 additional card from the encounter deck. Resolve the surge keyword immediately after resolving any when revealed effects on the card.

Peril

When a player reveals an encounter card with the Peril keyword, he must resolve the staging of that card on his own without conferring with the other players. The other players cannot take any actions or trigger any responses during the resolution of that card's staging.

Difficulty level

Easy Mode

easymode

During step 2 of Setup, "Place Heroes and Set Initial Threat Levels", add one resource to each hero's resource pool. When building the encounter deck, remove any card with the "difficulty" indicator around its encounter set icon (a gold border) from the current scenario's encounter deck.

Related Quests

Home

Back

Flight to the Ford

User rating (5.6)

rated by 74 players

Rate this Quest!

Keywords

Doomed X

If an encounter card with the doomed keyword is revealed during the staging step of the quest phase or in setup, each player must raise his threat level by the specified value.

Surge

When an encounter card with the surge keyword is revealed during the staging step of the quest phase or in setup, reveal 1 additional card from the encounter deck. Resolve the surge keyword immediately after resolving any when revealed effects on the card.

Peril

When a player reveals an encounter card with the Peril keyword, he must resolve the staging of that card on his own without conferring with the other players. The other players cannot take any actions or trigger any responses during the resolution of that card's staging.

Rulings

The Burden Deck

When setting up Flight to the Ford, players are instructed to create a "Burden deck." To do this, take each of the burden cards with the Flight to the Ford burden set icon and shuffle them into a deck, then set that deck next to the quest deck.

When a burden card is discarded from play, place it into the encounter deck discard pile. After the players defeat the scenario, any burden cards in the encounter deck and encounter deck discard pile are added to the players' campaign pool.

The Ring-bearer's Life

When setting up Flight to the Ford, players are instructed to set the Ring-bearer's life at 15. To do this, the players place a threat tracker by the quest deck and set it at 15. This threat tracker is now a "life tracker" and is used to track the Ring-bearer's life.

When the players are instructed to reduce the Ring-bearer's life by any amount, they reduce the number on the life tracker by that amount. Cards that remove damage from characters cannot increase the number on the Ring-bearer's life tracker. If the Ring-bearer's life reaches 0, the players lose the game.

Difficulty level

Easy Mode

easymode

During step 2 of Setup, "Place Heroes and Set Initial Threat Levels", add one resource to each hero's resource pool. When building the encounter deck, remove any card with the "difficulty" indicator around its encounter set icon (a gold border) from the current scenario's encounter deck.

Related Quests

Home

Back

The Stone of Erech

User rating (6.5)

rated by 37 players

Rate this Quest!

Keywords

Doomed X

If an encounter card with the doomed keyword is revealed during the staging step of the quest phase or in setup, each player must raise his threat level by the specified value.

Surge

When an encounter card with the surge keyword is revealed during the staging step of the quest phase or in setup, reveal 1 additional card from the encounter deck. Resolve the surge keyword immediately after resolving any when revealed effects on the card.

Battle

Tom has committed the characters Gandalf and an Ithilien Tracker to the quest card Ambush in Ithilien (1B), which has the battle keyword. When resolving this quest, instead of using his characters' , Tom counts their total . Gandalf has an of 4, and the Ithilien Tracker has an of 1, for a total of 5. Tom compares this total against the in the staging area, which is currently a 3. Tom therefore quests successfully, and makes 2 progress on the quest.

If a quest card has the battle keyword, when characters are committed to that quest, they count their total instead of their total when resolving the quest. Enemies and locations in the staging area still use their in opposition to this quest attempt.

Spectral

The Spectral keyword represents ghostly enemies who cannot be harmed without the courage and force of will to stand up to their horrifying presence. When characters attack an enemy with the Spectral keyword, they must use their instead of their to determine their attack strength.

Enemies still substract their from your attack strength to determine how much damage is dealt. Effects that deal direct damage will still affect an enemy with the Spectral keyword.

Rulings

The Night Objectives

During setup, stage 1A of the quest instructs players to set aside the 3 Night objectives (Eventide, Dusk and Midnight). The players then put Eventide into play, next to the current quest. These objectives cannot be claimed by the players, and only one will be in play at a time (next to the current quest).

The Night objective that is currently in play is the "current" Night objective, and shows the time of night from the heroes' perspective. Many encounter cards in this scenario have additional or different effects that are active only during the specified time of night, as follows:

While Dusk is in play, the Dusk effects of all encounter cards are active.

While Midnight is in play, the Midnight effects of all encounter cards are active.

FAQ & Errata

The Lord of the Dead

Q: If I am engaged with The Lord of the Dead (SoE 5) when I play Saruman (VoI 3), do I still have to raise each player's threat for his Doomed 3?

A: No. The moment Saruman enters play under your control, the passive effect on The Lord of the Dead causes you to treat his text box as blank, before the Doomed keyword can trigger.

Difficulty level

Related Quests

Home

Back

The Fords of Isen

Official difficulty (5)

User rating (6)

rated by 84 players

Rate this Quest!

Keywords

Surge

When an encounter card with the surge keyword is revealed during the staging step of the quest phase or in setup, reveal 1 additional card from the encounter deck. Resolve the surge keyword immediately after resolving any when revealed effects on the card.

Time X

Time X is a keyword that represents the urgency of the heroes' quest. When a card with the Time X keyword is revealed, the players put X resource tokens on that card. These tokens are called "time counters." At the end of each refresh phase, remove 1 time counter from each card with the Time X keyword, if able. When the last time counter is removed, there will be a triggered effect that resolves on that card. Some encounter cards will also remove time counters, making it more difficult for the players to predict when they will run out of time.

Rulings

Grima Objective-Ally

When setting up The Fords of Isen scenario, the players are instructed to attach the Grí­ma objective-ally card to the location, The Islet. An objective-ally card is considered to be both an objective and an ally. If an effect allows the players to take control of the Grí­ma objective-ally, it is moved into the controlling player's play area. Once there, Grí­ma can be used the same as any other ally.

Because the Grí­ma objective-ally is a unique character, no player can use the Grí­ma hero card when playing The Fords of Isen scenario.

Difficulty level

Easy Mode

easymode

During step 2 of Setup, "Place Heroes and Set Initial Threat Levels", add one resource to each hero's resource pool. When building the encounter deck, remove any card with the "difficulty" indicator around its encounter set icon (a gold border) from the current scenario's encounter deck.

Related Quests

Home

Back

To Catch an Orc

Official difficulty (4)

User rating (6.6)

rated by 88 players

Rate this Quest!

Keywords

Time X

Time X is a keyword that represents the urgency of the heroes' quest. When a card with the Time X keyword is revealed, the players put X resource tokens on that card. These tokens are called "time counters." At the end of each refresh phase, remove 1 time counter from each card with the Time X keyword, if able. When the last time counter is removed, there will be a triggered effect that resolves on that card. Some encounter cards will also remove time counters, making it more difficult for the players to predict when they will run out of time.

Surge

When an encounter card with the surge keyword is revealed during the staging step of the quest phase or in setup, reveal 1 additional card from the encounter deck. Resolve the surge keyword immediately after resolving any when revealed effects on the card.

Searches X

The Searches X keyword represents the heroes search for the Orc captain, Mugash. When a location with the Searches X keyword leaves play, the player (or players) identified by that location reveals the top X cards of his out-of-play deck. Players who reveal cards this way add each revealed enemy to the staging area, choose 1 player card to take into their hand, and discard the rest.

Rulings

The Out-of-Play Deck

When setting up To Catch an Orc, each player is instructed to set the top 20 cards of his deck aside, out of play. Those 20 cards become that player's out-of-play deck.

Mugash

There are 4 enemy cards in The Voice of Isengard that have player card backs: 1 copy of Mugash and 3 copies of Mugash's Guard. These are encounter cards, not player cards, and cannot be included in any player's deck. The reason Mugash and his guard have player card backs is because they are meant to be shuffled into the players' out-of-play decks when setting up To Catch an Orc.

Difficulty level

Easy Mode

easymode

During step 2 of Setup, "Place Heroes and Set Initial Threat Levels", add one resource to each hero's resource pool. When building the encounter deck, remove any card with the "difficulty" indicator around its encounter set icon (a gold border) from the current scenario's encounter deck.

Related Quests

Home

Back

Into Fangorn

Official difficulty (6)

User rating (4.4)

rated by 70 players

Rate this Quest!

Keywords

Guarded

The guarded keyword is a reminder on some objective cards to reveal and attach the next card of the encounter deck to the objective when it enters the staging area from the encounter deck, and place them both in the staging area. The objective cannot be claimed as long as any encounter card is attached. Once that encounter is dealt with, the objective remains in the staging area until it is claimed. If another objective card comes up while attaching a card for the guarded keyword, place the second objective in the staging area, and use the next card of the encounter deck to fulfil the original keyword effect. Enemy and location cards attached to guarded objectives do still count their threat while the enemy or location is in the staging area. An encounter card attached to a guarded objective is dealt with in the following method, depending on its card type:

Once all encounter cards attached to a guarded objective are dealt with, the players can claim the objective in the manner specified by its card text.

Surge

When an encounter card with the surge keyword is revealed during the staging step of the quest phase or in setup, reveal 1 additional card from the encounter deck. Resolve the surge keyword immediately after resolving any when revealed effects on the card.

Hinder

The Hinder keyword appears on the Huorn enemies in this scenario.

While engaged with a player, an enemy with the Hinder keyword is not dealt a shadow card and does not make an attack during the combat phase. Instead of making attacks, enemies with the Hinder keyword force players to remove progress from the current quest or active location. At the beginning of the combat phase, each player removes one progress from the current quest for each enemy with Hinder engaged with him. When there is no progress remaining on the current quest, players remove progress from the active location instead. If there is no progress on either the quest or active location, there is no effect.

Time X

Time X is a keyword that represents the urgency of the heroes' quest. When a card with the Time X keyword is revealed, the players put X resource tokens on that card. These tokens are called "time counters." At the end of each refresh phase, remove 1 time counter from each card with the Time X keyword, if able. When the last time counter is removed, there will be a triggered effect that resolves on that card. Some encounter cards will also remove time counters, making it more difficult for the players to predict when they will run out of time.

Difficulty level

Easy Mode

easymode

During step 2 of Setup, "Place Heroes and Set Initial Threat Levels", add one resource to each hero's resource pool. When building the encounter deck, remove any card with the "difficulty" indicator around its encounter set icon (a gold border) from the current scenario's encounter deck.

Related Quests

Home

Back

The Dunland Trap

Official difficulty (7)

User rating (7.5)

rated by 75 players

Rate this Quest!

Keywords

Surge

When an encounter card with the surge keyword is revealed during the staging step of the quest phase or in setup, reveal 1 additional card from the encounter deck. Resolve the surge keyword immediately after resolving any when revealed effects on the card.

Time X

Time X is a keyword that represents the urgency of the heroes' quest. When a card with the Time X keyword is revealed, the players put X resource tokens on that card. These tokens are called "time counters." At the end of each refresh phase, remove 1 time counter from each card with the Time X keyword, if able. When the last time counter is removed, there will be a triggered effect that resolves on that card. Some encounter cards will also remove time counters, making it more difficult for the players to predict when they will run out of time.

Strategy Tip

There are a number of effects in The Dunland Trap that trigger after a player draws a card. If several of these effects are in play at the same time, it can be difficult to keep track of the m all. In order to manage multiple effects that share the same trigger, it can be helpful to keep this strategy in mind:

After a player draws a card, check each encounter card in play for a Forced effect that triggers at that time. Then, resolve each effect before moving on.

This may cause the scenario to progress slowly at first, but as the players become familiar with the various Forced effects, the game will advance more quickly

Difficulty level

Easy Mode

easymode

During step 2 of Setup, "Place Heroes and Set Initial Threat Levels", add one resource to each hero's resource pool. When building the encounter deck, remove any card with the "difficulty" indicator around its encounter set icon (a gold border) from the current scenario's encounter deck.

Related Quests

Home

Back

The Three Trials

Official difficulty (5)

User rating (7.1)

rated by 60 players

Rate this Quest!

Keywords

Doomed X

If an encounter card with the doomed keyword is revealed during the staging step of the quest phase or in setup, each player must raise his threat level by the specified value.

Surge

When an encounter card with the surge keyword is revealed during the staging step of the quest phase or in setup, reveal 1 additional card from the encounter deck. Resolve the surge keyword immediately after resolving any when revealed effects on the card.

Time X

Time X is a keyword that represents the urgency of the heroes' quest. When a card with the Time X keyword is revealed, the players put X resource tokens on that card. These tokens are called "time counters." At the end of each refresh phase, remove 1 time counter from each card with the Time X keyword, if able. When the last time counter is removed, there will be a triggered effect that resolves on that card. Some encounter cards will also remove time counters, making it more difficult for the players to predict when they will run out of time.

Rulings

The "Current" Trial

David is playing The Three Trials and has just revealed stage 2A: "The Trial of Strength." It reads: "When Revealed: Randomly choose 1 of the remaining set aside Guardian enemies and 1 of the remaining set aside Barrow locations, reveal them, and add them to the staging area. Find the set aside Key objective that shares a Trait with the just revealed Guardian enemy and attach it to that enemy." David randomly chooses Wolf's Guardian and Stone Barrow, revealing them and adding them to the staging area. He then finds the set aside Key objective that shares a Trait with Wolf 's Guardian - Key of the Wolf - and attaches it to Wolf 's Guardian. Key of the Wolf is the current trial's Key objective. Once David claims Key of the Wolf, he will proceed to the next trial, or advance to stage 3 if he has completed all three trials.

The three stage 2 quests in this scenario (The Trial of Strength, The Trial of Perseverance, and The Trial of Intuition) represent three different trials that the heroes must complete in order to reach stage 3. The current stage 2 quest is referred to as the "current trial".

Each trial has a different Key objective that must be claimed, which is chosen randomly during each stage 2A's "when revealed" effect. The Key objective that is chosen during each stage is referred to as "the current trial's Key objective".
Each stage 2B says " When the players control the current trial's Key objective... " The "current trial's Key objective" is the one that was chosen during the "when revealed" effect of that quest's stage 2A.

Difficulty level

Easy Mode

easymode

During step 2 of Setup, "Place Heroes and Set Initial Threat Levels", add one resource to each hero's resource pool. When building the encounter deck, remove any card with the "difficulty" indicator around its encounter set icon (a gold border) from the current scenario's encounter deck.

Related Quests

Home

Back

Trouble in Tharbad

Official difficulty (4)

User rating (3.9)

rated by 59 players

Rate this Quest!

Keywords

Surge

When an encounter card with the surge keyword is revealed during the staging step of the quest phase or in setup, reveal 1 additional card from the encounter deck. Resolve the surge keyword immediately after resolving any when revealed effects on the card.

Time X

Time X is a keyword that represents the urgency of the heroes' quest. When a card with the Time X keyword is revealed, the players put X resource tokens on that card. These tokens are called "time counters." At the end of each refresh phase, remove 1 time counter from each card with the Time X keyword, if able. When the last time counter is removed, there will be a triggered effect that resolves on that card. Some encounter cards will also remove time counters, making it more difficult for the players to predict when they will run out of time.

Rulings

Threat Elimination Level

Stage 1B of this scenario reads: "Time 4. Forced : After the last time counter is removed from this quest, lower each player's threat elimination level by 10 for the remainder of the game. Then, place 4 time counters on this stage."

A player's "threat elimination level" is the amount of threat at which a player is eliminated. This number is typically 50. However, in this scenario, a player's threat elimination level may be lower than 50. If a player's threat is ever equal to or higher than their current threat elimination level, they are eliminated from the game.

Attacks Against Nalir

Nalir is an objective-ally in Trouble in Tharbad. An attack made against Nalir works the same as an attack made against the player who controls Nalir, with one exception: undefended damage from an attack made against Nalir must be assigned to Nalir.

Difficulty level

Easy Mode

easymode

During step 2 of Setup, "Place Heroes and Set Initial Threat Levels", add one resource to each hero's resource pool. When building the encounter deck, remove any card with the "difficulty" indicator around its encounter set icon (a gold border) from the current scenario's encounter deck.

Related Quests

Home

Back

The Ní­n-in-Eilph

Official difficulty (4)

User rating (7)

rated by 57 players

Rate this Quest!

Keywords

Surge

When an encounter card with the surge keyword is revealed during the staging step of the quest phase or in setup, reveal 1 additional card from the encounter deck. Resolve the surge keyword immediately after resolving any when revealed effects on the card.

Time X

Time X is a keyword that represents the urgency of the heroes' quest. When a card with the Time X keyword is revealed, the players put X resource tokens on that card. These tokens are called "time counters." At the end of each refresh phase, remove 1 time counter from each card with the Time X keyword, if able. When the last time counter is removed, there will be a triggered effect that resolves on that card. Some encounter cards will also remove time counters, making it more difficult for the players to predict when they will run out of time.

Rulings

Advancing to Parallel Stages

To simulate the experience of getting lost in an endless, shifting swamp, each stage 2B has the text:

"Forced : After the last time counter is removed from this stage, advance to a different stage 2A at random."

When the players are instructed to do this, the first player shuffles each stage 2 (except for the one currently in play) together and chooses one of them at random for the players to advance to, replacing the current stage 2. Then, the previous stage 2 is placed back in the quest deck with the other unused stage 2 cards. Any progress that was on that stage is lost. When the players are instructed to advance to a different random stage 3A, follow the same steps

Difficulty level

Easy Mode

easymode

During step 2 of Setup, "Place Heroes and Set Initial Threat Levels", add one resource to each hero's resource pool. When building the encounter deck, remove any card with the "difficulty" indicator around its encounter set icon (a gold border) from the current scenario's encounter deck.

Related Quests

Home

Back

Celebrimbor's Secret

Official difficulty (6)

User rating (5.6)

rated by 37 players

Rate this Quest!

Keywords

Doomed X

If an encounter card with the doomed keyword is revealed during the staging step of the quest phase or in setup, each player must raise his threat level by the specified value.

Surge

When an encounter card with the surge keyword is revealed during the staging step of the quest phase or in setup, reveal 1 additional card from the encounter deck. Resolve the surge keyword immediately after resolving any when revealed effects on the card.

Scour

Two players are at stage 2B, The Enemy's Servant, when they remove the last time counter at the end of the refresh phase. The Enemy's Servant has the text: "Forced: After the last time counter is removed from this stage, trigger each Scour effect currently in play." So the players examine each encounter card in play and discover that there are 2 cards with the Scour keyword in play: Bellach and Collapsed Tower.

Bellach reads: "Scour: Each player must search the encounter deck and discard pile for an Orc enemy and add it to the staging area." Collapsed Tower reads: "Scour: Return this location to the staging area and place 2 damage here." Player 1 is the first player, so he decides to resolve the scour effect on Collapsed Tower and places 2 damage on it. Then, player 1 and 2 resolve the scour effect on Bellach. They each search the encounter deck and discard pile for an Orc enemy, add them to the staging area, and shuffle the encounter deck

Scour is a new keyword that represents the efforts of Bellach and his minions to discover Celebrimbor's hidden forge and the heroes who seek it. The scour keyword does nothing by itself, but when the players are instructed by quest card or encounter card text to trigger a scour effect they must resolve the effect that follows the scour keyword on that card. The effect that follows the scour keyword on a card is called the "scour effect."

Time X

Time X is a keyword that represents the urgency of the heroes' quest. When a card with the Time X keyword is revealed, the players put X resource tokens on that card. These tokens are called "time counters." At the end of each refresh phase, remove 1 time counter from each card with the Time X keyword, if able. When the last time counter is removed, there will be a triggered effect that resolves on that card. Some encounter cards will also remove time counters, making it more difficult for the players to predict when they will run out of time.

Rulings

The Orcs' Search

The Orcs' Search is an objective that represents the efforts of Bellach and his servants to discover Celebrimbor's hidden forge and the heroes who search for it. As the agents of Mordor scour the ruins of Ost-in-Edhil, certain encounter card effects place damage on locations to represent their progress. This is significant because The Orcs' Search reads: "When a location has damage equal to its printed quest points, place it facedown underneath The Orcs' Search." When a location is placed facedown underneath The Orcs' Search, it means that Bellach and his minions have searched that location, bringing them one step closer to finding the knowledge they seek and leaving the heroes fewer places to hide.

Other cards besides locations can also be placed facedown underneath The Orcs' Search by various encounter card effects. When the players are instructed to place a card facedown underneath The Orcs' Search, they must first discard any tokens on that card and any attachments attached to that card. Facedown cards underneath The Orcs' Search are not in play and only interact with card effects that specifically reference cards underneath The Orcs' Search.

Difficulty level

Easy Mode

easymode

During step 2 of Setup, "Place Heroes and Set Initial Threat Levels", add one resource to each hero's resource pool. When building the encounter deck, remove any card with the "difficulty" indicator around its encounter set icon (a gold border) from the current scenario's encounter deck.

Related Quests

Home

Back

The Ring Goes South

User rating (6.1)

rated by 64 players

Rate this Quest!

Keywords

Doomed X

If an encounter card with the doomed keyword is revealed during the staging step of the quest phase or in setup, each player must raise his threat level by the specified value.

Surge

When an encounter card with the surge keyword is revealed during the staging step of the quest phase or in setup, reveal 1 additional card from the encounter deck. Resolve the surge keyword immediately after resolving any when revealed effects on the card.

Indestructible

An enemy with the Indestructible keyword cannot be destroyed by damage, even when it has damage on it equal to its hit points.

Peril

When a player reveals an encounter card with the Peril keyword, he must resolve the staging of that card on his own without conferring with the other players. The other players cannot take any actions or trigger any responses during the resolution of that card's staging.

Rulings

Stage 4

To defeat The Ring Goes South, the Company of the Ring must escape the wargs that hunt them through Hollin by escaping into the Mines of Moria. Unfortunately, the entrance to the ancient dwarven stronghold is hidden by a magic spell and guarded by a dangerous creature that grabs hold of Frodo.

To help bring the Company's dilemma to life, stage 4A reads: "When Revealed: Make Doors of Durin the active location. Add Watcher in the Water to the staging area. Then, discard all tokens from the Ring-bearer and place it (and each card attached to it) face down under Watcher in the Water." While Frodo is face down and under the Watcher, he is still in play and so is each card attached to him. However, no player controls Frodo or any cards attached to him while he is face down.

Then, stage 4B reads: "There can be 2 active locations. During the travel phase, the players must travel to a location, if able." This represents the Company's search for the Doors and their effort to gain entrance while fighting off the many tentacles of the Watcher in the Water. Since there can be 2 active locations, if Doors of Durin is the only active location during the travel phase and there is at least 1 location in the staging area, the players must travel to a location. This is done by making the chosen location the active location in addition to Doors of Durin. Place the new active location next to Doors of Durin.

Because Doors of Durin is immune to player card effects, player card effects that target the active location can only target the other active location.

Difficulty level

Easy Mode

easymode

During step 2 of Setup, "Place Heroes and Set Initial Threat Levels", add one resource to each hero's resource pool. When building the encounter deck, remove any card with the "difficulty" indicator around its encounter set icon (a gold border) from the current scenario's encounter deck.

Related Quests

Home

Back

Journey in the Dark

User rating (8)

rated by 70 players

Rate this Quest!

Keywords

Doomed X

If an encounter card with the doomed keyword is revealed during the staging step of the quest phase or in setup, each player must raise his threat level by the specified value.

Surge

When an encounter card with the surge keyword is revealed during the staging step of the quest phase or in setup, reveal 1 additional card from the encounter deck. Resolve the surge keyword immediately after resolving any when revealed effects on the card.

Indestructible

An enemy with the Indestructible keyword cannot be destroyed by damage, even when it has damage on it equal to its hit points.

Peril

When a player reveals an encounter card with the Peril keyword, he must resolve the staging of that card on his own without conferring with the other players. The other players cannot take any actions or trigger any responses during the resolution of that card's staging.

FAQ & Errata

The Balrog

Q: How many keywords does The Balrog (RD 44) have?

A: One. Indestructible is the only keyword on The Balrog.

Mines of Moria

Q: If Mines of Moria (TRD 52) is in the staging area and there is an active location, where is progress placed first?

A: Progress must be placed on the Mines of Moria in the staging area before it can be placed on the active location because the game text on Mines of Moria overrides the game rules via the Golden Rule.

Difficulty level

Easy Mode

easymode

During step 2 of Setup, "Place Heroes and Set Initial Threat Levels", add one resource to each hero's resource pool. When building the encounter deck, remove any card with the "difficulty" indicator around its encounter set icon (a gold border) from the current scenario's encounter deck.

Related Quests

Home

Back

Breaking of the Fellowship

User rating (7.2)

rated by 58 players

Rate this Quest!

Keywords

Doomed X

If an encounter card with the doomed keyword is revealed during the staging step of the quest phase or in setup, each player must raise his threat level by the specified value.

Surge

When an encounter card with the surge keyword is revealed during the staging step of the quest phase or in setup, reveal 1 additional card from the encounter deck. Resolve the surge keyword immediately after resolving any when revealed effects on the card.

Peril

When a player reveals an encounter card with the Peril keyword, he must resolve the staging of that card on his own without conferring with the other players. The other players cannot take any actions or trigger any responses during the resolution of that card's staging.

Toughness X

After Ian plays the Gandalf ally from his hand, he chooses to deal 4 damage to Uruk-hai Archer. The Uruk-hai Archer has toughness 1, so it reduces the damage that it is dealt from 4 to 3.

An enemy with the toughness keyword reduces the amount of damage it takes by X each time it is assigned any amount of damage.

Archery X

Tom and Kris are playing the scenario "Into Ithilien," and two copies of Southron Mercenaries are in play. Southron Mercenaries has the keyword archery X, where X is the number of players in the game. This gives a cumulative archery value of 4. At the beginning of the combat phase, the players decide to deal 2 damage to Kris' ally Gandalf, and 2 damage to Tom's hero Denethor.

While a card with the archery keyword is in play, players must deal damage to character cards in play equal to the specified archery value at the beginning of each combat phase. This damage can be dealt to characters under any player's control, and it can be divided among the players as they see fit. If there is disagreement as to where to assign archery damage, the first player makes the final decision. If multiple cards with the archery keyword are in play, the effects are cumulative. Remember that does not block archery damage.

Rulings

Multiple Staging Areas

When playing The Breaking of the Fellowship, the players are instructed by stage 2B to create their own staging areas. To do this, each player sets aside an area in front of himself to serve as his own staging area and places his quest stage 3 there. Players continue to resolve each phase of the game in player order, starting with the first player.

After a player commits characters to the quest at his stage, he reveals his encounter card. Then, he compares the total willpower of his characters committed to the total threat strength of encounter cards in his staging area. If the total willpower is greater, he places progress on his quest stage. If the total threat strength is greater, he raises his threat by the difference. Other players do not raise their threat when a different player quests unsuccessfully.

During the encounter phase, players only make engagement checks against enemies in their staging area. Effects that target enemies or locations "at this stage" do not affect encounter cards in another player's staging area. Archery damage is calculated separately at each stage, and only the player at that stage can assign that damage to characters he controls.

Unlike previous scenarios with separate staging areas, players may continue to interact with each other through the normal rules of the game. However, cards that reference "the staging area"only apply to your staging area, and cards that reference "the quest" only apply to your quest stage. If a player is eliminated while at a separate stage, that stage is discarded along with all encounter cards at that stage.

Difficulty level

Easy Mode

easymode

During step 2 of Setup, "Place Heroes and Set Initial Threat Levels", add one resource to each hero's resource pool. When building the encounter deck, remove any card with the "difficulty" indicator around its encounter set icon (a gold border) from the current scenario's encounter deck.

Related Quests

Home

Back

The Antlered Crown

Official difficulty (7)

User rating (6.8)

rated by 30 players

Rate this Quest!

Keywords

Doomed X

If an encounter card with the doomed keyword is revealed during the staging step of the quest phase or in setup, each player must raise his threat level by the specified value.

Surge

When an encounter card with the surge keyword is revealed during the staging step of the quest phase or in setup, reveal 1 additional card from the encounter deck. Resolve the surge keyword immediately after resolving any when revealed effects on the card.

Time X

Time X is a keyword that represents the urgency of the heroes' quest. When a card with the Time X keyword is revealed, the players put X resource tokens on that card. These tokens are called "time counters." At the end of each refresh phase, remove 1 time counter from each card with the Time X keyword, if able. When the last time counter is removed, there will be a triggered effect that resolves on that card. Some encounter cards will also remove time counters, making it more difficult for the players to predict when they will run out of time.

Rulings

The Raven Deck

When setting up The Antlered Crown, the players are instructed to create the "Raven deck." To do this, remove each enemy card in both the Dunlending Warriors and Dunlending Raiders from the encounter deck. Shuffle the removed enemy cards into a deck. This is the Raven deck.

When a player is instructed to reveal a card from the Raven deck, resolve the staging of that card as if it was just revealed from the encounter deck. If a card with surge is revealed from the Raven deck, the players must reveal the top card of the encounter deck for the surge effect.

Whenever an enemy would leave play, it should be placed in the discard pile of the deck that it originated from: An enemy from the encounter deck should be placed in the encounter deck discard pile. An enemy from the Raven deck should be placed in the Raven deck discard pile. If the Raven deck is empty at any time, shuffle the Raven deck discard pile back into the Raven deck.

Difficulty level

Easy Mode

easymode

During step 2 of Setup, "Place Heroes and Set Initial Threat Levels", add one resource to each hero's resource pool. When building the encounter deck, remove any card with the "difficulty" indicator around its encounter set icon (a gold border) from the current scenario's encounter deck.

Related Quests

Home

Back

The Old Forest

User rating (5.7)

rated by 31 players

Rate this Quest!

Keywords

Doomed X

If an encounter card with the doomed keyword is revealed during the staging step of the quest phase or in setup, each player must raise his threat level by the specified value.

Surge

When an encounter card with the surge keyword is revealed during the staging step of the quest phase or in setup, reveal 1 additional card from the encounter deck. Resolve the surge keyword immediately after resolving any when revealed effects on the card.

Peril

When a player reveals an encounter card with the Peril keyword, he must resolve the staging of that card on his own without conferring with the other players. The other players cannot take any actions or trigger any responses during the resolution of that card's staging.

Indestructible

An enemy with the Indestructible keyword cannot be destroyed by damage, even when it has damage on it equal to its hit points.

Rulings

Stage 2 Quest Cards

When Stage 2B instructs the players to advance to a different random stage 2A, the first player shuffles each stage 2 (except for the one currently in play) together and chooses one of them at random. Then, he replaced the current stage 2 with the chosen one. The previous stage 2 is placed back in the quest deck with the other unused stage 2 cards. Discard any progress or attachments that were on the previous stage 2.

Immune to Player Card Effects

Cards with the text 'Immune to player card effects' ignore the effects of all player cards. Additionally, cards that are immune to player card effects cannot be chosen as targets of player card effects.

Difficulty level

Easy Mode

easymode

During step 2 of Setup, "Place Heroes and Set Initial Threat Levels", add one resource to each hero's resource pool. When building the encounter deck, remove any card with the "difficulty" indicator around its encounter set icon (a gold border) from the current scenario's encounter deck.

Related Quests

Home

Back

Fog on the Barrow-Downs

User rating (7.5)

rated by 42 players

Rate this Quest!

Keywords

Doomed X

If an encounter card with the doomed keyword is revealed during the staging step of the quest phase or in setup, each player must raise his threat level by the specified value.

Surge

When an encounter card with the surge keyword is revealed during the staging step of the quest phase or in setup, reveal 1 additional card from the encounter deck. Resolve the surge keyword immediately after resolving any when revealed effects on the card.

Peril

When a player reveals an encounter card with the Peril keyword, he must resolve the staging of that card on his own without conferring with the other players. The other players cannot take any actions or trigger any responses during the resolution of that card's staging.

Rulings

Creating a Staging Area

When a player is instructed to create his own staging area, he sets aside an area in front of himself to serve as his own separate staging area. Players continue to resolve each phase of the game in turn order, starting with the first player, but the resolution of each phase occurs as if only the player or players that share any given staging area are present in the game. Players cannot affect players or cards that do not share a common staging area. The players as a group still cannot have more than 1 copy of a unique card in play. During the encounter phase, players only reveal 1 card per player that shares their staging area. Encounter card effects are limited to players and cards at that stage. Effects that reference 'each player' only affect each player at that staging area.

Difficulty level

Easy Mode

easymode

During step 2 of Setup, "Place Heroes and Set Initial Threat Levels", add one resource to each hero's resource pool. When building the encounter deck, remove any card with the "difficulty" indicator around its encounter set icon (a gold border) from the current scenario's encounter deck.

Related Quests

Home

Back

Intruders in Chetwood

Official difficulty (4)

User rating (5.8)

rated by 90 players

Rate this Quest!

Keywords

Doomed X

If an encounter card with the doomed keyword is revealed during the staging step of the quest phase or in setup, each player must raise his threat level by the specified value.

Surge

When an encounter card with the surge keyword is revealed during the staging step of the quest phase or in setup, reveal 1 additional card from the encounter deck. Resolve the surge keyword immediately after resolving any when revealed effects on the card.

Time X

Time X is a keyword that represents the urgency of the heroes' quest. When a card with the Time X keyword is revealed, the players put X resource tokens on that card. These tokens are called "time counters." At the end of each refresh phase, remove 1 time counter from each card with the Time X keyword, if able. When the last time counter is removed, there will be a triggered effect that resolves on that card. Some encounter cards will also remove time counters, making it more difficult for the players to predict when they will run out of time.

Rulings

Iârion

The objective-ally, Iârion, has the text: "If Iârion leaves play, the players lose the game." This text cannot be modified by card effects.

Difficulty level

Easy Mode

easymode

During step 2 of Setup, "Place Heroes and Set Initial Threat Levels", add one resource to each hero's resource pool. When building the encounter deck, remove any card with the "difficulty" indicator around its encounter set icon (a gold border) from the current scenario's encounter deck.

Related Quests

Home

Back

The Weather Hills

Official difficulty (5)

User rating (6.3)

rated by 65 players

Rate this Quest!

Keywords

Doomed X

If an encounter card with the doomed keyword is revealed during the staging step of the quest phase or in setup, each player must raise his threat level by the specified value.

Surge

When an encounter card with the surge keyword is revealed during the staging step of the quest phase or in setup, reveal 1 additional card from the encounter deck. Resolve the surge keyword immediately after resolving any when revealed effects on the card.

Rulings

The Orc Deck

When setting up The Weather Hills, the players are instructed to create the "Orc deck." The Orc deck represents the scattered Orcs hiding among the Weather Hills that the heroes must find and destroy. To create the Orc deck, remove each enemy card with the Angmar Orcs encounter set icon, as well as all copies of Concealed Orc-camp, from the encounter deck and shuffle them into a separate deck. This is the Orc deck. When a card from the Orc deck leaves play, it is placed in the encounter deck discard pile. If the Orc deck runs out of cards, ignore any effects that refer to the Orc deck.

Difficulty level

Easy Mode

easymode

During step 2 of Setup, "Place Heroes and Set Initial Threat Levels", add one resource to each hero's resource pool. When building the encounter deck, remove any card with the "difficulty" indicator around its encounter set icon (a gold border) from the current scenario's encounter deck.

Related Quests

Home

Back

Deadmen's Dike

Official difficulty (7)

User rating (7.5)

rated by 63 players

Rate this Quest!

Keywords

Doomed X

If an encounter card with the doomed keyword is revealed during the staging step of the quest phase or in setup, each player must raise his threat level by the specified value.

Surge

When an encounter card with the surge keyword is revealed during the staging step of the quest phase or in setup, reveal 1 additional card from the encounter deck. Resolve the surge keyword immediately after resolving any when revealed effects on the card.

Indestructible

An enemy with the Indestructible keyword cannot be destroyed by damage, even when it has damage on it equal to its hit points.

Difficulty level

Easy Mode

easymode

During step 2 of Setup, "Place Heroes and Set Initial Threat Levels", add one resource to each hero's resource pool. When building the encounter deck, remove any card with the "difficulty" indicator around its encounter set icon (a gold border) from the current scenario's encounter deck.

Related Quests

Home

Back

Mount Doom

User rating (9.1)

rated by 54 players

Rate this Quest!

Keywords

Surge

When an encounter card with the surge keyword is revealed during the staging step of the quest phase or in setup, reveal 1 additional card from the encounter deck. Resolve the surge keyword immediately after resolving any when revealed effects on the card.

Doomed X

If an encounter card with the doomed keyword is revealed during the staging step of the quest phase or in setup, each player must raise his threat level by the specified value.

Peril

When a player reveals an encounter card with the Peril keyword, he must resolve the staging of that card on his own without conferring with the other players. The other players cannot take any actions or trigger any responses during the resolution of that card's staging.

Dire

The dire keyword represents the world-changing endeavors that the heroes of Middle-Earth undertook in the final book of The Lord of the Rings. While the main quest has the dire keyword, each player's threat elimination level is increased to 99 and each player's threat cannot be reduced by more than 1 each round by non-boon player card effects. Boon card effects that reduce player's threat are not affected by the dire keyword. Additionally, the threat value for triggering Valour effects is changed from 40 threat to 80.

Rulings

Fortitude Tests 

Fortitude tests represent the Ring-bearer's courage and determination to complete the quest for Mount Doom in the face of overwhelming adversity. When a player is instructed to make a Fortitude test, he may exhaust any number of heroes he controls to commit them to the test. Then, he must discard the top X cards of the encounter deck, where X is the tens digit of his threat dial. If the total willpower of the heroes committed to the test is greater than the number of Sauron's Eye icons on the encounter cards discarded for the test, that player successfully passes the Fortitude test. If the number of Sauron's Eye icons is equal to or greater than the total willpower of the committed heroes, that player fails the Fortitude test. If the encounter deck is ever empty during a Fortitude test, shuffle the encounter discard pile into the encounter deck. 

Player Actions During Fortitude Tests

Jason has committed characters to the quest at stage 3B, The Last Gasp, when he draw The Lidless Eye, which reads: "When Revealed: Make a fortitude test." Jason exhausts Frodo Baggins and Sam Gamgee to commit them to the test for a total of 5 willpower. Then he discards cards from the top of the encounter deck equal to the tens digit of his threat, which is 43. The first card has no Sauron's Eye icon, but the second has 1, and the third and fourth each have 2, which makes the total number of 5 Sauron's Eye icons. With the total willpower committed to the test being equal to the number of Sauron's Eye icon, it looks like Jason will fail the test, but than he exhausts Rosie Cotton to add her 2 willpower to Sam Gamgee's, which raises his total willpower to 7. As a result, jason passes the test.

Fortitude tests interrupt the regular turn sequence and create a new action window. After the total number of Sauron's Eye icons on the discarded encounter cards has been determined, players are allowed to take actions. Once the Fortitude test is resolved, play continues as normal and player actions are restricted to regular action windows.

Epic Multiplayer Mode

The Black Gate Opens and Mount Doom, can be played simultaneously by 2-8 players in epic multiplayer mode. Epic multiplayer mode divides a group of players into 2 teams: one team plays The Black Gate Opens and on team plays Mount Doom. Each scenario is its own game with its own staging area and requires its own encounter deck to play, but the teams at each scenario must work together in order to defeat Sauron and win each game.

To play in epic multiplayer mode, follow the Setup instructions on the double-sided setup card labeled "Epic Multiplayer Mode".

Setting Up Epic Multiplayer Mode

The Setup instructions on the Epic Multiplayer Mode card directs the players to create 2 separate staging areas: one for The Black Gate Opens and one for Mount Doom. To do this, choose a play area large enough for both scenarios and follow the Setup instructions on each scenario as normal. 

Next, the players divide themselves into 2 teams, one team for each scenario. At least 1 player must be assigned to each scenario, and no more than 4 players can be assigned to either. Furthermore, the number of players assigned to Mount Doom cannot exceed the number of players assigned to The Black Gate Opens.

Note: Both Aragorn and the Ring-bearer are used when playing epic multiplayer mode. The first player at The Black Gate Opens takes controls of Aragorn during setup, and the first player at Mount Doom takes control of the Ring-bearer

After completing the Setup instructions, flip over the Epic Multiplayer Mode card and place it next to the Mount Doom quest deck.

Encounter cards that are only used in epic multiplayer mode are indicated by the following icon: 

Playing Epic Multiplayer Mode 

The players at each scenario are the only players in the game at that scenario. That means it is possible for two players at different scenarios to use the same hero. However, players at the same scenario must observe the game restrictions on unique cards. Player cards cannot target or affect cards at a different scenario. When a team ends a round at their stage they do not advance the next round of play until each other team in that group is ready to advance.

Before the teams advance to the next round, there are Forced effects on the Epic Multiplayer Mode card and The Eye of Sauron objective card that must be resolved. The teams are encouraged to discuss these effects to determine what is the best option for the group. The Eye of Sauron may move from one scenario to another as a result. 

Playing Epic Multiplayer Mode in Campaign Mode

Caleb and Matt are setting up The Black Gate Opens and Mount Doom in epic multiplayer campaign mode. Grievous Wound and Overcome by Grief are in the campaign pool and each of those burdens are included in the setup for both scenarios. Since Matt controls the Ring-bearer, he decides to place Grievous Wound in the staging area of The Black Gate Opens and Overcome by Grief in the staging are of Mount Doom during setup.

The Black Gate Opens and Mount Doom can be played by 2-4 players in epic multiplayer mode as the grand finale to your saga campaign. Simply follow the Setup instructions on the Epic Multiplayer Mode card and on each of the corresponding campaign cards.

Be sure to include all of the appropriate boons and burdens at each stage. If a boon or burden is included as part of the Setup for both scenarios, the player who controls the Ring-bearer decides which scenario receives that boon or burden.

Difficulty level

Easy Mode

easymode

During step 2 of Setup, "Place Heroes and Set Initial Threat Levels", add one resource to each hero's resource pool. When building the encounter deck, remove any card with the "difficulty" indicator around its encounter set icon (a gold border) from the current scenario's encounter deck.

Related Quests

Home

Back

The Uruk-hai

User rating (6.3)

rated by 57 players

Rate this Quest!

Keywords

Peril

When a player reveals an encounter card with the Peril keyword, he must resolve the staging of that card on his own without conferring with the other players. The other players cannot take any actions or trigger any responses during the resolution of that card's staging.

Toughness X

After Ian plays the Gandalf ally from his hand, he chooses to deal 4 damage to Uruk-hai Archer. The Uruk-hai Archer has toughness 1, so it reduces the damage that it is dealt from 4 to 3.

An enemy with the toughness keyword reduces the amount of damage it takes by X each time it is assigned any amount of damage.

Archery X

Tom and Kris are playing the scenario "Into Ithilien," and two copies of Southron Mercenaries are in play. Southron Mercenaries has the keyword archery X, where X is the number of players in the game. This gives a cumulative archery value of 4. At the beginning of the combat phase, the players decide to deal 2 damage to Kris' ally Gandalf, and 2 damage to Tom's hero Denethor.

While a card with the archery keyword is in play, players must deal damage to character cards in play equal to the specified archery value at the beginning of each combat phase. This damage can be dealt to characters under any player's control, and it can be divided among the players as they see fit. If there is disagreement as to where to assign archery damage, the first player makes the final decision. If multiple cards with the archery keyword are in play, the effects are cumulative. Remember that does not block archery damage.

Rulings

Pursuit Value and Pursuit Tracker

When setting up The Uruk-hai, players are instructed to set the pursuit value to 10. This is done by taking an extra threat tracker and setting it next to the quest deck. That threat tracker is now the pursuit tracker, and it tracks the pursuit value. The pursuit value represents the Uruk-hai's progress as they race towards Isengard with their prisoners. As the pursuit value increases, so does the amount of progress that the players must place on the current quest in order to defeat that stage. At the end of the round, if the pursuit value is 30, then the Uruk-hai have reached Isengard and delivered their prisoners to Saruman. If this happens, the players have failed to rescue their companions and they lose the game.

Difficulty level

Easy Mode

easymode

During step 2 of Setup, "Place Heroes and Set Initial Threat Levels", add one resource to each hero's resource pool. When building the encounter deck, remove any card with the "difficulty" indicator around its encounter set icon (a gold border) from the current scenario's encounter deck.

Related Quests

Home

Back

Helm's Deep

User rating (8.2)

rated by 71 players

Rate this Quest!

Keywords

Doomed X

If an encounter card with the doomed keyword is revealed during the staging step of the quest phase or in setup, each player must raise his threat level by the specified value.

Surge

When an encounter card with the surge keyword is revealed during the staging step of the quest phase or in setup, reveal 1 additional card from the encounter deck. Resolve the surge keyword immediately after resolving any when revealed effects on the card.

Peril

When a player reveals an encounter card with the Peril keyword, he must resolve the staging of that card on his own without conferring with the other players. The other players cannot take any actions or trigger any responses during the resolution of that card's staging.

Archery X

Tom and Kris are playing the scenario "Into Ithilien," and two copies of Southron Mercenaries are in play. Southron Mercenaries has the keyword archery X, where X is the number of players in the game. This gives a cumulative archery value of 4. At the beginning of the combat phase, the players decide to deal 2 damage to Kris' ally Gandalf, and 2 damage to Tom's hero Denethor.

While a card with the archery keyword is in play, players must deal damage to character cards in play equal to the specified archery value at the beginning of each combat phase. This damage can be dealt to characters under any player's control, and it can be divided among the players as they see fit. If there is disagreement as to where to assign archery damage, the first player makes the final decision. If multiple cards with the archery keyword are in play, the effects are cumulative. Remember that does not block archery damage.

Toughness X

After Ian plays the Gandalf ally from his hand, he chooses to deal 4 damage to Uruk-hai Archer. The Uruk-hai Archer has toughness 1, so it reduces the damage that it is dealt from 4 to 3.

An enemy with the toughness keyword reduces the amount of damage it takes by X each time it is assigned any amount of damage.

Defense

Defense is a keyword that represents the army of Saruman laying siege to Helm's Deep and their efforts to capture the fortress. While the current quest has the defense keyword, players cannot place progress on the quest (or active location) by questing successfully. Instead, the encounter deck tries to place progress on the current quest. If the encounter deck defeats stage 4B, the army of Saruman captures Helm's Deep, and the players lose the game.

During quest resolution, if the total in the staging area is greater than the total of characters committed to the quest, players do not raise their threat by the difference. Instead, the first player places progress on the current quest equal to the difference.

The active location still acts as a buffer to the quest, so progress made by the encounter deck or encounter card effect must be placed on the active location first before it is placed on the quest (unless a card effect bypasses the active location). When a quest has progress equal to its quest points, that stage is defeated and the players should advance to the next stage as usual.

FAQ & Errata

Devilry of Saruman

Should read: "When Revealed: Place 3 progress on the main quest..."

Difficulty level

Easy Mode

easymode

During step 2 of Setup, "Place Heroes and Set Initial Threat Levels", add one resource to each hero's resource pool. When building the encounter deck, remove any card with the "difficulty" indicator around its encounter set icon (a gold border) from the current scenario's encounter deck.

Related Quests

Home

Back

The Road to Isengard

User rating (6.5)

rated by 48 players

Rate this Quest!

Keywords

Doomed X

If an encounter card with the doomed keyword is revealed during the staging step of the quest phase or in setup, each player must raise his threat level by the specified value.

Surge

When an encounter card with the surge keyword is revealed during the staging step of the quest phase or in setup, reveal 1 additional card from the encounter deck. Resolve the surge keyword immediately after resolving any when revealed effects on the card.

Peril

When a player reveals an encounter card with the Peril keyword, he must resolve the staging of that card on his own without conferring with the other players. The other players cannot take any actions or trigger any responses during the resolution of that card's staging.

Archery X

Tom and Kris are playing the scenario "Into Ithilien," and two copies of Southron Mercenaries are in play. Southron Mercenaries has the keyword archery X, where X is the number of players in the game. This gives a cumulative archery value of 4. At the beginning of the combat phase, the players decide to deal 2 damage to Kris' ally Gandalf, and 2 damage to Tom's hero Denethor.

While a card with the archery keyword is in play, players must deal damage to character cards in play equal to the specified archery value at the beginning of each combat phase. This damage can be dealt to characters under any player's control, and it can be divided among the players as they see fit. If there is disagreement as to where to assign archery damage, the first player makes the final decision. If multiple cards with the archery keyword are in play, the effects are cumulative. Remember that does not block archery damage.

Indestructible

An enemy with the Indestructible keyword cannot be destroyed by damage, even when it has damage on it equal to its hit points.

Rulings

Wizardry

Wizardry is a new timing trigger in The Road to Isengard scenario that represents the various spells and machinations that Saruman used to defend Isengard from attack. When a location with the Wizardry trigger leaves play as an explored location, trigger its Wizardry effect (even if it is not the active location).

Difficulty level

Easy Mode

easymode

During step 2 of Setup, "Place Heroes and Set Initial Threat Levels", add one resource to each hero's resource pool. When building the encounter deck, remove any card with the "difficulty" indicator around its encounter set icon (a gold border) from the current scenario's encounter deck.

Related Quests

Home

Back

The Wastes of Eriador

Official difficulty (6)

User rating (7.1)

rated by 63 players

Rate this Quest!

Keywords

Surge

When an encounter card with the surge keyword is revealed during the staging step of the quest phase or in setup, reveal 1 additional card from the encounter deck. Resolve the surge keyword immediately after resolving any when revealed effects on the card.

Doomed X

If an encounter card with the doomed keyword is revealed during the staging step of the quest phase or in setup, each player must raise his threat level by the specified value.

Rulings

Daybreak and Nightfall

This scenario includes a double-sided objective, Daybreak / Nightfall. The Daybreak side of this objective has the text "It is Day" and the Nightfall side of this objective has the text "It is Night." In and of itself, the condition of "Day" or "Night" has no inherent effect. However, many encounter cards in this scenario (including Daybreak and Nightfall) have additional or different effects, depending on whether it is currently Day or Night.

Amarthiúl

Amarthiúl is an objective-ally in this scenario. During setup, the first player takes control of Amarthiúl. Amarthiúl has the text: "Response : After an enemy engages a player, give control of Amarthiúl to that player." This response is optional, and allows you to give control of Amarthiúl to another player after an enemy engages that player. Amarthiúl does not pass from one player to another when you pass the first player token.

Amarthiúl also has the text: "If Amarthiúl leaves play, the players lose the game." This text cannot be modified by card effects.

Difficulty level

Easy Mode

easymode

During step 2 of Setup, "Place Heroes and Set Initial Threat Levels", add one resource to each hero's resource pool. When building the encounter deck, remove any card with the "difficulty" indicator around its encounter set icon (a gold border) from the current scenario's encounter deck.

Related Quests

Home

Back

Escape from Mount Gram

Official difficulty (5)

User rating (3.5)

rated by 63 players

Rate this Quest!

Keywords

Doomed X

If an encounter card with the doomed keyword is revealed during the staging step of the quest phase or in setup, each player must raise his threat level by the specified value.

Capture X

Capture is a keyword that represents locations or enemies that guard one or more captured cards. When an encounter card or quest card with the capture X keyword enters play, before resolving that card's "when revealed" effects, each player takes the top X cards of his or her captured deck and captures them by placing them facedown underneath that card. (If the players are at different stages of the quest, only the players at that stage perform this act.)

Rulings

Preparing A Captured Deck

When setting up Escape from Mount Gram, stage 1A instructs each player to prepare a separate captured deck. A captured deck represents the allies, heroes and equipment taken from each player's party that he or she must find and recover before they can be played.

To prepare a captured deck, remove all allies, Item attachments, Mount attachments, and Artifact attachments from the player deck, and shuffle them together. This pile is now referred to as your captured deck. A captured deck does not have its own discard pile; any cards that are discarded from a captured deck are placed in its owner's discard pile.

After preparing his or her captured deck, each player chooses only 1 hero to be his or her starting hero. Then, each player randomly sets aside 1 of his or her other heroes, facedown. Shuffle any remaining heroes into their owner's captured decks, then place each facedown set aside hero on top of its owner's captured deck.

Captured Cards and Rescuing Cards

When cards are captured facedown underneath an encounter card, those cards are called " captured cards," and are considered to be out of play, under no player's control. This can occur from the capture X keyword, or from encounter card effects that instruct a player to capture 1 or more cards underneath a specified card. If a card is captured from play, all tokens on that card and attachments on that card are discarded.

When an encounter card or quest card with 1 or more captured cards underneath it leaves play, all of the captured cards underneath it are "rescued" by their owners. Rescued cards are placed in their owners' hands. If a hero card is rescued, immediately put it into play under its owner's control.

Creating a Staging Area

When each player is instructed to "create his own staging area, " each player sets aside an area in front of himself to serve as his own private staging area. Only players that share a common staging area can interact with each other in any way. Players continue to resolve each phase of the game in turn order, starting with the First Player (which continues to move), but the resolution of each phase occurs as if only the player or players that share any given staging area are currently in the game.

Joining Another Player

On stage 2B players are instructed to "join another player" if there are no captured cards underneath it. Joining another player happens at the beginning of the travel phase. The joining player(s) must add any encounter cards in his own staging area to the staging area of the player(s) he is joining with, keeping any enemies engaged with him and discarding any active location in the staging area being left. If multiple players have no captured cards underneath stage 2B during the same phase, they join quests starting with the First Player and proceeding clockwise around the table. If there is no player to join, then players must continue to stage 3.

Difficulty level

Easy Mode

easymode

During step 2 of Setup, "Place Heroes and Set Initial Threat Levels", add one resource to each hero's resource pool. When building the encounter deck, remove any card with the "difficulty" indicator around its encounter set icon (a gold border) from the current scenario's encounter deck.

Related Quests

Home

Back

The Passage of the Marshes

User rating (6.3)

rated by 40 players

Rate this Quest!

Keywords

Surge

When an encounter card with the surge keyword is revealed during the staging step of the quest phase or in setup, reveal 1 additional card from the encounter deck. Resolve the surge keyword immediately after resolving any when revealed effects on the card.

Doomed X

If an encounter card with the doomed keyword is revealed during the staging step of the quest phase or in setup, each player must raise his threat level by the specified value.

Peril

When a player reveals an encounter card with the Peril keyword, he must resolve the staging of that card on his own without conferring with the other players. The other players cannot take any actions or trigger any responses during the resolution of that card's staging.

Mire X

Mire is a new keyword that represents the shifting, sinking nature of the Dead Marshes. At the end of the refresh phase, place 1 resource token on each location in the staging area. Resource tokens placed on locations with the mire keyword are called "mire tokens." When a location with the mire keyword has mire tokens equal to its mire X value, it is immediately discarded.

Each location with the mire keyword also has a Forced effect that triggers when it is discarded from play by the mire keyword. These Forced effects do not trigger when a location is discarded by any other effect, or when a location is placed in the discard pile after being explored.

Strategy Tip

Since mire tokens are only placed on locations in the staging area during the refresh phase, the players should pay close attention to the number of mire tokens on each location, and any Forced effects that may trigger that round, when deciding which location to travel to during the travel phase

FAQ & Errata

The Passage of the Marshes

Should read: "Setup: Each player may change hero cards he controls without incurring the +1 threat penalty. Each player shuffles 1 copy..."

Difficulty level

Easy Mode

easymode

During step 2 of Setup, "Place Heroes and Set Initial Threat Levels", add one resource to each hero's resource pool. When building the encounter deck, remove any card with the "difficulty" indicator around its encounter set icon (a gold border) from the current scenario's encounter deck.

Related Quests

Home

Back

Journey to the Cross-roads

User rating (8.3)

rated by 50 players

Rate this Quest!

Keywords

Surge

When an encounter card with the surge keyword is revealed during the staging step of the quest phase or in setup, reveal 1 additional card from the encounter deck. Resolve the surge keyword immediately after resolving any when revealed effects on the card.

Archery X

Tom and Kris are playing the scenario "Into Ithilien," and two copies of Southron Mercenaries are in play. Southron Mercenaries has the keyword archery X, where X is the number of players in the game. This gives a cumulative archery value of 4. At the beginning of the combat phase, the players decide to deal 2 damage to Kris' ally Gandalf, and 2 damage to Tom's hero Denethor.

While a card with the archery keyword is in play, players must deal damage to character cards in play equal to the specified archery value at the beginning of each combat phase. This damage can be dealt to characters under any player's control, and it can be divided among the players as they see fit. If there is disagreement as to where to assign archery damage, the first player makes the final decision. If multiple cards with the archery keyword are in play, the effects are cumulative. Remember that does not block archery damage.

Peril

When a player reveals an encounter card with the Peril keyword, he must resolve the staging of that card on his own without conferring with the other players. The other players cannot take any actions or trigger any responses during the resolution of that card's staging.

Difficulty level

Easy Mode

easymode

During step 2 of Setup, "Place Heroes and Set Initial Threat Levels", add one resource to each hero's resource pool. When building the encounter deck, remove any card with the "difficulty" indicator around its encounter set icon (a gold border) from the current scenario's encounter deck.

Related Quests

Home

Back

Shelob's Lair

User rating (7.6)

rated by 36 players

Rate this Quest!

Keywords

Doomed X

If an encounter card with the doomed keyword is revealed during the staging step of the quest phase or in setup, each player must raise his threat level by the specified value.

Surge

When an encounter card with the surge keyword is revealed during the staging step of the quest phase or in setup, reveal 1 additional card from the encounter deck. Resolve the surge keyword immediately after resolving any when revealed effects on the card.

Indestructible

An enemy with the Indestructible keyword cannot be destroyed by damage, even when it has damage on it equal to its hit points.

Peril

When a player reveals an encounter card with the Peril keyword, he must resolve the staging of that card on his own without conferring with the other players. The other players cannot take any actions or trigger any responses during the resolution of that card's staging.

Difficulty level

Easy Mode

easymode

During step 2 of Setup, "Place Heroes and Set Initial Threat Levels", add one resource to each hero's resource pool. When building the encounter deck, remove any card with the "difficulty" indicator around its encounter set icon (a gold border) from the current scenario's encounter deck.

Related Quests

Home

Back

The Ruins of Belegost

User rating (8.6)

rated by 36 players

Rate this Quest!

Keywords

Doomed X

If an encounter card with the doomed keyword is revealed during the staging step of the quest phase or in setup, each player must raise his threat level by the specified value.

Surge

When an encounter card with the surge keyword is revealed during the staging step of the quest phase or in setup, reveal 1 additional card from the encounter deck. Resolve the surge keyword immediately after resolving any when revealed effects on the card.

Discover X

The Discover keyword represents the heroes' search for lost treasure, as well as the unexpected dangers they encounter as they travel to the different locations in the scenario. When a location with the Discover keyword becomes the active location, the first player resolves the following steps in order:

  1. Look at the top X cards of the encounter deck, where X is the active locations Discover value. 
  2. Choose 1 looked at objective with the Loot keyword and attach it to the active location as a guarded objective.
  3. Randomly select 1 looked at card with the Hazard trait, reveal it and add it to the staging area.
  4. Place any remaining looked at cards in the encounter discard pile.

If there are less than X cards remaining in the encounter deck when resolving the Discover keyword, shuffle the encounter discard pile into the encounter deck and continue resolving the Discover keyword.

Loot

Objectives with the Loot keyword are valuable treasures that can only be discovered by exploring the different locations of the scenario. A Loot card can only enter play by resolving the Discover keyword on a location.

If a card with the Loot keyword is revealed from the encounter deck, discard it and reveal another card from the top of the encounter deck.

Rulings

Taking Control of Loot

When the encounter card guarding a Loot objective leaves play, the first player must immediately attach that Loot objective to a hero he controls. If a Loot objective is attached to the active location when the players make enough progress to explore the active location and advance to the next stage, the first player takes control of the Loot objective before advancing to the next stage.

Difficulty level

Easy Mode

easymode

During step 2 of Setup, "Place Heroes and Set Initial Threat Levels", add one resource to each hero's resource pool. When building the encounter deck, remove any card with the "difficulty" indicator around its encounter set icon (a gold border) from the current scenario's encounter deck.

Related Quests

Home

Back

Across the Ettenmoors

Official difficulty (4)

User rating (4.2)

rated by 58 players

Rate this Quest!

Keywords

Surge

When an encounter card with the surge keyword is revealed during the staging step of the quest phase or in setup, reveal 1 additional card from the encounter deck. Resolve the surge keyword immediately after resolving any when revealed effects on the card.

Doomed X

If an encounter card with the doomed keyword is revealed during the staging step of the quest phase or in setup, each player must raise his threat level by the specified value.

Guarded

The guarded keyword is a reminder on some objective cards to reveal and attach the next card of the encounter deck to the objective when it enters the staging area from the encounter deck, and place them both in the staging area. The objective cannot be claimed as long as any encounter card is attached. Once that encounter is dealt with, the objective remains in the staging area until it is claimed. If another objective card comes up while attaching a card for the guarded keyword, place the second objective in the staging area, and use the next card of the encounter deck to fulfil the original keyword effect. Enemy and location cards attached to guarded objectives do still count their threat while the enemy or location is in the staging area. An encounter card attached to a guarded objective is dealt with in the following method, depending on its card type:

Once all encounter cards attached to a guarded objective are dealt with, the players can claim the objective in the manner specified by its card text.

Safe

Safe is a keyword in the Across the Ettenmoors scenario, representing havens in which the players can take refuge from the harsh weather and vicious Trolls of the Ettenmoors. 

When players travel to a location with the safe keyword, immediately return all engaged enemies to the staging area. 

While a location with the safe keyword is the active location, ignore the "when revealed"effects of all treachery cards, treat the printed text box of all encounter side quests as if they were blank, and enemies do not make engagement checks. At the end of the quest phase, if a safe location is the active location, add it to the victory display.

Rulings

Objective-Locations

In this scenario, there are four objective-location cards: Patch of Woods, Secluded Cave, Abandoned Camp, and The Hoarwell. These cards are objectives that are also considered to be locations for all purposes, except they do not have , and can have the guarded keyword, like other objectives. 

While an objective-location is guarded by another encounter card (including side quests), it cannot be the active location. Like other guarded objectives, once the attached encounter is dealt with, the objective-location returns to the staging area. Only then may the players travel to it. (If an objective-location is guarded by a location, traveling to the location guarding the objectivelocation does not count as traveling to the objective-location.)

Amarthiúl

Amarthiúl is an objective-ally in this scenario. During setup, the first player takes control of Amarthiúl. Amarthiúl has the text: "Response: After an enemy engages a player, give control of Amarthiúl to that player." This response is optional, and allows you to give control of Amarthiúl to another player after an enemy engages that player. Amarthiúl does not pass from one player to another when you pass the first player token. 

Amarthiúl also has the text: "If Amarthiúl leaves play, the players lose the game." This text cannot be modified by card effects.

Difficulty level

Easy Mode

easymode

During step 2 of Setup, "Place Heroes and Set Initial Threat Levels", add one resource to each hero's resource pool. When building the encounter deck, remove any card with the "difficulty" indicator around its encounter set icon (a gold border) from the current scenario's encounter deck.

Related Quests

Home

Back

The Treachery of Rhudaur

Official difficulty (5)

User rating (6)

rated by 53 players

Rate this Quest!

Keywords

Surge

When an encounter card with the surge keyword is revealed during the staging step of the quest phase or in setup, reveal 1 additional card from the encounter deck. Resolve the surge keyword immediately after resolving any when revealed effects on the card.

Doomed X

If an encounter card with the doomed keyword is revealed during the staging step of the quest phase or in setup, each player must raise his threat level by the specified value.

Time X

Time X is a keyword that represents the urgency of the heroes' quest. When a card with the Time X keyword is revealed, the players put X resource tokens on that card. These tokens are called "time counters." At the end of each refresh phase, remove 1 time counter from each card with the Time X keyword, if able. When the last time counter is removed, there will be a triggered effect that resolves on that card. Some encounter cards will also remove time counters, making it more difficult for the players to predict when they will run out of time.

Indestructible

An enemy with the Indestructible keyword cannot be destroyed by damage, even when it has damage on it equal to its hit points.

Rulings

The Investigation

This scenario includes 3 side quests which are added to the staging area during setup, "quest side faceup". The cards are double-sided, with a side quest on one side and a Clue objective on the other side. While they are quest side faceup, they function as an encounter side quest. Each of these quests has the text, "When this quest is defeated, flip it over". This means you turn it so that it is objective side faceup. As an objective, each of these cards has text that allows the players to claim the objective and attach it to Amarthiúl, or to a hero. Therefore, by completing each of these side quests, the players are able to claim objectives that aid them in their quest.

Amarthiúl

Amarthiúl is an objective-ally in this scenario. During setup, the first player takes control of Amarthiúl. Amarthiúl has the text: "Response: After an enemy engages a player, give control of Amarthiúl to that player." This response is optional, and allows you to give control of Amarthiúl to another player after an enemy engages that player. Amarthiúl does not pass from one player to another when you pass the first player token. 

Amarthiúl also has the text: "If Amarthiúl leaves play, the players lose the game." This text cannot be modified by card effects.

Difficulty level

Easy Mode

easymode

During step 2 of Setup, "Place Heroes and Set Initial Threat Levels", add one resource to each hero's resource pool. When building the encounter deck, remove any card with the "difficulty" indicator around its encounter set icon (a gold border) from the current scenario's encounter deck.

Related Quests

Home

Back

The Battle of Carn-Dûm

Official difficulty (8)

User rating (9.2)

rated by 104 players

Rate this Quest!

Keywords

Surge

When an encounter card with the surge keyword is revealed during the staging step of the quest phase or in setup, reveal 1 additional card from the encounter deck. Resolve the surge keyword immediately after resolving any when revealed effects on the card.

Doomed X

If an encounter card with the doomed keyword is revealed during the staging step of the quest phase or in setup, each player must raise his threat level by the specified value.

Battle

Tom has committed the characters Gandalf and an Ithilien Tracker to the quest card Ambush in Ithilien (1B), which has the battle keyword. When resolving this quest, instead of using his characters' , Tom counts their total . Gandalf has an of 4, and the Ithilien Tracker has an of 1, for a total of 5. Tom compares this total against the in the staging area, which is currently a 3. Tom therefore quests successfully, and makes 2 progress on the quest.

If a quest card has the battle keyword, when characters are committed to that quest, they count their total instead of their total when resolving the quest. Enemies and locations in the staging area still use their in opposition to this quest attempt.

Indestructible

An enemy with the Indestructible keyword cannot be destroyed by damage, even when it has damage on it equal to its hit points.

Rulings

Thaurdir

The players are on stage 1B and Thaurdir is Captain side faceup. The players reveal the treachery card "Daechanar's Will," which causes the players to flip Thaurdir to his Champion side. Once flipped, he triggers his new Forced effect, which reads: "Forced: After Thaurdir is flipped or a treachery card with the Sorcery trait is revealed, Thaurdir heals 3 damage and makes an attack against the first player." Thaurdir will heal 3 damage and make an attack against the first player, and remain Champion side face-up.

At the end of that round, if Thaurdir is still Champion side faceup, the players will have to flip him back to his Captain side, because of the text on stage 1B, which reads: "At the end of the round, if Thaurdir is Champion side face-up, flip him."Once flipped he will trigger his new Forced effect again, which reads: "Forced: After Thaurdir is flipped or a treachery card with the Sorcery trait is revealed, deal 1 shadow card to each enemy in play."

Thaurdir is a double-sided enemy card who is added to the staging area when setting up The Battle of Carn-Dúm. One side has the Captain trait, and the other side has the Champion trait. Each of his side has a Forced effect that triggers after a Sorcery card is reavealed, or after he is "flipped". Whenever an effect flips Thaurdir from one side to another, after he is flipped to his new side, trigger his new Forced effect.

Whenever Thaurdir flips from one side to another, keep all tokens and attachments that were one him. He does not leave play during this transition.

Because Thaurdir has no encounter card back, he cannot be placed or shuffled into the encounter deck for any reason.

Difficulty level

Easy Mode

easymode

During step 2 of Setup, "Place Heroes and Set Initial Threat Levels", add one resource to each hero's resource pool. When building the encounter deck, remove any card with the "difficulty" indicator around its encounter set icon (a gold border) from the current scenario's encounter deck.

Related Quests

Home

Back

The Tower of Cirith Ungol

User rating (7.4)

rated by 32 players

Rate this Quest!

Keywords

Guarded

The guarded keyword is a reminder on some objective cards to reveal and attach the next card of the encounter deck to the objective when it enters the staging area from the encounter deck, and place them both in the staging area. The objective cannot be claimed as long as any encounter card is attached. Once that encounter is dealt with, the objective remains in the staging area until it is claimed. If another objective card comes up while attaching a card for the guarded keyword, place the second objective in the staging area, and use the next card of the encounter deck to fulfil the original keyword effect. Enemy and location cards attached to guarded objectives do still count their threat while the enemy or location is in the staging area. An encounter card attached to a guarded objective is dealt with in the following method, depending on its card type:

Once all encounter cards attached to a guarded objective are dealt with, the players can claim the objective in the manner specified by its card text.

Surge

When an encounter card with the surge keyword is revealed during the staging step of the quest phase or in setup, reveal 1 additional card from the encounter deck. Resolve the surge keyword immediately after resolving any when revealed effects on the card.

Doomed X

If an encounter card with the doomed keyword is revealed during the staging step of the quest phase or in setup, each player must raise his threat level by the specified value.

Archery X

Tom and Kris are playing the scenario "Into Ithilien," and two copies of Southron Mercenaries are in play. Southron Mercenaries has the keyword archery X, where X is the number of players in the game. This gives a cumulative archery value of 4. At the beginning of the combat phase, the players decide to deal 2 damage to Kris' ally Gandalf, and 2 damage to Tom's hero Denethor.

While a card with the archery keyword is in play, players must deal damage to character cards in play equal to the specified archery value at the beginning of each combat phase. This damage can be dealt to characters under any player's control, and it can be divided among the players as they see fit. If there is disagreement as to where to assign archery damage, the first player makes the final decision. If multiple cards with the archery keyword are in play, the effects are cumulative. Remember that does not block archery damage.

Difficulty level

Easy Mode

easymode

During step 2 of Setup, "Place Heroes and Set Initial Threat Levels", add one resource to each hero's resource pool. When building the encounter deck, remove any card with the "difficulty" indicator around its encounter set icon (a gold border) from the current scenario's encounter deck.

Related Quests

Home

Back

The Dread Realm

Official difficulty (7)

User rating (8.1)

rated by 42 players

Rate this Quest!

Keywords

Doomed X

If an encounter card with the doomed keyword is revealed during the staging step of the quest phase or in setup, each player must raise his threat level by the specified value.

Surge

When an encounter card with the surge keyword is revealed during the staging step of the quest phase or in setup, reveal 1 additional card from the encounter deck. Resolve the surge keyword immediately after resolving any when revealed effects on the card.

Indestructible

An enemy with the Indestructible keyword cannot be destroyed by damage, even when it has damage on it equal to its hit points.

Rulings

Reanimated Dead

Many encounter cards in The Dread Realm scenario instruct players to "reanimate" a card. When a player is instructed to reanimate a card, place that card facedown in front of that player, as if it had just engaged that player from the staging area. Facedown cards that have been reanimated are called "Reanimated Dead" and act as if they are Undead enemy cards with 0 engagement cost, 2 , 2 , 2 , and 2 hit points. As a reminder, each quest card has the text: "Reanimated Dead are Undead enemies with 2 , 2 , 2 and 2 hit points." If a Reanimated Dead is destroyed or leaves play for any other reason, it is placed in its owner's discard pile.

Difficulty level

Easy Mode

easymode

During step 2 of Setup, "Place Heroes and Set Initial Threat Levels", add one resource to each hero's resource pool. When building the encounter deck, remove any card with the "difficulty" indicator around its encounter set icon (a gold border) from the current scenario's encounter deck.

Related Quests

Home

Back

Murder at the Prancing Pony

User rating (7.6)

rated by 27 players

Rate this Quest!

Keywords

Surge

When an encounter card with the surge keyword is revealed during the staging step of the quest phase or in setup, reveal 1 additional card from the encounter deck. Resolve the surge keyword immediately after resolving any when revealed effects on the card.

Doomed X

If an encounter card with the doomed keyword is revealed during the staging step of the quest phase or in setup, each player must raise his threat level by the specified value.

Investigate X

Investigate is a new keyword the represents the heroes' efforts to solve the crime. When an active location with the Investigage keyword is explored, the first player shuffles the Investigation deck and looks at the top X cards. Then, he placed those cards back on top of the Investigation deck in the same order.

While the players are at stage 2B, the Investigate keyword on the active location is resolved before the second Forced effect on that stage.

Rulings

The Investigation Deck

Begin the game by following the Setup instructions on stage 1A. When the players are instructed to "build the investigation deck," do the following: take the 4 remaining Suspect enemies and the 4 remaining Hideout locations, plus each copy of Taken By Surprise, and shuffle them together without looking at them. This is the Investigation deck.

The players are not allowed to look at cards in the Investigation deck except when resolving the Investigation keyword or instructed by a card effect.

The Investigation List

The Investigation List has the name of all 5 Suspect enemies and all 5 Hideout locations. During the game, players should check enemies and locations off of their Investigation list in order to help them determine the correct Suspect and Hideout by process of elimination.

Suspects

Hideouts

Making the Accusation

In order to advance from stage 2B to 3A, the players must "make an accusation." To make the accusation, the first player names 1 Suspect and 1 Hideout. Then, he reveals the facedown, out of play Suspect and Hideout cards and adds them to the staging area.

If the revealed Suspect and Hideout are the same as those named by the first player, the accusation is correct and the players have successfully identified the killer and the outlaw's secret hideout.

If the out of play cards are not the same as the ones named by the first player, then the accusation is not correct, and the heroes have embroiled themselves in a deeper plot by pursuing the wrong the wrong Suspect or investigating the wrong Hideout. If the accusation is not correct, search the Investigation deck for each just named card that is not already in play and add it to the staging area. Then, raise each player's threat by 3.

Difficulty level

Easy Mode

easymode

During step 2 of Setup, "Place Heroes and Set Initial Threat Levels", add one resource to each hero's resource pool. When building the encounter deck, remove any card with the "difficulty" indicator around its encounter set icon (a gold border) from the current scenario's encounter deck.

Related Quests

Home

Back

Flight of the Stormcaller

Official difficulty (6)

User rating (6)

rated by 41 players

Rate this Quest!

Keywords

Doomed X

If an encounter card with the doomed keyword is revealed during the staging step of the quest phase or in setup, each player must raise his threat level by the specified value.

Surge

When an encounter card with the surge keyword is revealed during the staging step of the quest phase or in setup, reveal 1 additional card from the encounter deck. Resolve the surge keyword immediately after resolving any when revealed effects on the card.

Boarding X

Boarding is a keyword that appears on many ship-enemies. When a ship-enemy with the Boarding keyword engages a player from the staging area, reveal the top X cards from the Corsair Deck and put the revealed enemies into play, engaged with that player. Note that the Boarding keyword does not resolve if the ship-enemy engages a player from another player's play area, or from the encounter deck or discard pile.

Sailing

Sailing is a keyword that represents that the players are currently traveling across the sea on their ships. At the beginning of each quest phase (before committing characters to the quest), if the main quest has the Sailing keyword, the first player must perform a Sailing test.

Sailing Tests

Brandon and Brian are playing a scenario and the main quest has the Sailing keyword. Their heading is not looking too good (), but a good Sailing test could get it back on course ().

1. At the beginning of the quest phase, the first player, Brandon, must perform a Sailing test. First, he shifts his heading off" course by rotating the Heading card 90 degrees counter " clockwise. This sets their heading to .

2. He then commits Ci­rdan the Shipwright and 2 Sailors of Lune to the Sailing test. Since he committed 3 characters to the Sailing test, he looks at the top 3 cards of the encounter deck and counts the number of symbols found on those cards.

3. Brandon spots no symbols on the first card, but one on each of the other two cards. He therefore shifts his heading two steps towards on" course by rotating the Heading card 90 degrees clockwise twice. This puts the fleet back on" course ()!

Sailing tests represent the players' ability to change their course or alter their sails and riggings in such a way as to adapt to the changing winds.

In order to perform a Sailing test, you must first shift your heading off-course. This represents the shifting of the winds, and the difficulty of navigating at sea. (If it is already at , it does not change.)

Then, the player performing the Sailing test exhausts any number of characters he controls, committing them to the Sailing test. After choosing which characters to commit to the Sailing test, that player looks at a number of cards from the top of the encounter deck equal to the total number of characters committed to the Sailing test. If the encounter deck does not contain enough cards to look at, shuffle the encounter discard pile back into the encounter deck first.

Some encounter cards have a symbol on the bottom left corner of their text box. This symbol represents a success when performing a Sailing test. For each symbol found on the looked at encounter cards, you may shift your heading on-course. If no symbols are found, your heading stays the same. Then, discard all of the looked at cards.

symbols have no effect other than representing success during a Sailing test.

Players have the opportunity to use Action effects before and after a Sailing test, but not during.

Rulings

Ships

There are two kinds of ship cards: Ship-Enemies and Ship-Objectives. Both ship-enemies and ship-objectives count as ship cards, but have different rules associated with them.

Ship-Enemies

Ship-enemies function in the same way as enemies and are considered to be enemies for all purposes, with the following exceptions:

Ship-Objectives

Ship-objectives function in the same way as objective-allies and are considered to be allies (and characters) for all purposes, with the following exceptions:

The Corsair Deck

The Corsair Deck is a separate deck made up of only non-ship enemies, and represents the sailors, pirates and raiders players may encounter on Corsair ships in the encounter deck.

When ships are included in a scenario's encounter deck, that scenario's Setup will instruct the players to "prepare the Corsair Deck." This is done by removing all non-ship enemies from the encounter deck, placing them in a separate pile, and shuffling it. This pile is referred to as the Corsair Deck. Ship-enemies remain in the standard encounter deck.

The enemies in the Corsair Deck are only revealed through card abilities, such as the Boarding keyword (see below).

The Corsair Deck has its own discard pile. Whenever a non- ship enemy would be placed in the discard pile, place it in the Corsair discard pile instead. When the Corsair Deck runs out of cards, immediately shuffle the Corsair discard pile back into the Corsair Deck.

Preparing Your Fleet

When ships are included in a scenario's encounter deck, that scenario's Setup will instruct the players to "prepare their fleet." To prepare their fleet, each player chooses and takes control of one of the four unique ship-objectives included in The Dream-chaser 's Fleet encounter set: the Dream-chaser, the Dawn Star, the Nárelenya, or the Silver Wing. One of the players must choose the Dream-chaser. In a game with only one player, that player takes control of the Dream-chaser and one other ship-objective of his or her choice. Each ship-objective that is not used is then removed from the game.

Finally, the player who controls the Dream-chaser attaches the Heading card to the Dream-chaser and sets it to .

Heading

The Heading card attached to the Dream-chaser represents the fleet's current ability to navigate their ships with the wind and through the many hazards that may appear at sea. A bad heading represents sailing poorly, into hazards such as enemies or foul weather.

The symbol shown on the Heading card is called "your current heading." All players share the same heading. Some cards will have additional or different effects depending on the current heading. The possible headings are described below:

: This is the only heading that is considered to be "on-course," and is the best possible setting. Your heading cannot shift any further on-course than this. You are traveling windward, with maximum maneuverability.

/: These headings are considered "off-course." You are struggling against the elements and are not navigating properly.

: This heading is considered "off-course," and is the worst possible setting. Your heading cannot shift any further off-course than this. You are traveling against the wind, and are completely at the mercy of the sea.

If you are instructed to shift your heading off-course, you must rotate the Heading card 90° counterclockwise so that your current Heading is one step closer to the worst setting (). If it is already at the worst setting (), it cannot shift off-course.

If you are instructed to shift your heading on-course, you must rotate the Heading card 90° clockwise so that your current Heading is one step closer to on-course (). If it is already at on-course (), it cannot shift on-course.

Note: When you are instructed to shift your heading on-course, it does not shift all the way to the on-course () setting; it only shifts one step closer to the on-course () setting.

Preparing the Stormcaller's Area

The setup for this scenario instructs the players to "Prepare the Stormcaller's area." To prepare the Stormcaller's area, the players must prepare a second quest deck consisting of stage 2C, stage 3C, and stage 4C, in that order. (The quest stages labeled stage 1A, 2A, 3A, and 4A are used in the player's quest deck, as normal.) Then, in an area next to the Stormcaller's quest deck, place the Stormcaller enemy card.

The Stormcaller's Area

The Stormcaller's area is a play area, separate from the staging area, that represents the Stormcaller's journey in its attempt to flee from the players. As the players advance through their quest deck, the Stormcaller also advances through its quest deck, attempting to reach and defeat stage 4 before the players do. The quest stage on top of the Stormcaller's quest deck is called "the Stormcaller's current quest stage." Each of these quest stages has the following text: "Forced : At the end of the round, discard the top card of the encounter deck. The Stormcaller places progress on this stage equal to its plus the of the discarded card." Every round, this effect causes the Stormcaller to make progress on its stage, just as the players try to make progress on their quest stage. If the Stormcaller's current quest stage has progress on it equal to or above its quest points, it advances to the next quest stage in the same way players would, first advancing to the "C" side of the next stage, resolving its effects, and then advancing to the "D" side.

While the Stormcaller is at a different quest stage than the players, cards in the Stormcaller's area are immune to player card effects, cannot leave the Stormcaller's area, and are not considered to be in the staging area (and thus do not contribute their to the total in the staging area). Players are considered to be at "the same stage"as the Stormcaller if their main quest stage's name and number match the Stormcaller's current quest stage ("2B" Full Sail Ahead!" and "2D" Full Sail Ahead!", for example).

When the players and the Stormcaller are at the same quest stage, cards in the Stormcaller's area are no longer immune to player card effects, can leave the Stormcaller's area, and are considered to be in the staging area (and thus do contribute their to  the total in the staging area). Thus, by catching up to the same quest stage as the Stormcaller, the players can travel to locations in the Stormcaller's area and engage ships in the Stormcaller's area, including the Stormcaller itself.

Difficulty level

Easy Mode

easymode

During step 2 of Setup, "Place Heroes and Set Initial Threat Levels", add one resource to each hero's resource pool. When building the encounter deck, remove any card with the "difficulty" indicator around its encounter set icon (a gold border) from the current scenario's encounter deck.

Related Quests

Home

Back

The Thing in the Depths

Official difficulty (5)

User rating (5.7)

rated by 40 players

Rate this Quest!

Keywords

Surge

When an encounter card with the surge keyword is revealed during the staging step of the quest phase or in setup, reveal 1 additional card from the encounter deck. Resolve the surge keyword immediately after resolving any when revealed effects on the card.

Grapple

Jeremy and Brad are playing The Thing in the Depths, and a Grasping Arm is revealed by the encounter deck. Grasping Arm has the following text: "Grapple (highest printed )." This means that they must immediately attach the Grasping Arm facedown to the location in the staging area with the highest printed . There are two locations in the staging area: a Crew Quarters with 1 and a Quarter Deck with 4 . The Grasping Arm attaches facedown to the Quarter Deck and is now grappled with the Quarter Deck. While grappled with the Quarter Deck, Jeremy and Brad cannot engage, attack, or affect the Grasping Arm in any way, and it adds 2 to the Quarter Deck's 4 , for a total of 6 . However, if they travel to the Quarter Deck, the Grasping Arm detaches and is added to the staging area faceup, at which point they can engage and deal with it like a normal enemy.

Grapple is a keyword that represents the many tentacles of the sea" beast grasping onto different parts of the Stormcaller , threatening to pull the ship underwater. When an enemy with the Grapple keyword is revealed, or when you are instructed to resolve an enemy's Grapple keyword, immediately attach that enemy facedown to the location in the staging area specified in parentheses (for example, the location with the highest , or the highest quest points). If more than one location meets the specified criteria, the first player may choose which of those locations the enemy grapples. If there are no locations in the staging area, add the enemy to the staging area without attaching it to any location. While attached to a location by the Grapple keyword, an enemy is "grappled with" that location.

While grappled with a location, an enemy is not considered to be in the staging area, cannot be engaged, and is immune to player card effects. Instead, it adds 2 to the of the location it is grappled with.

When a location becomes the active location, or when a location in the staging area is explored, any enemies grappled with that location are detached, flipped faceup, and added to the staging area as normal enemies. Thus, by traveling to a location, the players can engage and attack the tentacles grappled with that location, freeing the Stormcaller from the creature's grasp!

Indestructible

An enemy with the Indestructible keyword cannot be destroyed by damage, even when it has damage on it equal to its hit points.

Rulings

The Stormcaller and The Thing in the Depths

This Adventure Pack includes two separate encounter sets: The Stormcaller encounter set and The Thing in the Depths encounter set. The setup instructions for this scenario instructs the players to "Build the encounter deck using only The Stormcaller and Corsair Raiders encounter sets, setting The Thing in the Depths and The Stormcaller Elite encounter sets aside, out of play."  When setting up this scenario, players should set the entire The Thing in the Depths encounter set aside for the time being, shuffling together only the Corsair Raiders and The Stormcaller encounter sets. When the players advance to stage 2, the "When Revealed" effect of that stage will remove the Corsair Raiders encounter set from the game and shuffle The Thing in the Depths encounter set into the encounter deck, completely changing the nature of the scenario!

Difficulty level

Easy Mode

easymode

During step 2 of Setup, "Place Heroes and Set Initial Threat Levels", add one resource to each hero's resource pool. When building the encounter deck, remove any card with the "difficulty" indicator around its encounter set icon (a gold border) from the current scenario's encounter deck.

Related Quests

Home

Back

Temple of the Deceived

Official difficulty (4)

User rating (4.1)

rated by 33 players

Rate this Quest!

Keywords

Doomed X

If an encounter card with the doomed keyword is revealed during the staging step of the quest phase or in setup, each player must raise his threat level by the specified value.

Surge

When an encounter card with the surge keyword is revealed during the staging step of the quest phase or in setup, reveal 1 additional card from the encounter deck. Resolve the surge keyword immediately after resolving any when revealed effects on the card.

Guarded

The guarded keyword is a reminder on some objective cards to reveal and attach the next card of the encounter deck to the objective when it enters the staging area from the encounter deck, and place them both in the staging area. The objective cannot be claimed as long as any encounter card is attached. Once that encounter is dealt with, the objective remains in the staging area until it is claimed. If another objective card comes up while attaching a card for the guarded keyword, place the second objective in the staging area, and use the next card of the encounter deck to fulfil the original keyword effect. Enemy and location cards attached to guarded objectives do still count their threat while the enemy or location is in the staging area. An encounter card attached to a guarded objective is dealt with in the following method, depending on its card type:

Once all encounter cards attached to a guarded objective are dealt with, the players can claim the objective in the manner specified by its card text.

Uncharted

Uncharted locations represent unknown areas of Middle-earth, untouched and unexplored during this age of the world. As such, the players do not know what to expect when traveling to them.

These locations are double-sided. One side is called "Lost Island," and has the Uncharted keyword. Uncharted locations are always added to the staging area with the "Lost Island" side faceup, without looking at the other side of the card. Locations with the Uncharted keyword do not have quest points and cannot be explored by placing progress on them, although progress may still be placed on them (in order to trigger their Action ability).

Each copy of Lost Island has the following text: "Forced: After Lost Island becomes the active location, flip it over." Thus, by traveling to an Uncharted location, the players can discover what kind of location it really is, flipping it over to its other side. Flipping over an Uncharted location removes all progress from it. Once flipped, it functions as a normal location, with the following exceptions: Double-sided locations cannot enter the encounter deck. If a double-sided location would enter the discard pile, it is instead shuffled back into the Uncharted deck, Lost Island side faceup.

Each copy of Lost Island also has the following text: "Action: Remove 4 progress from Lost Island to look at its facedown side." Thus, by placing progress on a Lost Island card in the staging area, the players may look at its facedown side in order to gain information about where to travel.

Many locations on the other side of an Uncharted location have Forced effects that trigger after they are flipped. After flipping an Uncharted location, make sure to check the newly flipped location for any such effects. Note that "looking" at the facedown side of an Uncharted location does not trigger any of these effects.

Note that all copies of Lost Island have the Ruins of Númenor encounter set icon on their Lost Island side, even though some of these cards may actually belong to different encounter sets.

Exploration

David is playing Temple of the Deceived and a Flooded Ruins is the active location. Adjacent to the Flooded Ruins are two copies of Lost Island, one above and one to the right. There are no locations to the left or below the Flooded Ruins. Both of the adjacent Lost Islands are considered to be in the staging area, and therefore contribute their combined of 4 to the staging area. After questing successfully, David places progress on the Flooded Ruins equal to its quest points (5), and the remainder is placed on the current quest. Normally, this would explore the Flooded Ruins, but because of the Exploration keyword, it remains in play. Then, during the Travel phase, because the Flooded Ruins has progress on it equal to its quest points, David may travel to a location in the staging area. He travels to the Lost Island to the right of the Flooded Ruins, moving his active location marker from the Flooded Ruins to the Lost Island and removing all progress from the Flooded Ruins, but keeping it in play without flipping it (it is now considered "explored"). He then flips the Lost Island card faceup, due to the Forced effect on the Lost Island.

The Exploration keyword on the main quest represents the player's ability to traverse the Island Map prepared during the setup of the scenario. In this scenario, locations are not revealed from the encounter deck, and the entire island is laid out for the players to explore, one location at a time.

Locations in the Island Map cannot leave the Island Map for any reason, nor can they leave their individual positions within the island (for example, an effect that would switch two locations does not work in this scenario). The Island Map is not the same as the staging area and does not function in the same way. Note that there is still a staging area, which is used for enemies and other cards that would be placed into the staging area.

During this scenario, the active location is represented through the use of an "active location marker," which can be a resource token or a pawn/figurine of the players' choice. The active location is not moved out of its place in the island map when the players travel to it. The locations adjacent (orthogonally, not diagonally) to the active location are considered to be in the staging area. All of the other locations on the Island Map are not considered to be in the staging area.

When the players quest successfully, progress is still placed on the active location before it is placed on the current quest, up to that location's quest points, as normal. However, if progress is placed on any location equal to its quest points, it is not immediately explored. Instead, it remains in play.

During the Travel phase, if the active location has progress on it equal to its quest points, the players have the option to travel to a location in the staging area (i.e. an adjacent location). If the active location does not have enough progress on it, they cannot travel from it. If the players travel to another location, all progress is removed from the active location, and their active location marker is moved to the new location. At this point, the formerly active location is considered "explored," although it is not discarded or flipped over, and remains in place. Because players always travel from one location directly to another in this scenario, there is always an active location at any given moment in time. Remember that flipping an Uncharted location also removes all progress from it.

Players can freely travel around the Island Map using the above rules, and may return to locations they have already explored. Your goal is to find the entrance to the underwater Grotto which is somewhere inside the grand temple" the three locations on the rightmost side of the Island Map. But, in order to enter the Temple, you must find the Gate Key somewhere on the island.

Rulings

Preparing the Island Map

The setup for this scenario instructs the players to "Prepare the Island Map." This is done by separating all 15 of the double-sided Uncharted locations in the encounter deck and laying them out in a three by five grid as shown below, with each "Lost Island" card in the first four columns, and the three "Temple of the Deceived" cards in the rightmost column. This should be done without looking at the facedown side of any of these locations, so that the map is randomly generated.

Any card effects that reference a direction (left, right, above or below) should be interpreted from the perspective of the diagram below ("to the right," for example, would mean in the direction towards the three Temple of the Deceived locations).


Quest Progress

Remember you always have an active location, you track your progress along the map with a token, the only locations considered to be "in the staging area" are those orthogonally adjacent to your active location, and all the locations in the Island Map enter place facedown, only to be turned faceup once you travel to them, as shown on the example below:

Difficulty level

Easy Mode

easymode

During step 2 of Setup, "Place Heroes and Set Initial Threat Levels", add one resource to each hero's resource pool. When building the encounter deck, remove any card with the "difficulty" indicator around its encounter set icon (a gold border) from the current scenario's encounter deck.

Related Quests

Home

Back

Attack on Dol Guldur

User rating (9.3)

rated by 29 players

Rate this Quest!

Keywords

Surge

When an encounter card with the surge keyword is revealed during the staging step of the quest phase or in setup, reveal 1 additional card from the encounter deck. Resolve the surge keyword immediately after resolving any when revealed effects on the card.

Doomed X

If an encounter card with the doomed keyword is revealed during the staging step of the quest phase or in setup, each player must raise his threat level by the specified value.

Archery X

Tom and Kris are playing the scenario "Into Ithilien," and two copies of Southron Mercenaries are in play. Southron Mercenaries has the keyword archery X, where X is the number of players in the game. This gives a cumulative archery value of 4. At the beginning of the combat phase, the players decide to deal 2 damage to Kris' ally Gandalf, and 2 damage to Tom's hero Denethor.

While a card with the archery keyword is in play, players must deal damage to character cards in play equal to the specified archery value at the beginning of each combat phase. This damage can be dealt to characters under any player's control, and it can be divided among the players as they see fit. If there is disagreement as to where to assign archery damage, the first player makes the final decision. If multiple cards with the archery keyword are in play, the effects are cumulative. Remember that does not block archery damage.

Indestructible

An enemy with the Indestructible keyword cannot be destroyed by damage, even when it has damage on it equal to its hit points.

Rulings

Attack on Dol Guldur can be played in one of two game modes: standard game mode and epic multiplayer mode. Standard game mode supports 1-4 players and requires only 1 copy of Attack on Dol Guldur. Epic multiplayer mode supports 3-12 players and requires 3 copies of Attack on Dol Guldur. To play in standard game mode, follow the Setup instructions on the double-sided setup card labeled "Standard Game Mode." To play in epic multiplayer mode, follow the Setup instructions on the double-sided setup card labeled "Epic Multiplayer Mode".

Epic Multiplayer Mode

Epic multiplayer mode divides a group of 3-12 players into 3 teams who play at 3 different stages simultaneously. Each stage is its own game and requires its own encounter deck to play. The teams at each stage must work together in order to defeat the scenario.

Setting Up Epic Multiplayer Mode

The Setup instructions on the epic multiplayer mode setup card instruct the player to create 3 separate staging areas with 3 different quest decks. Each quest deck is built with 6 quest cards included in a single copy of Attack on Dol Guldur.

Next, the players divide themselves into 3 teams, one team for each stage. At least 1 player must be assigned to each stage, and no more than 4 players can be assigned to a single stage.

Only 1 copy of the epic multiplayer mode setup card should be used by the group while setting up the game. After completing the Setup instructions, flip over all 3 setup cards and place 1 next to each quest deck.

Playing Epic Multiplayer Mode

The players at each stage are the only players in the game at that stage. That means it is possible for two players at the same stage must observe the game restrictions on unique cards. Player cards cannot target or affect cards at different stage.

When a team ends a round at their stage they do not advance to the next round of play unit each other team in that group is ready to advance. Furthermore, abilities that trigger at the end of the round resolve in alphabetical stage order. (Resolve end of round effects at stage 3B before resolving end of round effects at stage 3D, etc.)

Immune to Player Card Effects

Cards with the text "Immune to player card effects" ignore the effects of all player cards. Additionally, cards that are immune to player card effects cannot be chosen as targets of player card effects.

City Strength

"City Strength" represents the amount of damage that must be dealt to Dol Guldur in order to capture the fortress. To set the city strength of Dol Guldur during setup, take a threat tracker, place it next to Dol Guldur and set its value to the amount determined by the setup card. That threat tracker is the "siege tracker" for the rest of the game.

Siege

Siege is a value that appears on the lower right corner of many enemies and locations in this scenario. While the players are at stage 3, Dol Guldur's city strength is reduced by the siege value of each location explored and each enemy defeated at each stage at the end of the round.

FAQ & Errata

Assault on the Golden Wood

What is the difference between a "group" and a "team"?

"Group" refers to the 3-12 players who are participating in the event together. "Team" refers to the 1-4 players at the same stage.

What does it mean for a card to be "in a victory display"?

A card is in a victory display if it is in the victory display of any team in your group.

Difficulty level

Easy Mode

easymode

During step 2 of Setup, "Place Heroes and Set Initial Threat Levels", add one resource to each hero's resource pool. When building the encounter deck, remove any card with the "difficulty" indicator around its encounter set icon (a gold border) from the current scenario's encounter deck.

Related Quests

Home

Back

Voyage Across Belegaer

Official difficulty (5)

User rating (5.1)

rated by 58 players

Rate this Quest!

Keywords

Sailing

Sailing is a keyword that represents that the players are currently traveling across the sea on their ships. At the beginning of each quest phase (before committing characters to the quest), if the main quest has the Sailing keyword, the first player must perform a Sailing test.

Sailing Tests

Brandon and Brian are playing a scenario and the main quest has the Sailing keyword. Their heading is not looking too good (), but a good Sailing test could get it back on course ().

1. At the beginning of the quest phase, the first player, Brandon, must perform a Sailing test. First, he shifts his heading off" course by rotating the Heading card 90 degrees counter " clockwise. This sets their heading to .

2. He then commits Ci­rdan the Shipwright and 2 Sailors of Lune to the Sailing test. Since he committed 3 characters to the Sailing test, he looks at the top 3 cards of the encounter deck and counts the number of symbols found on those cards.

3. Brandon spots no symbols on the first card, but one on each of the other two cards. He therefore shifts his heading two steps towards on" course by rotating the Heading card 90 degrees clockwise twice. This puts the fleet back on" course ()!

Sailing tests represent the players' ability to change their course or alter their sails and riggings in such a way as to adapt to the changing winds.

In order to perform a Sailing test, you must first shift your heading off-course. This represents the shifting of the winds, and the difficulty of navigating at sea. (If it is already at , it does not change.)

Then, the player performing the Sailing test exhausts any number of characters he controls, committing them to the Sailing test. After choosing which characters to commit to the Sailing test, that player looks at a number of cards from the top of the encounter deck equal to the total number of characters committed to the Sailing test. If the encounter deck does not contain enough cards to look at, shuffle the encounter discard pile back into the encounter deck first.

Some encounter cards have a symbol on the bottom left corner of their text box. This symbol represents a success when performing a Sailing test. For each symbol found on the looked at encounter cards, you may shift your heading on-course. If no symbols are found, your heading stays the same. Then, discard all of the looked at cards.

symbols have no effect other than representing success during a Sailing test.

Players have the opportunity to use Action effects before and after a Sailing test, but not during.

Boarding X

Boarding is a keyword that appears on many ship-enemies. When a ship-enemy with the Boarding keyword engages a player from the staging area, reveal the top X cards from the Corsair Deck and put the revealed enemies into play, engaged with that player. Note that the Boarding keyword does not resolve if the ship-enemy engages a player from another player's play area, or from the encounter deck or discard pile.

Archery X

Tom and Kris are playing the scenario "Into Ithilien," and two copies of Southron Mercenaries are in play. Southron Mercenaries has the keyword archery X, where X is the number of players in the game. This gives a cumulative archery value of 4. At the beginning of the combat phase, the players decide to deal 2 damage to Kris' ally Gandalf, and 2 damage to Tom's hero Denethor.

While a card with the archery keyword is in play, players must deal damage to character cards in play equal to the specified archery value at the beginning of each combat phase. This damage can be dealt to characters under any player's control, and it can be divided among the players as they see fit. If there is disagreement as to where to assign archery damage, the first player makes the final decision. If multiple cards with the archery keyword are in play, the effects are cumulative. Remember that does not block archery damage.

Rulings

Ships

There are two kinds of ship cards: Ship-Enemies and Ship-Objectives. Both ship-enemies and ship-objectives count as ship cards, but have different rules associated with them.

Ship-Enemies

Ship-enemies function in the same way as enemies and are considered to be enemies for all purposes, with the following exceptions:

Ship-Objectives

Ship-objectives function in the same way as objective-allies and are considered to be allies (and characters) for all purposes, with the following exceptions:

The Corsair Deck

The Corsair Deck is a separate deck made up of only non-ship enemies, and represents the sailors, pirates and raiders players may encounter on Corsair ships in the encounter deck.

When ships are included in a scenario's encounter deck, that scenario's Setup will instruct the players to "prepare the Corsair Deck." This is done by removing all non-ship enemies from the encounter deck, placing them in a separate pile, and shuffling it. This pile is referred to as the Corsair Deck. Ship-enemies remain in the standard encounter deck.

The enemies in the Corsair Deck are only revealed through card abilities, such as the Boarding keyword (see below).

The Corsair Deck has its own discard pile. Whenever a non- ship enemy would be placed in the discard pile, place it in the Corsair discard pile instead. When the Corsair Deck runs out of cards, immediately shuffle the Corsair discard pile back into the Corsair Deck.

Preparing Your Fleet

When ships are included in a scenario's encounter deck, that scenario's Setup will instruct the players to "prepare their fleet." To prepare their fleet, each player chooses and takes control of one of the four unique ship-objectives included in The Dream-chaser 's Fleet encounter set: the Dream-chaser, the Dawn Star, the Nárelenya, or the Silver Wing. One of the players must choose the Dream-chaser. In a game with only one player, that player takes control of the Dream-chaser and one other ship-objective of his or her choice. Each ship-objective that is not used is then removed from the game.

Finally, the player who controls the Dream-chaser attaches the Heading card to the Dream-chaser and sets it to .

Heading

The Heading card attached to the Dream-chaser represents the fleet's current ability to navigate their ships with the wind and through the many hazards that may appear at sea. A bad heading represents sailing poorly, into hazards such as enemies or foul weather.

The symbol shown on the Heading card is called "your current heading." All players share the same heading. Some cards will have additional or different effects depending on the current heading. The possible headings are described below:

: This is the only heading that is considered to be "on-course," and is the best possible setting. Your heading cannot shift any further on-course than this. You are traveling windward, with maximum maneuverability.

/: These headings are considered "off-course." You are struggling against the elements and are not navigating properly.

: This heading is considered "off-course," and is the worst possible setting. Your heading cannot shift any further off-course than this. You are traveling against the wind, and are completely at the mercy of the sea.

If you are instructed to shift your heading off-course, you must rotate the Heading card 90° counterclockwise so that your current Heading is one step closer to the worst setting (). If it is already at the worst setting (), it cannot shift off-course.

If you are instructed to shift your heading on-course, you must rotate the Heading card 90° clockwise so that your current Heading is one step closer to on-course (). If it is already at on-course (), it cannot shift on-course.

Note: When you are instructed to shift your heading on-course, it does not shift all the way to the on-course () setting; it only shifts one step closer to the on-course () setting.

Difficulty level

Easy Mode

easymode

During step 2 of Setup, "Place Heroes and Set Initial Threat Levels", add one resource to each hero's resource pool. When building the encounter deck, remove any card with the "difficulty" indicator around its encounter set icon (a gold border) from the current scenario's encounter deck.

Related Quests

Home

Back

The Drowned Ruins

Official difficulty (6)

User rating (5)

rated by 26 players

Rate this Quest!

Keywords

Doomed X

If an encounter card with the doomed keyword is revealed during the staging step of the quest phase or in setup, each player must raise his threat level by the specified value.

Surge

When an encounter card with the surge keyword is revealed during the staging step of the quest phase or in setup, reveal 1 additional card from the encounter deck. Resolve the surge keyword immediately after resolving any when revealed effects on the card.

Rulings

Grotto / Underwater Locations

This scenario includes nine double-sided locations that do not have the Uncharted keyword. Instead, one has the Grotto trait, while the other side has the Underwater trait. During Setup, the players are instructed to "prepare the Grotto deck". First, the players must remove the double-sided "Shrine to Morgoth" card and set it aside (this card is put into play during stage 2). Then, turn the remained of the double-sided locations Grotto side face-up, and shuffle then together into a separate pile. This pile is referred to as "the Grotto deck."

Players may freely look at the Grotto side of the top location of the Grotto deck. However, players cannot look at the facedown Underwater sides of any location until they are instructed to flip that location. Flipping a double-sided location from one side to the another removes all progress from it.

During the game, locations will often be placed from the top of the Grotto deck into the staging area. This must be done with the location entering with its Grotto side face-up, without looking at its Underwater side (unless instructed otherwse).

Because these locations are double-sided, they cannot enter the encounter deck or discard pile for any reason. When one of these locations is explored, if its Grotto side is face-up, it is shuffled back into the Grotto deck, Grotto side face-up. If it is Underwater side face-up when it is explored, it has the victory keyword and is therefore placed in the victory display.

Note that Grotto locations do not always have the same Underwater location on its facedown side.

Difficulty level

Easy Mode

easymode

During step 2 of Setup, "Place Heroes and Set Initial Threat Levels", add one resource to each hero's resource pool. When building the encounter deck, remove any card with the "difficulty" indicator around its encounter set icon (a gold border) from the current scenario's encounter deck.

Related Quests

Home

Back

Raid on the Grey Havens

Official difficulty (6)

User rating (7.5)

rated by 45 players

Rate this Quest!

Keywords

Surge

When an encounter card with the surge keyword is revealed during the staging step of the quest phase or in setup, reveal 1 additional card from the encounter deck. Resolve the surge keyword immediately after resolving any when revealed effects on the card.

Doomed X

If an encounter card with the doomed keyword is revealed during the staging step of the quest phase or in setup, each player must raise his threat level by the specified value.

Aflame X

Many of the locations in this scenario have the Aflame X keyword. This represents ships in the Elven fleet and piers in the Grey Havens which are under attack by Corsairs and are being set on fire.

At the end of each round, the players must place 1 damage token on each Aflame location in the staging area. Many encounter card effects can also cause damage tokens to be placed on Aflame locations.

If at any point an Aflame location has damage tokens on it equal to its Aflame X value, it is destroyed, and must be placed facedown underneath The Havens Burn objective card. Cards facedown underneath The Havens Burn are considered to be out of play.

If an Aflame location is explored, it is placed in the discard pile as normal, and all damage tokens on it are also discarded.

Rulings

The Stormcaller Elite

The Stormcaller Elite is an encounter set consisting of two double- sided cards: Captain Sahí­r and Na'asiyah. Each of these cards has an enemy side and an objective ally side. When this encounter set is included in a scenario, the scenario will instruct the players which of these two sides should be used in that scenario. (None of the scenarios in The Grey Havens expansion use the objective ally sides, so you may ignore those sides for the time being.)

Because these cards do not have encounter card backs, they can never be added to or shuffled into the encounter deck or discard pile. If one of them leaves play as an enemy, it is added to the victory display. If one of them leaves play as an objective ally, it is simply removed from the game.

Difficulty level

Easy Mode

easymode

During step 2 of Setup, "Place Heroes and Set Initial Threat Levels", add one resource to each hero's resource pool. When building the encounter deck, remove any card with the "difficulty" indicator around its encounter set icon (a gold border) from the current scenario's encounter deck.

Related Quests

Home

Back

The Fate of Númenor

Official difficulty (5)

User rating (4.1)

rated by 46 players

Rate this Quest!

Keywords

Surge

When an encounter card with the surge keyword is revealed during the staging step of the quest phase or in setup, reveal 1 additional card from the encounter deck. Resolve the surge keyword immediately after resolving any when revealed effects on the card.

Doomed X

If an encounter card with the doomed keyword is revealed during the staging step of the quest phase or in setup, each player must raise his threat level by the specified value.

Uncharted

Uncharted locations represent unknown areas of Middle-earth, untouched and unexplored during this age of the world. As such, the players do not know what to expect when traveling to them.

These locations are double-sided. One side is called "Lost Island," and has the Uncharted keyword. Uncharted locations are always added to the staging area with the "Lost Island" side faceup, without looking at the other side of the card. Locations with the Uncharted keyword do not have quest points and cannot be explored by placing progress on them, although progress may still be placed on them (in order to trigger their Action ability).

Each copy of Lost Island has the following text: "Forced: After Lost Island becomes the active location, flip it over." Thus, by traveling to an Uncharted location, the players can discover what kind of location it really is, flipping it over to its other side. Flipping over an Uncharted location removes all progress from it. Once flipped, it functions as a normal location, with the following exceptions: Double-sided locations cannot enter the encounter deck. If a double-sided location would enter the discard pile, it is instead shuffled back into the Uncharted deck, Lost Island side faceup.

Each copy of Lost Island also has the following text: "Action: Remove 4 progress from Lost Island to look at its facedown side." Thus, by placing progress on a Lost Island card in the staging area, the players may look at its facedown side in order to gain information about where to travel.

Many locations on the other side of an Uncharted location have Forced effects that trigger after they are flipped. After flipping an Uncharted location, make sure to check the newly flipped location for any such effects. Note that "looking" at the facedown side of an Uncharted location does not trigger any of these effects.

Note that all copies of Lost Island have the Ruins of Númenor encounter set icon on their Lost Island side, even though some of these cards may actually belong to different encounter sets.

Rulings

Preparing the Uncharted Deck

When Uncharted locations are included in a scenario's encounter deck, that scenario's Setup may instruct the players to "prepare the Uncharted deck." This is done by shuffling all of the double-sided locations with the Uncharted keyword into a separate pile. This pile is referred to as the Uncharted deck. When preparing the Uncharted deck, each card in that deck should be Lost Island side faceup, so that players do not know which location is on the facedown side.

Difficulty level

Easy Mode

easymode

During step 2 of Setup, "Place Heroes and Set Initial Threat Levels", add one resource to each hero's resource pool. When building the encounter deck, remove any card with the "difficulty" indicator around its encounter set icon (a gold border) from the current scenario's encounter deck.

Related Quests

Home

Back

The Passing of the Grey Company

User rating (6.5)

rated by 37 players

Rate this Quest!

Keywords

Peril

When a player reveals an encounter card with the Peril keyword, he must resolve the staging of that card on his own without conferring with the other players. The other players cannot take any actions or trigger any responses during the resolution of that card's staging.

Doomed X

If an encounter card with the doomed keyword is revealed during the staging step of the quest phase or in setup, each player must raise his threat level by the specified value.

Surge

When an encounter card with the surge keyword is revealed during the staging step of the quest phase or in setup, reveal 1 additional card from the encounter deck. Resolve the surge keyword immediately after resolving any when revealed effects on the card.

Phantom

Phantom is a keyword that appears on Undead enemies. The Phantom keyword represents the mysterious and terrifying nature of the Undead oathbreakers that the Grey Company encountered on their journey through the paths of dead.

During the 'determine combat damage' step of an attack made by an enemy with Phantom, if any damage would be dealt by the attack it is canceled andthe defending player raises his threat by an equal amount instead.

Rulings

Army of the Dead

Army of the Dead is a double-sided card with an enemy version on one side and an objective-ally version on the other side. When playing The Passing of the Grey Company, the Army of the Dead is added to the staging area when the players advance to stage 3A. The Army of the Dead objective-ally is a boon card that can only be earned by defeating the Army of the Dead enemy while playing in campaign mode.

Difficulty level

Easy Mode

easymode

During step 2 of Setup, "Place Heroes and Set Initial Threat Levels", add one resource to each hero's resource pool. When building the encounter deck, remove any card with the "difficulty" indicator around its encounter set icon (a gold border) from the current scenario's encounter deck.

Related Quests

Home

Back

The Siege of Gondor

User rating (6.5)

rated by 33 players

Rate this Quest!

Keywords

Peril

When a player reveals an encounter card with the Peril keyword, he must resolve the staging of that card on his own without conferring with the other players. The other players cannot take any actions or trigger any responses during the resolution of that card's staging.

Doomed X

If an encounter card with the doomed keyword is revealed during the staging step of the quest phase or in setup, each player must raise his threat level by the specified value.

Archery X

Tom and Kris are playing the scenario "Into Ithilien," and two copies of Southron Mercenaries are in play. Southron Mercenaries has the keyword archery X, where X is the number of players in the game. This gives a cumulative archery value of 4. At the beginning of the combat phase, the players decide to deal 2 damage to Kris' ally Gandalf, and 2 damage to Tom's hero Denethor.

While a card with the archery keyword is in play, players must deal damage to character cards in play equal to the specified archery value at the beginning of each combat phase. This damage can be dealt to characters under any player's control, and it can be divided among the players as they see fit. If there is disagreement as to where to assign archery damage, the first player makes the final decision. If multiple cards with the archery keyword are in play, the effects are cumulative. Remember that does not block archery damage.

Difficulty level

Easy Mode

easymode

During step 2 of Setup, "Place Heroes and Set Initial Threat Levels", add one resource to each hero's resource pool. When building the encounter deck, remove any card with the "difficulty" indicator around its encounter set icon (a gold border) from the current scenario's encounter deck.

Related Quests

Home

Back

The Battle of the Pelennor Fields

User rating (8)

rated by 36 players

Rate this Quest!

Keywords

Peril

When a player reveals an encounter card with the Peril keyword, he must resolve the staging of that card on his own without conferring with the other players. The other players cannot take any actions or trigger any responses during the resolution of that card's staging.

Doomed X

If an encounter card with the doomed keyword is revealed during the staging step of the quest phase or in setup, each player must raise his threat level by the specified value.

Surge

When an encounter card with the surge keyword is revealed during the staging step of the quest phase or in setup, reveal 1 additional card from the encounter deck. Resolve the surge keyword immediately after resolving any when revealed effects on the card.

Archery X

Tom and Kris are playing the scenario "Into Ithilien," and two copies of Southron Mercenaries are in play. Southron Mercenaries has the keyword archery X, where X is the number of players in the game. This gives a cumulative archery value of 4. At the beginning of the combat phase, the players decide to deal 2 damage to Kris' ally Gandalf, and 2 damage to Tom's hero Denethor.

While a card with the archery keyword is in play, players must deal damage to character cards in play equal to the specified archery value at the beginning of each combat phase. This damage can be dealt to characters under any player's control, and it can be divided among the players as they see fit. If there is disagreement as to where to assign archery damage, the first player makes the final decision. If multiple cards with the archery keyword are in play, the effects are cumulative. Remember that does not block archery damage.

Assault

Assault is a keyword that represents the army of Mordor's relentless attack on the city of Minas Tirith. While stage 3B is in play, progress cannot be placed on that stage by player card effects or by questing successfully. However, progress can still be placed on the active location as normal.

When the players quest unsuccessfully, each player does not raise his threat. Instead, the players must deal X damage to Minas Tirith. X is the amount by which the total threat in the staging area was greater than the total willpower of each character committed to the quest. (This damage is only calculated once for the group, not per player.)

Rulings

Minas Tirith

Minas Tirith is an objective that is put into play when the players reach stage 3A. The objective represents the White City as it comes under attack during The Battle of the Pelennor Fields. If Minas Tirith has damage equal to its hit points at the end of a round, the White City has fallen and the players lose the game.

Several encounter card effects target Minas Tirith. If these effects trigger at stage 2B, while Minas Tirith is not in play, the players must resolve the effects as fully as possible.

Strategy Tip

When playing The Battle of the Pelennor Fields there are several triggered effects that need to be observed each round. In order to provide players with the most rewarding adventure, and avoid bogging down the game, these effects were all made to trigger at either the beginning of the quest phase or at the end of the round. For the best play experience, we recommend that the players check for triggered effects at the beginning of each quest phase, and again at the end of the round.

Cards to look for in particular are:

Difficulty level

Easy Mode

easymode

During step 2 of Setup, "Place Heroes and Set Initial Threat Levels", add one resource to each hero's resource pool. When building the encounter deck, remove any card with the "difficulty" indicator around its encounter set icon (a gold border) from the current scenario's encounter deck.

Related Quests

Home

Back

The Siege of Annúminas

User rating (8.2)

rated by 22 players

Rate this Quest!

Keywords

Doomed X

If an encounter card with the doomed keyword is revealed during the staging step of the quest phase or in setup, each player must raise his threat level by the specified value.

Surge

When an encounter card with the surge keyword is revealed during the staging step of the quest phase or in setup, reveal 1 additional card from the encounter deck. Resolve the surge keyword immediately after resolving any when revealed effects on the card.

Archery X

Tom and Kris are playing the scenario "Into Ithilien," and two copies of Southron Mercenaries are in play. Southron Mercenaries has the keyword archery X, where X is the number of players in the game. This gives a cumulative archery value of 4. At the beginning of the combat phase, the players decide to deal 2 damage to Kris' ally Gandalf, and 2 damage to Tom's hero Denethor.

While a card with the archery keyword is in play, players must deal damage to character cards in play equal to the specified archery value at the beginning of each combat phase. This damage can be dealt to characters under any player's control, and it can be divided among the players as they see fit. If there is disagreement as to where to assign archery damage, the first player makes the final decision. If multiple cards with the archery keyword are in play, the effects are cumulative. Remember that does not block archery damage.

Rulings

The Siege of Annúminas can be played in one of two game modes: standard game mode and epic multiplayer mode. Standard game mode supports 1-4 players and requires only 1 copy of The Siege of Annúminas. Epic multiplayer supports 3-12 players and requires three copies of The Siege of Annúminas. To play standard game mode, follow the Setup instructions on the double-sided setup card labeled "Standard Game Mode." To playing epic multiplayer mode, follow the Setup instructions on the double-sided setup card labeled "Epic Multiplayer Mode."

Epic Multiplayer Mode

Epic multiplayer mode divides a group of 3-12 players into 3 teams who play at 3 different stages simultaneously. Each stage is its own game and requires its own encounter set to play. The teams at each stage must work together in order to defeat the scenario card.

Setting Up Epic Multiplayer Mode

The Setup instructions on the epic multiplayer mode setup card instruct the players to create 3 separate staging areas with 3 different quest decks. To do this, take the quest card from a single copy of The Siege of Annúminas and arrange them into 3 separate quest decks: 1A-3A, 1C-3C, and 1E-3E. Remove the unused quest cards from the event.

Next, the players divide themselves into 3 teams, one team for each stage. At least 1 player must be assigned to each stage, and no more than 4 players can be assigned to a single stage.

Only 1 copy of the epic multiplayer mode setup card should be used by the group while setting up the game. After completing the Setup instructions, flip over all 3 Setup cards and place 1 next to each quest deck.

Playing Epic Multiplayer Mode

Players at each stage are the only players in the game at that stage. That means it is possible for two players at different stages to use the same hero. However, players at the same stage must observe the game restrictions on unique cards. Player cards cannot target or affect cards at a different stage.

When a team ends a round at their stage they do not advance to the next round of play until each other team in that group is ready to advance. Furthermore, abilities that trigger at the end of the round resolve in alphabetical stage order. (Resolve end of round effects at stage 2B before resolving end of round effects at stage 2D, etc.)

City Strength

"City strength" is a value that represents the amount of damage the city of Annúminas can take before it is overrun by the enemy. To set the city strength of Annúminas during setup, take a threat tracker, place it next to Annúminas, and set its value to the correct amount. That threat tracker is the "city strength tracker" for the rest of the game. Any time Annúminas takes X damage, reduce its city strength by X. If the city strength of Annúminas reaches 0, the players lose the game.

FAQ & Errata

Rebuild the Defenses

Q: What is the difference between a 'group' and a 'team'?

A: 'Group' refers to the 3-12 players who are participating in the event together. 'Team' refers to the 1-4 players at the same stage.

Q: What does it mean for a card to be "in a victory display"?

A: A card is in a victory display if it is in the victory display of any team in your group.

Q: Does damage on an enemy remain on that enemy when it moves to a different stage?

A: Yes.

Dúnedain of Annúminas

Q: When the first player takes control of a Dúnedain of Annúminas at stage 1, does he resolve its "when revealed" effect?

A: No.

Q: What happens when a Dúnedain of Annúminas is destroyed?

A: It is placed in the encounter deck discard pile.

Difficulty level

Easy Mode

easymode

During step 2 of Setup, "Place Heroes and Set Initial Threat Levels", add one resource to each hero's resource pool. When building the encounter deck, remove any card with the "difficulty" indicator around its encounter set icon (a gold border) from the current scenario's encounter deck.

Related Quests

Home

Back

A Storm on Cobas Haven

Official difficulty (7)

User rating (7.4)

rated by 36 players

Rate this Quest!

Keywords

Surge

When an encounter card with the surge keyword is revealed during the staging step of the quest phase or in setup, reveal 1 additional card from the encounter deck. Resolve the surge keyword immediately after resolving any when revealed effects on the card.

Doomed X

If an encounter card with the doomed keyword is revealed during the staging step of the quest phase or in setup, each player must raise his threat level by the specified value.

Archery X

Tom and Kris are playing the scenario "Into Ithilien," and two copies of Southron Mercenaries are in play. Southron Mercenaries has the keyword archery X, where X is the number of players in the game. This gives a cumulative archery value of 4. At the beginning of the combat phase, the players decide to deal 2 damage to Kris' ally Gandalf, and 2 damage to Tom's hero Denethor.

While a card with the archery keyword is in play, players must deal damage to character cards in play equal to the specified archery value at the beginning of each combat phase. This damage can be dealt to characters under any player's control, and it can be divided among the players as they see fit. If there is disagreement as to where to assign archery damage, the first player makes the final decision. If multiple cards with the archery keyword are in play, the effects are cumulative. Remember that does not block archery damage.

Boarding X

Boarding is a keyword that appears on many ship-enemies. When a ship-enemy with the Boarding keyword engages a player from the staging area, reveal the top X cards from the Corsair Deck and put the revealed enemies into play, engaged with that player. Note that the Boarding keyword does not resolve if the ship-enemy engages a player from another player's play area, or from the encounter deck or discard pile.

Sailing

Sailing is a keyword that represents that the players are currently traveling across the sea on their ships. At the beginning of each quest phase (before committing characters to the quest), if the main quest has the Sailing keyword, the first player must perform a Sailing test.

Sailing Tests

Brandon and Brian are playing a scenario and the main quest has the Sailing keyword. Their heading is not looking too good (), but a good Sailing test could get it back on course ().

1. At the beginning of the quest phase, the first player, Brandon, must perform a Sailing test. First, he shifts his heading off" course by rotating the Heading card 90 degrees counter " clockwise. This sets their heading to .

2. He then commits Ci­rdan the Shipwright and 2 Sailors of Lune to the Sailing test. Since he committed 3 characters to the Sailing test, he looks at the top 3 cards of the encounter deck and counts the number of symbols found on those cards.

3. Brandon spots no symbols on the first card, but one on each of the other two cards. He therefore shifts his heading two steps towards on" course by rotating the Heading card 90 degrees clockwise twice. This puts the fleet back on" course ()!

Sailing tests represent the players' ability to change their course or alter their sails and riggings in such a way as to adapt to the changing winds.

In order to perform a Sailing test, you must first shift your heading off-course. This represents the shifting of the winds, and the difficulty of navigating at sea. (If it is already at , it does not change.)

Then, the player performing the Sailing test exhausts any number of characters he controls, committing them to the Sailing test. After choosing which characters to commit to the Sailing test, that player looks at a number of cards from the top of the encounter deck equal to the total number of characters committed to the Sailing test. If the encounter deck does not contain enough cards to look at, shuffle the encounter discard pile back into the encounter deck first.

Some encounter cards have a symbol on the bottom left corner of their text box. This symbol represents a success when performing a Sailing test. For each symbol found on the looked at encounter cards, you may shift your heading on-course. If no symbols are found, your heading stays the same. Then, discard all of the looked at cards.

symbols have no effect other than representing success during a Sailing test.

Players have the opportunity to use Action effects before and after a Sailing test, but not during.

Rulings

Ships

There are two kinds of ship cards: Ship-Enemies and Ship-Objectives. Both ship-enemies and ship-objectives count as ship cards, but have different rules associated with them.

Ship-Enemies

Ship-enemies function in the same way as enemies and are considered to be enemies for all purposes, with the following exceptions:

Ship-Objectives

Ship-objectives function in the same way as objective-allies and are considered to be allies (and characters) for all purposes, with the following exceptions:

The Corsair Deck

The Corsair Deck is a separate deck made up of only non-ship enemies, and represents the sailors, pirates and raiders players may encounter on Corsair ships in the encounter deck.

When ships are included in a scenario's encounter deck, that scenario's Setup will instruct the players to "prepare the Corsair Deck." This is done by removing all non-ship enemies from the encounter deck, placing them in a separate pile, and shuffling it. This pile is referred to as the Corsair Deck. Ship-enemies remain in the standard encounter deck.

The enemies in the Corsair Deck are only revealed through card abilities, such as the Boarding keyword (see below).

The Corsair Deck has its own discard pile. Whenever a non- ship enemy would be placed in the discard pile, place it in the Corsair discard pile instead. When the Corsair Deck runs out of cards, immediately shuffle the Corsair discard pile back into the Corsair Deck.

Preparing Your Fleet

When ships are included in a scenario's encounter deck, that scenario's Setup will instruct the players to "prepare their fleet." To prepare their fleet, each player chooses and takes control of one of the four unique ship-objectives included in The Dream-chaser 's Fleetencounter set: the Dream-chaser, the Dawn Star, the Nárelenya, or the Silver Wing. One of the players mustchoose the Dream-chaser. In a game with only one player, that player takes control of the Dream-chaser andone other ship-objective of his or her choice. Each ship-objective that is not used is then removed from the game.

Finally, the player who controls the Dream-chaser attaches the Heading card to the Dream-chaser and sets it to .

Heading

The Heading card attached to the Dream-chaser represents the fleet's current ability to navigate their ships with the wind and through the many hazards that may appear at sea. A bad heading represents sailing poorly, into hazards such as enemies or foul weather.

The symbol shown on the Heading card is called "your current heading." All players share the same heading. Some cards will have additional or different effects depending on the current heading. The possible headings are described below:

: This is the only heading that is considered to be "on-course," and is the best possible setting. Your heading cannot shift any further on-course than this. You are traveling windward, with maximum maneuverability.

/: These headings are considered "off-course." You are struggling against the elements and are not navigating properly.

: This heading is considered "off-course," and is the worst possible setting. Your heading cannot shift any further off-course than this. You are traveling against the wind, and are completely at the mercy of the sea.

If you are instructed to shift your heading off-course, you must rotate the Heading card 90° counterclockwise so that your current Heading is one step closer to the worst setting (). If it is already at the worst setting (), it cannot shift off-course.

If you are instructed to shift your heading on-course, you must rotate the Heading card 90° clockwise so that your current Heading is one step closer to on-course (). If it is already at on-course (), it cannot shift on-course.

Note: When you are instructed to shift your heading on-course, it does not shift all the way to the on-course () setting; it only shifts one step closer to the on-course () setting.

Difficulty level

Easy Mode

easymode

During step 2 of Setup, "Place Heroes and Set Initial Threat Levels", add one resource to each hero's resource pool. When building the encounter deck, remove any card with the "difficulty" indicator around its encounter set icon (a gold border) from the current scenario's encounter deck.

Related Quests

Home

Back

The City of Corsairs

User rating (7.6)

rated by 36 players

Rate this Quest!

Keywords

Surge

When an encounter card with the surge keyword is revealed during the staging step of the quest phase or in setup, reveal 1 additional card from the encounter deck. Resolve the surge keyword immediately after resolving any when revealed effects on the card.

Indestructible

An enemy with the Indestructible keyword cannot be destroyed by damage, even when it has damage on it equal to its hit points.

Boarding X

Boarding is a keyword that appears on many ship-enemies. When a ship-enemy with the Boarding keyword engages a player from the staging area, reveal the top X cards from the Corsair Deck and put the revealed enemies into play, engaged with that player. Note that the Boarding keyword does not resolve if the ship-enemy engages a player from another player's play area, or from the encounter deck or discard pile.

Sailing

Sailing is a keyword that represents that the players are currently traveling across the sea on their ships. At the beginning of each quest phase (before committing characters to the quest), if the main quest has the Sailing keyword, the first player must perform a Sailing test.

Sailing Tests

Brandon and Brian are playing a scenario and the main quest has the Sailing keyword. Their heading is not looking too good (), but a good Sailing test could get it back on course ().

1. At the beginning of the quest phase, the first player, Brandon, must perform a Sailing test. First, he shifts his heading off" course by rotating the Heading card 90 degrees counter " clockwise. This sets their heading to .

2. He then commits Ci­rdan the Shipwright and 2 Sailors of Lune to the Sailing test. Since he committed 3 characters to the Sailing test, he looks at the top 3 cards of the encounter deck and counts the number of symbols found on those cards.

3. Brandon spots no symbols on the first card, but one on each of the other two cards. He therefore shifts his heading two steps towards on" course by rotating the Heading card 90 degrees clockwise twice. This puts the fleet back on" course ()!

Sailing tests represent the players' ability to change their course or alter their sails and riggings in such a way as to adapt to the changing winds.

In order to perform a Sailing test, you must first shift your heading off-course. This represents the shifting of the winds, and the difficulty of navigating at sea. (If it is already at , it does not change.)

Then, the player performing the Sailing test exhausts any number of characters he controls, committing them to the Sailing test. After choosing which characters to commit to the Sailing test, that player looks at a number of cards from the top of the encounter deck equal to the total number of characters committed to the Sailing test. If the encounter deck does not contain enough cards to look at, shuffle the encounter discard pile back into the encounter deck first.

Some encounter cards have a symbol on the bottom left corner of their text box. This symbol represents a success when performing a Sailing test. For each symbol found on the looked at encounter cards, you may shift your heading on-course. If no symbols are found, your heading stays the same. Then, discard all of the looked at cards.

symbols have no effect other than representing success during a Sailing test.

Players have the opportunity to use Action effects before and after a Sailing test, but not during.

Rulings

Ships

There are two kinds of ship cards: Ship-Enemies and Ship-Objectives. Both ship-enemies and ship-objectives count as ship cards, but have different rules associated with them.

Ship-Enemies

Ship-enemies function in the same way as enemies and are considered to be enemies for all purposes, with the following exceptions:

Ship-Objectives

Ship-objectives function in the same way as objective-allies and are considered to be allies (and characters) for all purposes, with the following exceptions:

The Corsair Deck

The Corsair Deck is a separate deck made up of only non-ship enemies, and represents the sailors, pirates and raiders players may encounter on Corsair ships in the encounter deck.

When ships are included in a scenario's encounter deck, that scenario's Setup will instruct the players to "prepare the Corsair Deck." This is done by removing all non-ship enemies from the encounter deck, placing them in a separate pile, and shuffling it. This pile is referred to as the Corsair Deck. Ship-enemies remain in the standard encounter deck.

The enemies in the Corsair Deck are only revealed through card abilities, such as the Boarding keyword (see below).

The Corsair Deck has its own discard pile. Whenever a non- ship enemy would be placed in the discard pile, place it in the Corsair discard pile instead. When the Corsair Deck runs out of cards, immediately shuffle the Corsair discard pile back into the Corsair Deck.

Preparing Your Fleet

When ships are included in a scenario's encounter deck, that scenario's Setup will instruct the players to "prepare their fleet." To prepare their fleet, each player chooses and takes control of one of the four unique ship-objectives included in The Dream-chaser 's Fleetencounter set: the Dream-chaser, the Dawn Star, the Nárelenya, or the Silver Wing. One of the players mustchoose the Dream-chaser. In a game with only one player, that player takes control of the Dream-chaser andone other ship-objective of his or her choice. Each ship-objective that is not used is then removed from the game.

Finally, the player who controls the Dream-chaser attaches the Heading card to the Dream-chaser and sets it to .

Heading

The Heading card attached to the Dream-chaser represents the fleet's current ability to navigate their ships with the wind and through the many hazards that may appear at sea. A bad heading represents sailing poorly, into hazards such as enemies or foul weather.

The symbol shown on the Heading card is called "your current heading." All players share the same heading. Some cards will have additional or different effects depending on the current heading. The possible headings are described below:

: This is the only heading that is considered to be "on-course," and is the best possible setting. Your heading cannot shift any further on-course than this. You are traveling windward, with maximum maneuverability.

/: These headings are considered "off-course." You are struggling against the elements and are not navigating properly.

: This heading is considered "off-course," and is the worst possible setting. Your heading cannot shift any further off-course than this. You are traveling against the wind, and are completely at the mercy of the sea.

If you are instructed to shift your heading off-course, you must rotate the Heading card 90° counterclockwise so that your current Heading is one step closer to the worst setting (). If it is already at the worst setting (), it cannot shift off-course.

If you are instructed to shift your heading on-course, you must rotate the Heading card 90° clockwise so that your current Heading is one step closer to on-course (). If it is already at on-course (), it cannot shift on-course.

Note: When you are instructed to shift your heading on-course, it does not shift all the way to the on-course () setting; it only shifts one step closer to the on-course () setting.

From Sea to Land

This adventure pack includes two different encounter sets: The City of Corsairs encounter set and The Coast of Umbar encounter set. The Setup effect for this scenario instructs the players to shuffle the Corsair Raiders, Stormy Weather, Umbar Fleet, Voyage Across Belegaer, and Coast of Umbar encounter sets into an encounter deck and make it the active encounter deck. Then, the player set The City of Corsairs encounter set aside, as an inactive second encounter deck. This second encounter deck is not used until the players finish stage 1

When the players reach stage 2B, they are instructed to shuffle the Corsair deck and Corsair discard pile into the second encounter deck. Then, they search the encounter deck and discard pile for each copy of Watch Tower and each copy of Battle-hardened, and shuffle those cards into the second encounter deck as well (copies of Watch Tower that are currently in play should remain in play). Finally, the players set the current encounter deck aside, inactive, and the second encounter deck becomes the active encounter deck. This represents the transition from sailing the seas to traveling the streets of Umbar, and the heroes must continue their journey without the use of their ships.

Difficulty level

Easy Mode

easymode

During step 2 of Setup, "Place Heroes and Set Initial Threat Levels", add one resource to each hero's resource pool. When building the encounter deck, remove any card with the "difficulty" indicator around its encounter set icon (a gold border) from the current scenario's encounter deck.

Related Quests

Home

Back

Escape from Umbar

Official difficulty (5)

User rating (5.4)

rated by 41 players

Rate this Quest!

Keywords

Surge

When an encounter card with the surge keyword is revealed during the staging step of the quest phase or in setup, reveal 1 additional card from the encounter deck. Resolve the surge keyword immediately after resolving any when revealed effects on the card.

Archery X

Tom and Kris are playing the scenario "Into Ithilien," and two copies of Southron Mercenaries are in play. Southron Mercenaries has the keyword archery X, where X is the number of players in the game. This gives a cumulative archery value of 4. At the beginning of the combat phase, the players decide to deal 2 damage to Kris' ally Gandalf, and 2 damage to Tom's hero Denethor.

While a card with the archery keyword is in play, players must deal damage to character cards in play equal to the specified archery value at the beginning of each combat phase. This damage can be dealt to characters under any player's control, and it can be divided among the players as they see fit. If there is disagreement as to where to assign archery damage, the first player makes the final decision. If multiple cards with the archery keyword are in play, the effects are cumulative. Remember that does not block archery damage.

Difficulty level

Easy Mode

easymode

During step 2 of Setup, "Place Heroes and Set Initial Threat Levels", add one resource to each hero's resource pool. When building the encounter deck, remove any card with the "difficulty" indicator around its encounter set icon (a gold border) from the current scenario's encounter deck.

Related Quests

Home

Back

The Mûmakil

Official difficulty (4)

User rating (4.8)

rated by 36 players

Rate this Quest!

Keywords

Surge

When an encounter card with the surge keyword is revealed during the staging step of the quest phase or in setup, reveal 1 additional card from the encounter deck. Resolve the surge keyword immediately after resolving any when revealed effects on the card.

Doomed X

If an encounter card with the doomed keyword is revealed during the staging step of the quest phase or in setup, each player must raise his threat level by the specified value.

Indestructible

An enemy with the Indestructible keyword cannot be destroyed by damage, even when it has damage on it equal to its hit points.

Difficulty level

Easy Mode

easymode

During step 2 of Setup, "Place Heroes and Set Initial Threat Levels", add one resource to each hero's resource pool. When building the encounter deck, remove any card with the "difficulty" indicator around its encounter set icon (a gold border) from the current scenario's encounter deck.

Related Quests

Home

Back

Race Across Harad

Official difficulty (6)

User rating (6.9)

rated by 32 players

Rate this Quest!

Keywords

Surge

When an encounter card with the surge keyword is revealed during the staging step of the quest phase or in setup, reveal 1 additional card from the encounter deck. Resolve the surge keyword immediately after resolving any when revealed effects on the card.

Doomed X

If an encounter card with the doomed keyword is revealed during the staging step of the quest phase or in setup, each player must raise his threat level by the specified value.

Rulings

Preparing the Orcs' Area

The setup for this scenario instructs the players to "Prepare the Orcs' area". To prepare the Orcs' area, the players must prepare a second quest deck consisting of stage 1C, stage 2C, stage 3D, and stage 4C, in that order. (The quest stages labeled stage 1A, 2A, 3A, and 4A are used in the player's quest deck, as normal.)

The Orcs' Area

The Orcs' area is a new play area, separate from the staging area, that represents the Orcs' pursuit as they try to overtake the players on their journey through Harad. As the players advance through their quest deck, the Orcs also advance through their quest deck, attempting to reach the same stage as the players and defeat it before they do. The quest stage on top of the Orcs' quest deck is called "the Orcs' stage." Each of these quest stages has the following text: "Forced: At the end of the quest phase, discard the top card of the encounter deck. Place X progress on this stage, where X is the discarded card's plus the total in the Orcs' area." Every round, this effect causes the Orcs to make progress on their stage, just as the players try to make progress on their quest stage. If the Orcs' quest stage has progress on it equal to or above its quest points, they advance to the next quest stage in the same way players would, first advancing to the "C" side of the next stage, resolving its effects, and then advancing to the "D" side.

While the Orcs are at a different quest stage than the players, cards in the Orcs' are immune to player card effects, cannot leave the Orcs' area, and are not considered to be in the staging area (and thus do not contribute their to the total in the staging area). Players are considered to be "at the same stage" as the Orcs if their main quest stage's name and number match the Orcs' quest stage ("2B Racing North" and "2D Racing North", for example).

When the players and the Orcs are at the same quest stage, cards in the Orcs' area are no longer immune to player card effects, can leave the Orcs' area, and are considered to be in the staging area (and thus do contribute their to the total in the staging area). Thus, when the Orcs catch up to the players, the players can engage enemies in the Orcs' area and travel to locations in the Orcs' area.

Difficulty level

Easy Mode

easymode

During step 2 of Setup, "Place Heroes and Set Initial Threat Levels", add one resource to each hero's resource pool. When building the encounter deck, remove any card with the "difficulty" indicator around its encounter set icon (a gold border) from the current scenario's encounter deck.

Related Quests

Home

Back

Desert Crossing

Official difficulty (6)

User rating (5.6)

rated by 42 players

Rate this Quest!

Keywords

Surge

When an encounter card with the surge keyword is revealed during the staging step of the quest phase or in setup, reveal 1 additional card from the encounter deck. Resolve the surge keyword immediately after resolving any when revealed effects on the card.

Rulings

Heat Tracker 

When setting up Desert Crossing, the players are instructed to "place the heat tracker next to the quest deck and set the temperature to 10." To do this, take an unused threat tracker and place it next to the quest deck. For the rest of the game, that threat tracker is the heat tracker and the value it displays is the "temperature." If the temperature reaches 60, the players lose the game.

Difficulty level

Easy Mode

easymode

During step 2 of Setup, "Place Heroes and Set Initial Threat Levels", add one resource to each hero's resource pool. When building the encounter deck, remove any card with the "difficulty" indicator around its encounter set icon (a gold border) from the current scenario's encounter deck.

Related Quests

Home

Back

The Long Arm of Mordor

Official difficulty (7)

User rating (6.2)

rated by 29 players

Rate this Quest!

Keywords

Surge

When an encounter card with the surge keyword is revealed during the staging step of the quest phase or in setup, reveal 1 additional card from the encounter deck. Resolve the surge keyword immediately after resolving any when revealed effects on the card.

Guarded

The guarded keyword is a reminder on some objective cards to reveal and attach the next card of the encounter deck to the objective when it enters the staging area from the encounter deck, and place them both in the staging area. The objective cannot be claimed as long as any encounter card is attached. Once that encounter is dealt with, the objective remains in the staging area until it is claimed. If another objective card comes up while attaching a card for the guarded keyword, place the second objective in the staging area, and use the next card of the encounter deck to fulfil the original keyword effect. Enemy and location cards attached to guarded objectives do still count their threat while the enemy or location is in the staging area. An encounter card attached to a guarded objective is dealt with in the following method, depending on its card type:

Once all encounter cards attached to a guarded objective are dealt with, the players can claim the objective in the manner specified by its card text.

Rulings

Objective Heroes 

Objective-hero is a new card type in The Long Arm of Mordor. The four objective-heroes in this scenario represent the brave Haradrim of Kahliel's tribe who are fighting against Sauron's Orcs in order to save the heroes and escape from the oppressive rule of Mordor. An objective-hero is both an objective and a neutral hero. An objective-hero functions the same as a regular hero with the following exceptions: an objective-hero has no threat cost and does not count towards the hero limit of 3. 

As a neutral hero, each objective-hero collects 1 resource at the beginning of the resource phase, and resources from its resource pool may be spent to pay for neutral player cards. 

When setting up The Long Arm of Mordor, each player is instructed to take control of an objective-hero. Starting with the first player, each player should choose 1 of the available objective-heroes in turn order. Then, any unused objective-heroes are removed from the game. 

Each objective-hero in The Long Arm of Mordor has the text: "If (this hero) leaves play, you are eliminated from the game." This text cannot be modified in any way. 

Heroes in the Staging Area 

At the beginning of The Long Arm of Mordor, the heroes are still recovering from their difficult desert crossing. To represent this in the scenario, the players are instructed to place their heroes in the staging area during setup. Stage 1A reads: "For the remainder of the game, heroes in the staging area are in play but under no player's control, immune to player card effects, and their text boxes are considered to be blank." This creates a lasting effect that applies to heroes while they are in the staging area. 

When an effect causes a player to take control of a hero in the staging area, that player moves that hero from the staging area to his play area. Once that hero is no longer in the staging area, the lasting effect created by stage 1A no longer applies to it. 

While a hero is under no player's control, it does not collect resources during the resource phase. 

When a card effect refers to ownership of a hero, the player who owns that hero is the player who selected that hero as one of his starting heroes during the game's setup. If a hero in the staging area has its hit points reduced to 0, it is destroyed and placed in its owner's discard pile. 

Guarded Heroes 

When the players advance to stage 3A, they are instructed to attach each hero in the staging area to a different Orc enemy in the staging area. Each hero attached to an Orc enemy is guarded by that enemy. While a hero is guarded by an enemy, it is treated like a guarded objective. 

Stage Number 

When a card refers to the "stage number" of a quest card, it is referencing the numerical value of the sequence in the upper left hand corner of that quest card.

Difficulty level

Easy Mode

easymode

During step 2 of Setup, "Place Heroes and Set Initial Threat Levels", add one resource to each hero's resource pool. When building the encounter deck, remove any card with the "difficulty" indicator around its encounter set icon (a gold border) from the current scenario's encounter deck.

Related Quests

Home

Back

The Black Gate Opens

User rating (9.1)

rated by 34 players

Rate this Quest!

Keywords

Surge

When an encounter card with the surge keyword is revealed during the staging step of the quest phase or in setup, reveal 1 additional card from the encounter deck. Resolve the surge keyword immediately after resolving any when revealed effects on the card.

Doomed X

If an encounter card with the doomed keyword is revealed during the staging step of the quest phase or in setup, each player must raise his threat level by the specified value.

Archery X

Tom and Kris are playing the scenario "Into Ithilien," and two copies of Southron Mercenaries are in play. Southron Mercenaries has the keyword archery X, where X is the number of players in the game. This gives a cumulative archery value of 4. At the beginning of the combat phase, the players decide to deal 2 damage to Kris' ally Gandalf, and 2 damage to Tom's hero Denethor.

While a card with the archery keyword is in play, players must deal damage to character cards in play equal to the specified archery value at the beginning of each combat phase. This damage can be dealt to characters under any player's control, and it can be divided among the players as they see fit. If there is disagreement as to where to assign archery damage, the first player makes the final decision. If multiple cards with the archery keyword are in play, the effects are cumulative. Remember that does not block archery damage.

Peril

When a player reveals an encounter card with the Peril keyword, he must resolve the staging of that card on his own without conferring with the other players. The other players cannot take any actions or trigger any responses during the resolution of that card's staging.

Dire

The dire keyword represents the world-changing endeavors that the heroes of Middle-Earth undertook in the final book of The Lord of the Rings. While the main quest has the dire keyword, each player's threat elimination level is increased to 99 and each player's threat cannot be reduced by more than 1 each round by non-boon player card effects. Boon card effects that reduce player's threat are not affected by the dire keyword. Additionally, the threat value for triggering Valour effects is changed from 40 threat to 80.

Rulings

Epic Multiplayer Mode

The Black Gate Opens and Mount Doom, can be played simultaneously by 2-8 players in epic multiplayer mode. Epic multiplayer mode divides a group of players into 2 teams: one team plays The Black Gate Opens and on team plays Mount Doom. Each scenario is its own game with its own staging area and requires its own encounter deck to play, but the teams at each scenario must work together in order to defeat Sauron and win each game.

To play in epic multiplayer mode, follow the Setup instructions on the double-sided setup card labeled "Epic Multiplayer Mode".

Setting Up Epic Multiplayer Mode

The Setup instructions on the Epic Multiplayer Mode card directs the players to create 2 separate staging areas: one for The Black Gate Opens and one for Mount Doom. To do this, choose a play area large enough for both scenarios and follow the Setup instructions on each scenario as normal. 

Next, the players divide themselves into 2 teams, one team for each scenario. At least 1 player must be assigned to each scenario, and no more than 4 players can be assigned to either. Furthermore, the number of players assigned to Mount Doom cannot exceed the number of players assigned to The Black Gate Opens.

Note: Both Aragorn and the Ring-bearer are used when playing epic multiplayer mode. The first player at The Black Gate Opens takes controls of Aragorn during setup, and the first player at Mount Doom takes control of the Ring-bearer

After completing the Setup instructions, flip over the Epic Multiplayer Mode card and place it next to the Mount Doom quest deck.

Encounter cards that are only used in epic multiplayer mode are indicated by the following icon: 

Playing Epic Multiplayer Mode 

The players at each scenario are the only players in the game at that scenario. That means it is possible for two players at different scenarios to use the same hero. However, players at the same scenario must observe the game restrictions on unique cards. Player cards cannot target or affect cards at a different scenario. When a team ends a round at their stage they do not advance the next round of play until each other team in that group is ready to advance.

Before the teams advance to the next round, there are Forced effects on the Epic Multiplayer Mode card and The Eye of Sauron objective card that must be resolved. The teams are encouraged to discuss these effects to determine what is the best option for the group. The Eye of Sauron may move from one scenario to another as a result. 

Playing Epic Multiplayer Mode in Campaign Mode

Caleb and Matt are setting up The Black Gate Opens and Mount Doom in epic multiplayer campaign mode. Grievous Wound and Overcome by Grief are in the campaign pool and each of those burdens are included in the setup for both scenarios. Since Matt controls the Ring-bearer, he decides to place Grievous Wound in the staging area of The Black Gate Opens and Overcome by Grief in the staging are of Mount Doom during setup.

The Black Gate Opens and Mount Doom can be played by 2-4 players in epic multiplayer mode as the grand finale to your saga campaign. Simply follow the Setup instructions on the Epic Multiplayer Mode card and on each of the corresponding campaign cards.

Be sure to include all of the appropriate boons and burdens at each stage. If a boon or burden is included as part of the Setup for both scenarios, the player who controls the Ring-bearer decides which scenario receives that boon or burden.

Difficulty level

Easy Mode

easymode

During step 2 of Setup, "Place Heroes and Set Initial Threat Levels", add one resource to each hero's resource pool. When building the encounter deck, remove any card with the "difficulty" indicator around its encounter set icon (a gold border) from the current scenario's encounter deck.

Related Quests

Home

Back

Beneath the Sands

Official difficulty (5)

User rating (5.9)

rated by 28 players

Rate this Quest!

Keywords

Surge

When an encounter card with the surge keyword is revealed during the staging step of the quest phase or in setup, reveal 1 additional card from the encounter deck. Resolve the surge keyword immediately after resolving any when revealed effects on the card.

Doomed X

If an encounter card with the doomed keyword is revealed during the staging step of the quest phase or in setup, each player must raise his threat level by the specified value.

Track

Mercedes is playing "Beneath the Sands" and the Search objective is Off Track. During the travel phase, she chooses to travel to Nest of Vermin with Track 3. After she resolves the Travel effect on Nest of Vermin, she resolves its Track keyword by discarding the top 3 cards of the encounter deck. However, there is only 1 card remaining in the encounter deck, so Mercedes shuffles the encounter discard pile back into the encounter deck and discards 2 more cards from the top, for a total of 3. One of the discarded cards has "On Track" printed in the lower right, so she discards each resource on Off Track and flips the Search objective to On Track.

Track is a keyword that represents the heroes' efforts to locate their missing companions somewhere in the spiders' labyrinth. After the players travel to a location, if they are off track, they discard X cards from the encounter deck, where X is the active location's Track value. If any of the discarded cards has On Track printed in the lower right corner, then the players flip the Search objective to On Track. If the encounter deck is ever empty while the players are resolving the Track keyword, shuffle the encounter discard pile into the encounter deck and continue resolving the Track keyword. When the Search objective is flipped from Off Track to On Track, discard all resources on it.

Rulings

On Track / Off Track

Included in Beneath the Sands is a double-sided Search objective: One Track / Off Track. This objective represents whether or not the heroes are heading in the right direction to find their missing companions. When setting up the scenario at the beginning of the game, the players are instructed to add the Search objective to the staging area with the Off Track side faceup. While Off Track is in play, players cannot place progress on the main quest because they are searching in the wrong direction. While On Track is in play, progress can be placed on the main quest, but the scenario becomes more challenging because the spiders grow more vicious as the heroes draw closer to their lair.

Difficulty level

Easy Mode

easymode

During step 2 of Setup, "Place Heroes and Set Initial Threat Levels", add one resource to each hero's resource pool. When building the encounter deck, remove any card with the "difficulty" indicator around its encounter set icon (a gold border) from the current scenario's encounter deck.

Related Quests

Home

Back

The Black Serpent

Official difficulty (8)

User rating (7)

rated by 22 players

Rate this Quest!

Keywords

Surge

When an encounter card with the surge keyword is revealed during the staging step of the quest phase or in setup, reveal 1 additional card from the encounter deck. Resolve the surge keyword immediately after resolving any when revealed effects on the card.

Doomed X

If an encounter card with the doomed keyword is revealed during the staging step of the quest phase or in setup, each player must raise his threat level by the specified value.

Archery X

Tom and Kris are playing the scenario "Into Ithilien," and two copies of Southron Mercenaries are in play. Southron Mercenaries has the keyword archery X, where X is the number of players in the game. This gives a cumulative archery value of 4. At the beginning of the combat phase, the players decide to deal 2 damage to Kris' ally Gandalf, and 2 damage to Tom's hero Denethor.

While a card with the archery keyword is in play, players must deal damage to character cards in play equal to the specified archery value at the beginning of each combat phase. This damage can be dealt to characters under any player's control, and it can be divided among the players as they see fit. If there is disagreement as to where to assign archery damage, the first player makes the final decision. If multiple cards with the archery keyword are in play, the effects are cumulative. Remember that does not block archery damage.

Guarded

The guarded keyword is a reminder on some objective cards to reveal and attach the next card of the encounter deck to the objective when it enters the staging area from the encounter deck, and place them both in the staging area. The objective cannot be claimed as long as any encounter card is attached. Once that encounter is dealt with, the objective remains in the staging area until it is claimed. If another objective card comes up while attaching a card for the guarded keyword, place the second objective in the staging area, and use the next card of the encounter deck to fulfil the original keyword effect. Enemy and location cards attached to guarded objectives do still count their threat while the enemy or location is in the staging area. An encounter card attached to a guarded objective is dealt with in the following method, depending on its card type:

Once all encounter cards attached to a guarded objective are dealt with, the players can claim the objective in the manner specified by its card text.

Guarded X

Matt is setting up "The Black Serpent" and the Setup on stage 1A instructions him to reveal a random, set aside Harad objective. He randomly selects Banner of the Serpent which reads: "Guarded (enemy or location)." Matt places Banner of the Serpent in the staging area and begins discarding cards from the top of the encounter deck. The first card is a treachery card, so he continues discarding. The second card is an enemy, Southron Archer. Since enemy is a type listed after the Guarded keyword on Banner of the Serpent, Matt takes Southron Archer from the encounter discard pile, adds it to the staging area, and attaches Banner of the Serpent to it.

Guarded (X) is a new version of the Guarded keyword. When a card with Guarded (X) is revealed, instead of revealing the next card from the encounter deck, discard cards from the encounter deck until an encounter card with the matching type is discarded. Then, add it to the staging area and attach the just revealed objective to it. Once attached, an objective with Guarded (X) works just like and objective with the Guarded keyword.

Difficulty level

Easy Mode

easymode

During step 2 of Setup, "Place Heroes and Set Initial Threat Levels", add one resource to each hero's resource pool. When building the encounter deck, remove any card with the "difficulty" indicator around its encounter set icon (a gold border) from the current scenario's encounter deck.

Related Quests

Home

Back

The Dungeons of Cirith Gurat

Official difficulty (7)

User rating (7)

rated by 21 players

Rate this Quest!

Keywords

Surge

When an encounter card with the surge keyword is revealed during the staging step of the quest phase or in setup, reveal 1 additional card from the encounter deck. Resolve the surge keyword immediately after resolving any when revealed effects on the card.

Doomed X

If an encounter card with the doomed keyword is revealed during the staging step of the quest phase or in setup, each player must raise his threat level by the specified value.

Guarded

The guarded keyword is a reminder on some objective cards to reveal and attach the next card of the encounter deck to the objective when it enters the staging area from the encounter deck, and place them both in the staging area. The objective cannot be claimed as long as any encounter card is attached. Once that encounter is dealt with, the objective remains in the staging area until it is claimed. If another objective card comes up while attaching a card for the guarded keyword, place the second objective in the staging area, and use the next card of the encounter deck to fulfil the original keyword effect. Enemy and location cards attached to guarded objectives do still count their threat while the enemy or location is in the staging area. An encounter card attached to a guarded objective is dealt with in the following method, depending on its card type:

Once all encounter cards attached to a guarded objective are dealt with, the players can claim the objective in the manner specified by its card text.

Rulings

The Captives of Cirith Gurat

In "The Dungeons of Cirith Gurat", players attempt to rescue their captive friends from the fortress of the Orcs. To help represent the captives' plight, The Captives of Cirith Gurat objective is added to the staging area during setup. It reads: "While a character is attached to an encounter card, it is considered to be a guarded objective with a blank text box." This means the characters who are captured and guarded by encounter cards lose their card type, and their player card status, and gain the objective card type instead. When a guarded objective is 'rescued' and returned to its owner's control, that card regains its card type and player card status.

Difficulty level

Easy Mode

easymode

During step 2 of Setup, "Place Heroes and Set Initial Threat Levels", add one resource to each hero's resource pool. When building the encounter deck, remove any card with the "difficulty" indicator around its encounter set icon (a gold border) from the current scenario's encounter deck.

Related Quests

Home

Back

The Crossing of Poros

User rating (8)

rated by 24 players

Rate this Quest!

Keywords

Surge

When an encounter card with the surge keyword is revealed during the staging step of the quest phase or in setup, reveal 1 additional card from the encounter deck. Resolve the surge keyword immediately after resolving any when revealed effects on the card.

Doomed X

If an encounter card with the doomed keyword is revealed during the staging step of the quest phase or in setup, each player must raise his threat level by the specified value.

Archery X

Tom and Kris are playing the scenario "Into Ithilien," and two copies of Southron Mercenaries are in play. Southron Mercenaries has the keyword archery X, where X is the number of players in the game. This gives a cumulative archery value of 4. At the beginning of the combat phase, the players decide to deal 2 damage to Kris' ally Gandalf, and 2 damage to Tom's hero Denethor.

While a card with the archery keyword is in play, players must deal damage to character cards in play equal to the specified archery value at the beginning of each combat phase. This damage can be dealt to characters under any player's control, and it can be divided among the players as they see fit. If there is disagreement as to where to assign archery damage, the first player makes the final decision. If multiple cards with the archery keyword are in play, the effects are cumulative. Remember that does not block archery damage.

Rulings

Multiple Encounter Sets

"The Crossings of Poros" comes with two encounter sets: The Crossings of Poros and Mountains of Shadow. When setting up the scenario, the Mountains of Shadow encounter set is set aside along with four encounter sets. Only the Crossings of Poros set is used to create the encounter deck at the beginning of the game. Throughout the rest of the game the players are instructed to shuffle in other encounter cards from set aside encounter decks. Once a set aside encounter card is revealed, put into play, placed in the encounter discard pile, or shuffled into the encounter deck, it is considered to be part of the encounter deck for the rest of the game.

Removed from the Game

When the players advance to stage 2A, they are instructed to shuffle either the Desert Sands or Mountains of Shadow encounter set into the encounter deck and remove the other one from the game. When an encounter set is removed from the game, it should be placed back in the box and remain unused for the rest of the game. Effects that target a "set aside" encounter set cannot target an encounter set that has been removed from the game.

Difficulty level

Easy Mode

easymode

During step 2 of Setup, "Place Heroes and Set Initial Threat Levels", add one resource to each hero's resource pool. When building the encounter deck, remove any card with the "difficulty" indicator around its encounter set icon (a gold border) from the current scenario's encounter deck.

Related Quests

Home

Back

Journey Up the Anduin

Official difficulty (5)

User rating (6.4)

rated by 33 players

Rate this Quest!

Keywords

Surge

When an encounter card with the surge keyword is revealed during the staging step of the quest phase or in setup, reveal 1 additional card from the encounter deck. Resolve the surge keyword immediately after resolving any when revealed effects on the card.

Doomed X

If an encounter card with the doomed keyword is revealed during the staging step of the quest phase or in setup, each player must raise his threat level by the specified value.

Guarded

The guarded keyword is a reminder on some objective cards to reveal and attach the next card of the encounter deck to the objective when it enters the staging area from the encounter deck, and place them both in the staging area. The objective cannot be claimed as long as any encounter card is attached. Once that encounter is dealt with, the objective remains in the staging area until it is claimed. If another objective card comes up while attaching a card for the guarded keyword, place the second objective in the staging area, and use the next card of the encounter deck to fulfil the original keyword effect. Enemy and location cards attached to guarded objectives do still count their threat while the enemy or location is in the staging area. An encounter card attached to a guarded objective is dealt with in the following method, depending on its card type:

Once all encounter cards attached to a guarded objective are dealt with, the players can claim the objective in the manner specified by its card text.

Rulings

Evil Creatures Deck

To create the Evil Creatures deck, take each enemy card from the Wilderlands encounter set and shuffle them together. This is the Evil Creatures deck. Remove each location and treachery card from the Wilderlands encounter set from the game.

When an enemy from the Evil Creatures deck leaves play, place it in a separate Evil Creatures discard pile, even if it has victory points. If the Evil Creatures deck is ever empty, shuffle the Evil Creatures discard pile back into the Evil Creatures deck.

FAQ & Errata

Wargs

Q: When do "after this enemy attacks" Forced effects like those on Chieftan Ufthak (CORE 90) and Wargs (CORE 85) resolve?

A: These effects resolve immediately after step 4 of enemy attack resolution.

Banks of the Anduin

Q: What happens to Banks of the Anduin (CORE 113) if it is drawn as a Shadow card?

A: It will be discarded from play at the end of the combat phase, like other Shadow cards. When a card is drawn as a Shadow card, only its Shadow text is considered to be active.

Difficulty level

Easy Mode

During step 2 of Setup, "Place Heroes and Set Initial Threat Levels", add one resource to each hero's resource pool. Then remove the following cards:

  • Wilderlands
    • 1x Hill Troll
    • 1x Marsh Adder
    • 2x Despair
  • Journey Down the Anduin
    • 1x Massing at Night
    • 2x Gladden Fields

Related Quests

Home

Back

Lost in Mirkwood

Official difficulty (5)

User rating (5.2)

rated by 25 players

Rate this Quest!

Keywords

Surge

When an encounter card with the surge keyword is revealed during the staging step of the quest phase or in setup, reveal 1 additional card from the encounter deck. Resolve the surge keyword immediately after resolving any when revealed effects on the card.

Doomed X

If an encounter card with the doomed keyword is revealed during the staging step of the quest phase or in setup, each player must raise his threat level by the specified value.

Guarded

The guarded keyword is a reminder on some objective cards to reveal and attach the next card of the encounter deck to the objective when it enters the staging area from the encounter deck, and place them both in the staging area. The objective cannot be claimed as long as any encounter card is attached. Once that encounter is dealt with, the objective remains in the staging area until it is claimed. If another objective card comes up while attaching a card for the guarded keyword, place the second objective in the staging area, and use the next card of the encounter deck to fulfil the original keyword effect. Enemy and location cards attached to guarded objectives do still count their threat while the enemy or location is in the staging area. An encounter card attached to a guarded objective is dealt with in the following method, depending on its card type:

Once all encounter cards attached to a guarded objective are dealt with, the players can claim the objective in the manner specified by its card text.

Guarded (X)

During the planning phase, Tyler plays "Necklace of Girion" which has the Guarded (enemy or location) keyword, so he discards cards from the top of the encounter deck until he discards an enemy or location. In this case the first card he discards is Lonely Lands. He adds the Lonely Lands to the staging area and attaches Necklace of Girion to it as a Guarded objective. Once that Lonely Lands is explored, Tyler will take control of the Necklace of Girion and attach it to a hero of his choice.

Guarded (X) is a new version of the Guarded keyword that appears on both objective cards and some player card attachments. X is a card type: enemy or location. When a card with Guarded (X) enters play, discard cards from the encounter deck until an encounter card with the matching type is discarded. Then, add that card to the staging area and attach the Guarded (X) card to it as a guarded objective. Once attached, an objective card with the Guarded (X) keyword works just like an objective with the original Guarded keyword. If the encounter deck is empty while resolving the Guarded (X) keyword, shuffle the encounter discard pile into the encounter deck and finish resolving the Guarded (X) keyword.

A player card attachment with the Guarded (X) keyword cannot be attached to a character until it is free of encounters. Once free of encounters, its owner gains control of it attaches it to an eligible card.

FAQ & Errata

Chieftan Ufthak

Q: When do "after this enemy attacks" Forced effects like those on Chieftan Ufthak (CORE 90) and Wargs (CORE 85) resolve?

A: These effects resolve immediately after step 4 of enemy attack resolution.

Dol Guldur Beastmaster

Should read: "Forced: When Dol Guldur Beastmaster attacks..."

The additional shadow card is dealt when the Dol Guldur Beastmaster is chosen during step 1 of enemy attack resolution.

Caught in a Web

Q: How does a player resolve the situation in which a single hero has multiple copies of Caught in a Web (CORE 80) attached?

A: The player must pay for each copy of Caught in a Web before the hero can ready. Each copy of the card creates an independent condition that must be fulfilled before readying the attached hero, so if each condition is not fulfilled the hero cannot ready. End result, if a hero has two copies of Caught in a Web attached, the player will have to pay 4 resources from that hero's resource pool in order to ready the card.

Difficulty level

Easy Mode

During step 2 of Setup, "Place Heroes and Set Initial Threat Levels", add one resource to each hero's resource pool. Then remove the following cards:

  • Dol Guldur Orcs
    • 1x Chieftain Ufthak
    • 1x Dol Guldur Beast Master
    • 1x Necromancer's Pass
    • 2x Necromancer's Reach
  • Spiders of Mirkwood
    • 2x Caught in the Web
    • 1x Eyes of the Forest
    • 1x Hummerthorns

Related Quests

Home

Back

The King's Quest

Official difficulty (5)

User rating (7.1)

rated by 22 players

Rate this Quest!

Keywords

Surge

When an encounter card with the surge keyword is revealed during the staging step of the quest phase or in setup, reveal 1 additional card from the encounter deck. Resolve the surge keyword immediately after resolving any when revealed effects on the card.

Doomed X

If an encounter card with the doomed keyword is revealed during the staging step of the quest phase or in setup, each player must raise his threat level by the specified value.

Guarded

The guarded keyword is a reminder on some objective cards to reveal and attach the next card of the encounter deck to the objective when it enters the staging area from the encounter deck, and place them both in the staging area. The objective cannot be claimed as long as any encounter card is attached. Once that encounter is dealt with, the objective remains in the staging area until it is claimed. If another objective card comes up while attaching a card for the guarded keyword, place the second objective in the staging area, and use the next card of the encounter deck to fulfil the original keyword effect. Enemy and location cards attached to guarded objectives do still count their threat while the enemy or location is in the staging area. An encounter card attached to a guarded objective is dealt with in the following method, depending on its card type:

Once all encounter cards attached to a guarded objective are dealt with, the players can claim the objective in the manner specified by its card text.

Guarded (X)

During the planning phase, Tyler plays "Necklace of Girion" which has the Guarded (enemy or location) keyword, so he discards cards from the top of the encounter deck until he discards an enemy or location. In this case the first card he discards is Lonely Lands. He adds the Lonely Lands to the staging area and attaches Necklace of Girion to it as a Guarded objective. Once that Lonely Lands is explored, Tyler will take control of the Necklace of Girion and attach it to a hero of his choice.

Guarded (X) is a new version of the Guarded keyword that appears on both objective cards and some player card attachments. X is a card type: enemy or location. When a card with Guarded (X) enters play, discard cards from the encounter deck until an encounter card with the matching type is discarded. Then, add that card to the staging area and attach the Guarded (X) card to it as a guarded objective. Once attached, an objective card with the Guarded (X) keyword works just like an objective with the original Guarded keyword. If the encounter deck is empty while resolving the Guarded (X) keyword, shuffle the encounter discard pile into the encounter deck and finish resolving the Guarded (X) keyword.

A player card attachment with the Guarded (X) keyword cannot be attached to a character until it is free of encounters. Once free of encounters, its owner gains control of it attaches it to an eligible card.

Deep

After the players travel to a Deep location, they discard it and replace it with the top card of the Caves deck. That location then becomes the active location. If there are no cards remaining in the Caves deck, the Deep keyword is ignored.

Rulings

The Caves Deck

To create the Caves deck, take each card from the Lost Caves encounter set and shuffle them together. This is the Caves deck.

Difficulty level

Easy Mode

easymode

During step 2 of Setup, "Place Heroes and Set Initial Threat Levels", add one resource to each hero's resource pool. When building the encounter deck, remove any card with the "difficulty" indicator around its encounter set icon (a gold border) from the current scenario's encounter deck.

Related Quests

Home

Back

The Withered Heath

Official difficulty (6)

User rating (7.2)

rated by 26 players

Rate this Quest!

Keywords

Surge

When an encounter card with the surge keyword is revealed during the staging step of the quest phase or in setup, reveal 1 additional card from the encounter deck. Resolve the surge keyword immediately after resolving any when revealed effects on the card.

Doomed X

If an encounter card with the doomed keyword is revealed during the staging step of the quest phase or in setup, each player must raise his threat level by the specified value.

Guarded

The guarded keyword is a reminder on some objective cards to reveal and attach the next card of the encounter deck to the objective when it enters the staging area from the encounter deck, and place them both in the staging area. The objective cannot be claimed as long as any encounter card is attached. Once that encounter is dealt with, the objective remains in the staging area until it is claimed. If another objective card comes up while attaching a card for the guarded keyword, place the second objective in the staging area, and use the next card of the encounter deck to fulfil the original keyword effect. Enemy and location cards attached to guarded objectives do still count their threat while the enemy or location is in the staging area. An encounter card attached to a guarded objective is dealt with in the following method, depending on its card type:

Once all encounter cards attached to a guarded objective are dealt with, the players can claim the objective in the manner specified by its card text.

Guarded (X)

During the planning phase, Tyler plays "Necklace of Girion" which has the Guarded (enemy or location) keyword, so he discards cards from the top of the encounter deck until he discards an enemy or location. In this case the first card he discards is Lonely Lands. He adds the Lonely Lands to the staging area and attaches Necklace of Girion to it as a Guarded objective. Once that Lonely Lands is explored, Tyler will take control of the Necklace of Girion and attach it to a hero of his choice.

Guarded (X) is a new version of the Guarded keyword that appears on both objective cards and some player card attachments. X is a card type: enemy or location. When a card with Guarded (X) enters play, discard cards from the encounter deck until an encounter card with the matching type is discarded. Then, add that card to the staging area and attach the Guarded (X) card to it as a guarded objective. Once attached, an objective card with the Guarded (X) keyword works just like an objective with the original Guarded keyword. If the encounter deck is empty while resolving the Guarded (X) keyword, shuffle the encounter discard pile into the encounter deck and finish resolving the Guarded (X) keyword.

A player card attachment with the Guarded (X) keyword cannot be attached to a character until it is free of encounters. Once free of encounters, its owner gains control of it attaches it to an eligible card.

Deep

After the players travel to a Deep location, they discard it and replace it with the top card of the Caves deck. That location then becomes the active location. If there are no cards remaining in the Caves deck, the Deep keyword is ignored.

Rulings

The Caves Deck

To create the Caves deck, take each card from the Lost Caves encounter set and shuffle them together. This is the Caves deck.

Dragon Sign

If a Dragon Sign replaces the active location via the deep keyword, add the Dragon Sign to the staging area and resolve its guarded keyword.

Difficulty level

Easy Mode

easymode

During step 2 of Setup, "Place Heroes and Set Initial Threat Levels", add one resource to each hero's resource pool. When building the encounter deck, remove any card with the "difficulty" indicator around its encounter set icon (a gold border) from the current scenario's encounter deck.

Related Quests

Home

Back

Roam Across Rhovanion

Official difficulty (5)

User rating (6.3)

rated by 23 players

Rate this Quest!

Keywords

Surge

When an encounter card with the surge keyword is revealed during the staging step of the quest phase or in setup, reveal 1 additional card from the encounter deck. Resolve the surge keyword immediately after resolving any when revealed effects on the card.

Doomed X

If an encounter card with the doomed keyword is revealed during the staging step of the quest phase or in setup, each player must raise his threat level by the specified value.

Guarded

The guarded keyword is a reminder on some objective cards to reveal and attach the next card of the encounter deck to the objective when it enters the staging area from the encounter deck, and place them both in the staging area. The objective cannot be claimed as long as any encounter card is attached. Once that encounter is dealt with, the objective remains in the staging area until it is claimed. If another objective card comes up while attaching a card for the guarded keyword, place the second objective in the staging area, and use the next card of the encounter deck to fulfil the original keyword effect. Enemy and location cards attached to guarded objectives do still count their threat while the enemy or location is in the staging area. An encounter card attached to a guarded objective is dealt with in the following method, depending on its card type:

Once all encounter cards attached to a guarded objective are dealt with, the players can claim the objective in the manner specified by its card text.

Indestructible

An enemy with the Indestructible keyword cannot be destroyed by damage, even when it has damage on it equal to its hit points.

Difficulty level

Easy Mode

easymode

During step 2 of Setup, "Place Heroes and Set Initial Threat Levels", add one resource to each hero's resource pool. When building the encounter deck, remove any card with the "difficulty" indicator around its encounter set icon (a gold border) from the current scenario's encounter deck.

Related Quests

Home

Back

The Wizard's Quest

User rating (6.6)

rated by 8 players

Rate this Quest!

Keywords

Surge

When an encounter card with the surge keyword is revealed during the staging step of the quest phase or in setup, reveal 1 additional card from the encounter deck. Resolve the surge keyword immediately after resolving any when revealed effects on the card.

Doomed X

If an encounter card with the doomed keyword is revealed during the staging step of the quest phase or in setup, each player must raise his threat level by the specified value.

Guarded

The guarded keyword is a reminder on some objective cards to reveal and attach the next card of the encounter deck to the objective when it enters the staging area from the encounter deck, and place them both in the staging area. The objective cannot be claimed as long as any encounter card is attached. Once that encounter is dealt with, the objective remains in the staging area until it is claimed. If another objective card comes up while attaching a card for the guarded keyword, place the second objective in the staging area, and use the next card of the encounter deck to fulfil the original keyword effect. Enemy and location cards attached to guarded objectives do still count their threat while the enemy or location is in the staging area. An encounter card attached to a guarded objective is dealt with in the following method, depending on its card type:

Once all encounter cards attached to a guarded objective are dealt with, the players can claim the objective in the manner specified by its card text.

Rulings

The Wizard's Quest is a custom scenario kit. It comes with everything a player needs to construct their own adventure for The Lord of the Rings: The Card Game.

Included in this kit are:

Note: The encounter cards in The Wizard's Quest are fully compatible with The Woodland Realm custom scenario kit and vice versa. Additional copies of each kit may be purchased to increase your customization options when using the Advanced-build rules described on page 3. The Woodland Realm contains sets 1-14 and The Wizard's Quest contains sets 15-28. The encounter cards from both kits can be identified by the green border around the encounter set number.

Build Your Own Adventure

There are two ways to create your own scenario: Quickbuild or Advanced-build. If this is your first time playing The Wizard's Quest, follow the Quick-build rules.

Quick-build Rules

The Quick-build rules allow you to build your own adventure in minutes using only the contents of this set. To create a Quick-build custom scenario follow these 3 steps:

  1. Create your quest deck by choosing one stage 2 and one stage 3 and placing them in numerical order under stage 1.
  2. Create your encounter deck by choosing 7 different encounter sets and shuffling them together. Each encounter set is identified by a different number.
  3. Choose what type of game to play: cooperative or competitive. To play a cooperative game, simply follow the standard game rules. To play a competitive game, see below.

Note: If you wish to surprise yourself in cooperative play, you can randomly choose your encounter sets and quest cards.

Advanced-build Rules

The Advanced-build rules give players greater flexibility to customize a scenario. The quest deck is built using the same rules as Quick-build, but the encounter deck is built by selecting individual encounter cards instead of entire encounter sets. To create an Advanced-build custom scenario, follow these guidelines:

Note: When building a custom scenario, you can choose encounter cards from both The Wizard's Quest and The Woodland Realm, but you cannot mix quest cards.

Competitive Rules

The Wizard's Quest was designed to encourage competitive play for The Lord of the Rings: The Card Game. These rules are intended for games of 1v1 or 2v2. A 1v1 game allows players to test their best solo decks against their opponent-s custom scenario, and 2v2 maintains the cooperative aspect of the LCG as teammates work together to outrace the opposing team. The team that defeats their scenario first wins!

Setting Up a Competitive Game

In order to play a competitive game of The Lord of the Rings LCG, each team must bring the following:

  1. A player deck for each team member
  2. Enough threat dials and tokens for each team member
  3. One custom scenario for the opposing team to play

Important: Before the game begins, teams trade custom scenarios so that the adventure you play is the one your opponent created, and vice versa.

Playing a Competitive Game

To play a competitive game using The Wizard's Quest, follow these rules:

  1. Resource Phase and Planning Phase
  2. Quest Phase and Travel Phase
  3. Encounter Phase, Combat Phase and Refresh Phase

Rules Clarifications

Difficulty level

Easy Mode

easymode

During step 2 of Setup, "Place Heroes and Set Initial Threat Levels", add one resource to each hero's resource pool. When building the encounter deck, remove any card with the "difficulty" indicator around its encounter set icon (a gold border) from the current scenario's encounter deck.

Related Quests

Home

Back

The Woodland Realm

User rating (6)

rated by 2 players

Rate this Quest!

Keywords

Doomed X

If an encounter card with the doomed keyword is revealed during the staging step of the quest phase or in setup, each player must raise his threat level by the specified value.

Surge

When an encounter card with the surge keyword is revealed during the staging step of the quest phase or in setup, reveal 1 additional card from the encounter deck. Resolve the surge keyword immediately after resolving any when revealed effects on the card.

Rulings

The Woodland Realm is a custom scenario kit. It comes with everything a player needs to construct their own adventure for The Lord of the Rings: The Card Game.

Included in this kit are:

Note: The encounter cards in The Woodland Realm are fully compatible with The Woodland Realm custom scenario kit and vice versa. Additional copies of each kit may be purchased to increase your customization options when using the Advanced-build rules. The Woodland Realm contains sets 1-14 and The Wizard's Quest contains sets 15-28. The encounter cards from both kits can be identified by the green border around the encounter set number.

Build Your Own Adventure

There are two ways to create your own scenario: Quickbuild or Advanced-build. If this is your first time playing The Woodland Realm, follow the Quick-build rules.

Quick-build Rules

The Quick-build rules allow you to build your own adventure in minutes using only the contents of this set. To create a Quick-build custom scenario follow these 3 steps:

  1. Create your quest deck by choosing one stage 2 and one stage 3 and placing them in numerical order under stage 1.
  2. Create your encounter deck by choosing 7 different encounter sets and shuffling them together. Each encounter set is identified by a different number.
  3. Choose what type of game to play: cooperative or competitive. To play a cooperative game, simply follow the standard game rules. To play a competitive game, see below.

Note: If you wish to surprise yourself in cooperative play, you can randomly choose your encounter sets and quest cards.

Advanced-build Rules

The Advanced-build rules give players greater flexibility to customize a scenario. The quest deck is built using the same rules as Quick-build, but the encounter deck is built by selecting individual encounter cards instead of entire encounter sets. To create an Advanced-build custom scenario, follow these guidelines:

Note: When building a custom scenario, you can choose encounter cards from both The Woodland Realm and The Wizard's Quest, but you cannot mix quest cards.

Competitive Rules

The Woodland Realm was designed to encourage competitive play for The Lord of the Rings: The Card Game. These rules are intended for games of 1v1 or 2v2. A 1v1 game allows players to test their best solo decks against their opponent-s custom scenario, and 2v2 maintains the cooperative aspect of the LCG as teammates work together to outrace the opposing team. The team that defeats their scenario first wins!

Setting Up a Competitive Game

In order to play a competitive game of The Lord of the Rings LCG, each team must bring the following:

  1. A player deck for each team member
  2. Enough threat dials and tokens for each team member
  3. One custom scenario for the opposing team to play

Important: Before the game begins, teams trade custom scenarios so that the adventure you play is the one your opponent created, and vice versa.

Playing a Competitive Game

To play a competitive game using The Woodland Realm, follow these rules:

  1. Resource Phase and Planning Phase
  2. Quest Phase and Travel Phase
  3. Encounter Phase, Combat Phase and Refresh Phase

Rules Clarifications

Difficulty level

Easy Mode

easymode

During step 2 of Setup, "Place Heroes and Set Initial Threat Levels", add one resource to each hero's resource pool. When building the encounter deck, remove any card with the "difficulty" indicator around its encounter set icon (a gold border) from the current scenario's encounter deck.

Related Quests

Home

Back

The Oath

User rating (3.5)

rated by 42 players

Rate this Quest!

Keywords

Doomed X

If an encounter card with the doomed keyword is revealed during the staging step of the quest phase or in setup, each player must raise his threat level by the specified value.

Surge

When an encounter card with the surge keyword is revealed during the staging step of the quest phase or in setup, reveal 1 additional card from the encounter deck. Resolve the surge keyword immediately after resolving any when revealed effects on the card.

Difficulty level

Easy Mode

easymode

During step 2 of Setup, "Place Heroes and Set Initial Threat Levels", add one resource to each hero's resource pool. When building the encounter deck, remove any card with the "difficulty" indicator around its encounter set icon (a gold border) from the current scenario's encounter deck.

Related Quests

Home

Back

The Caves of Nibin-Dûm

User rating (4.9)

rated by 37 players

Rate this Quest!

Keywords

Doomed X

If an encounter card with the doomed keyword is revealed during the staging step of the quest phase or in setup, each player must raise his threat level by the specified value.

Surge

When an encounter card with the surge keyword is revealed during the staging step of the quest phase or in setup, reveal 1 additional card from the encounter deck. Resolve the surge keyword immediately after resolving any when revealed effects on the card.

Difficulty level

Easy Mode

easymode

During step 2 of Setup, "Place Heroes and Set Initial Threat Levels", add one resource to each hero's resource pool. When building the encounter deck, remove any card with the "difficulty" indicator around its encounter set icon (a gold border) from the current scenario's encounter deck.

Related Quests

Home

Back

Fire in the Night

Official difficulty (7)

User rating (8.3)

rated by 27 players

Rate this Quest!

Keywords

Surge

When an encounter card with the surge keyword is revealed during the staging step of the quest phase or in setup, reveal 1 additional card from the encounter deck. Resolve the surge keyword immediately after resolving any when revealed effects on the card.

Doomed X

If an encounter card with the doomed keyword is revealed during the staging step of the quest phase or in setup, each player must raise his threat level by the specified value.

Guarded (X)

During the planning phase, Tyler plays "Necklace of Girion" which has the Guarded (enemy or location) keyword, so he discards cards from the top of the encounter deck until he discards an enemy or location. In this case the first card he discards is Lonely Lands. He adds the Lonely Lands to the staging area and attaches Necklace of Girion to it as a Guarded objective. Once that Lonely Lands is explored, Tyler will take control of the Necklace of Girion and attach it to a hero of his choice.

Guarded (X) is a new version of the Guarded keyword that appears on both objective cards and some player card attachments. X is a card type: enemy or location. When a card with Guarded (X) enters play, discard cards from the encounter deck until an encounter card with the matching type is discarded. Then, add that card to the staging area and attach the Guarded (X) card to it as a guarded objective. Once attached, an objective card with the Guarded (X) keyword works just like an objective with the original Guarded keyword. If the encounter deck is empty while resolving the Guarded (X) keyword, shuffle the encounter discard pile into the encounter deck and finish resolving the Guarded (X) keyword.

A player card attachment with the Guarded (X) keyword cannot be attached to a character until it is free of encounters. Once free of encounters, its owner gains control of it attaches it to an eligible card.

Difficulty level

Easy Mode

easymode

During step 2 of Setup, "Place Heroes and Set Initial Threat Levels", add one resource to each hero's resource pool. When building the encounter deck, remove any card with the "difficulty" indicator around its encounter set icon (a gold border) from the current scenario's encounter deck.

Related Quests

Home

Back

The Ghost of Framsburg

Official difficulty (5)

User rating (5.1)

rated by 20 players

Rate this Quest!

Keywords

Surge

When an encounter card with the surge keyword is revealed during the staging step of the quest phase or in setup, reveal 1 additional card from the encounter deck. Resolve the surge keyword immediately after resolving any when revealed effects on the card.

Doomed X

If an encounter card with the doomed keyword is revealed during the staging step of the quest phase or in setup, each player must raise his threat level by the specified value.

Guarded

The guarded keyword is a reminder on some objective cards to reveal and attach the next card of the encounter deck to the objective when it enters the staging area from the encounter deck, and place them both in the staging area. The objective cannot be claimed as long as any encounter card is attached. Once that encounter is dealt with, the objective remains in the staging area until it is claimed. If another objective card comes up while attaching a card for the guarded keyword, place the second objective in the staging area, and use the next card of the encounter deck to fulfil the original keyword effect. Enemy and location cards attached to guarded objectives do still count their threat while the enemy or location is in the staging area. An encounter card attached to a guarded objective is dealt with in the following method, depending on its card type:

Once all encounter cards attached to a guarded objective are dealt with, the players can claim the objective in the manner specified by its card text.

Discover X

The Discover keyword represents the heroes' search for lost treasure, as well as the unexpected dangers they encounter as they travel to the different locations in the scenario. When a location with the Discover keyword becomes the active location, the first player resolves the following steps in order:

  1. Look at the top X cards of the encounter deck, where X is the active locations Discover value. 
  2. Choose 1 looked at objective with the Loot keyword and attach it to the active location as a guarded objective.
  3. Randomly select 1 looked at card with the Hazard trait, reveal it and add it to the staging area.
  4. Place any remaining looked at cards in the encounter discard pile.

If there are less than X cards remaining in the encounter deck when resolving the Discover keyword, shuffle the encounter discard pile into the encounter deck and continue resolving the Discover keyword.

Loot

Objectives with the Loot keyword are valuable treasures that can only be discovered by exploring the different locations of the scenario. A Loot card can only enter play by resolving the Discover keyword on a location.

If a card with the Loot keyword is revealed from the encounter deck, discard it and reveal another card from the top of the encounter deck.

Difficulty level

Easy Mode

easymode

During step 2 of Setup, "Place Heroes and Set Initial Threat Levels", add one resource to each hero's resource pool. When building the encounter deck, remove any card with the "difficulty" indicator around its encounter set icon (a gold border) from the current scenario's encounter deck.

Related Quests

Home

Back

Mount Gundabad

Official difficulty (8)

User rating (7)

rated by 21 players

Rate this Quest!

Keywords

Surge

When an encounter card with the surge keyword is revealed during the staging step of the quest phase or in setup, reveal 1 additional card from the encounter deck. Resolve the surge keyword immediately after resolving any when revealed effects on the card.

Doomed X

If an encounter card with the doomed keyword is revealed during the staging step of the quest phase or in setup, each player must raise his threat level by the specified value.

Guarded

The guarded keyword is a reminder on some objective cards to reveal and attach the next card of the encounter deck to the objective when it enters the staging area from the encounter deck, and place them both in the staging area. The objective cannot be claimed as long as any encounter card is attached. Once that encounter is dealt with, the objective remains in the staging area until it is claimed. If another objective card comes up while attaching a card for the guarded keyword, place the second objective in the staging area, and use the next card of the encounter deck to fulfil the original keyword effect. Enemy and location cards attached to guarded objectives do still count their threat while the enemy or location is in the staging area. An encounter card attached to a guarded objective is dealt with in the following method, depending on its card type:

Once all encounter cards attached to a guarded objective are dealt with, the players can claim the objective in the manner specified by its card text.

Indestructible

An enemy with the Indestructible keyword cannot be destroyed by damage, even when it has damage on it equal to its hit points.

Deep

After the players travel to a Deep location, they discard it and replace it with the top card of the Caves deck. That location then becomes the active location. If there are no cards remaining in the Caves deck, the Deep keyword is ignored.

Rulings

Creating the Quest Deck

This scenario uses multiple stage 2 quest cards. When setup instructs players to "Prepare the quest deck," players must shuffle all stage 2 quest cards together randomly, with side 2A face-up, and place them beneath stage 1. These shuffled stage 2 quest cards are considered to be the "quest deck".

Players will progress through stage 2 quest cards until they have won the game; there is no stage 3. Quest cards are not flipped to side B immediately when revealed. Rather, the current quest card is revealed only at the beginning of the quest phase. Flipping the quest card this way causes  the B side to be revealed.

Bypassing a Quest Card

Players are given the option to bypass some of the quest cards at the end of the combat phase. Bypassing the current quest removes all progress tokens on it, and moves it to the bottom of the quest deck with side 2B face down. Bypassing a quest is optional, and players may choose to stay on each quest card instead of bypassing it. When a quest stage is bypassed (or defeated), it causes the next stage 2A to be revealed, triggering its 'when revealed' effect.

When a quest is completed, players will either add it to their victory display or win the game.

The Caves Deck

To create the Caves deck, take each card from the Lost Caves encounter set and shuffle them together. This is the Caves deck.

The two unique locations, Dagnir's Hoard and Throat of the Mountain, should be added to the Caves deck in addition to the cards from the Lost Caves encounter set.

Difficulty level

Easy Mode

easymode

During step 2 of Setup, "Place Heroes and Set Initial Threat Levels", add one resource to each hero's resource pool. When building the encounter deck, remove any card with the "difficulty" indicator around its encounter set icon (a gold border) from the current scenario's encounter deck.

Related Quests

Home

Back

The Fate of Wilderland

Official difficulty (6)

User rating (6.3)

rated by 21 players

Rate this Quest!

Keywords

Surge

When an encounter card with the surge keyword is revealed during the staging step of the quest phase or in setup, reveal 1 additional card from the encounter deck. Resolve the surge keyword immediately after resolving any when revealed effects on the card.

Doomed X

If an encounter card with the doomed keyword is revealed during the staging step of the quest phase or in setup, each player must raise his threat level by the specified value.

Difficulty level

Easy Mode

easymode

During step 2 of Setup, "Place Heroes and Set Initial Threat Levels", add one resource to each hero's resource pool. When building the encounter deck, remove any card with the "difficulty" indicator around its encounter set icon (a gold border) from the current scenario's encounter deck.

Related Quests

Home

Back

The River Running

Official difficulty (6)

User rating (6.9)

rated by 19 players

Rate this Quest!

Keywords

Surge

When an encounter card with the surge keyword is revealed during the staging step of the quest phase or in setup, reveal 1 additional card from the encounter deck. Resolve the surge keyword immediately after resolving any when revealed effects on the card.

Doomed X

If an encounter card with the doomed keyword is revealed during the staging step of the quest phase or in setup, each player must raise his threat level by the specified value.

Archery X

Tom and Kris are playing the scenario "Into Ithilien," and two copies of Southron Mercenaries are in play. Southron Mercenaries has the keyword archery X, where X is the number of players in the game. This gives a cumulative archery value of 4. At the beginning of the combat phase, the players decide to deal 2 damage to Kris' ally Gandalf, and 2 damage to Tom's hero Denethor.

While a card with the archery keyword is in play, players must deal damage to character cards in play equal to the specified archery value at the beginning of each combat phase. This damage can be dealt to characters under any player's control, and it can be divided among the players as they see fit. If there is disagreement as to where to assign archery damage, the first player makes the final decision. If multiple cards with the archery keyword are in play, the effects are cumulative. Remember that does not block archery damage.

Difficulty level

Easy Mode

easymode

During step 2 of Setup, "Place Heroes and Set Initial Threat Levels", add one resource to each hero's resource pool. When building the encounter deck, remove any card with the "difficulty" indicator around its encounter set icon (a gold border) from the current scenario's encounter deck.

Related Quests

Home

Back

Danger in Dorwinion

Official difficulty (5)

User rating (5.9)

rated by 22 players

Rate this Quest!

Keywords

Surge

When an encounter card with the surge keyword is revealed during the staging step of the quest phase or in setup, reveal 1 additional card from the encounter deck. Resolve the surge keyword immediately after resolving any when revealed effects on the card.

Doomed X

If an encounter card with the doomed keyword is revealed during the staging step of the quest phase or in setup, each player must raise his threat level by the specified value.

Guarded (X)

During the planning phase, Tyler plays "Necklace of Girion" which has the Guarded (enemy or location) keyword, so he discards cards from the top of the encounter deck until he discards an enemy or location. In this case the first card he discards is Lonely Lands. He adds the Lonely Lands to the staging area and attaches Necklace of Girion to it as a Guarded objective. Once that Lonely Lands is explored, Tyler will take control of the Necklace of Girion and attach it to a hero of his choice.

Guarded (X) is a new version of the Guarded keyword that appears on both objective cards and some player card attachments. X is a card type: enemy or location. When a card with Guarded (X) enters play, discard cards from the encounter deck until an encounter card with the matching type is discarded. Then, add that card to the staging area and attach the Guarded (X) card to it as a guarded objective. Once attached, an objective card with the Guarded (X) keyword works just like an objective with the original Guarded keyword. If the encounter deck is empty while resolving the Guarded (X) keyword, shuffle the encounter discard pile into the encounter deck and finish resolving the Guarded (X) keyword.

A player card attachment with the Guarded (X) keyword cannot be attached to a character until it is free of encounters. Once free of encounters, its owner gains control of it attaches it to an eligible card.

Difficulty level

Easy Mode

easymode

During step 2 of Setup, "Place Heroes and Set Initial Threat Levels", add one resource to each hero's resource pool. When building the encounter deck, remove any card with the "difficulty" indicator around its encounter set icon (a gold border) from the current scenario's encounter deck.

Related Quests

Home

Back

The Temple of Doom

Official difficulty (7)

User rating (8.4)

rated by 33 players

Rate this Quest!

Keywords

Surge

When an encounter card with the surge keyword is revealed during the staging step of the quest phase or in setup, reveal 1 additional card from the encounter deck. Resolve the surge keyword immediately after resolving any when revealed effects on the card.

Doomed X

If an encounter card with the doomed keyword is revealed during the staging step of the quest phase or in setup, each player must raise his threat level by the specified value.

Archery X

Tom and Kris are playing the scenario "Into Ithilien," and two copies of Southron Mercenaries are in play. Southron Mercenaries has the keyword archery X, where X is the number of players in the game. This gives a cumulative archery value of 4. At the beginning of the combat phase, the players decide to deal 2 damage to Kris' ally Gandalf, and 2 damage to Tom's hero Denethor.

While a card with the archery keyword is in play, players must deal damage to character cards in play equal to the specified archery value at the beginning of each combat phase. This damage can be dealt to characters under any player's control, and it can be divided among the players as they see fit. If there is disagreement as to where to assign archery damage, the first player makes the final decision. If multiple cards with the archery keyword are in play, the effects are cumulative. Remember that does not block archery damage.

Indestructible

An enemy with the Indestructible keyword cannot be destroyed by damage, even when it has damage on it equal to its hit points.

Rulings

The Power of Mordor Deck

The Power of Mordor Deck represents Sauron's expanding influence over Middle-Earth. To build The Power of Mordor deck when setting up The Temple of Doom, take each card from "The Power of Mordor" encounter set and shuffle them together. This is The Power of Mordor deck.

Quest Stages vs. Side Quests

Some cards in The Temple of Doom reference the number of quest stages in the victory display. Quest stage refers only to the double-sided quest cards that come from the quest deck. Therefore, when calculating the number of quest stages in the victory display count each individual double-sided quest card found there, but do not count side quests in the victory display.

Difficulty level

Easy Mode

easymode

During step 2 of Setup, "Place Heroes and Set Initial Threat Levels", add one resource to each hero's resource pool. When building the encounter deck, remove any card with the "difficulty" indicator around its encounter set icon (a gold border) from the current scenario's encounter deck.

Related Quests

Home

Back

The Mines of Moria

User rating (6.3)

rated by 4 players

Rate this Quest!

Keywords

Surge

When an encounter card with the surge keyword is revealed during the staging step of the quest phase or in setup, reveal 1 additional card from the encounter deck. Resolve the surge keyword immediately after resolving any when revealed effects on the card.

Rulings

The Mines of Moria is a custom scenario kit. It comes with everything a player needs to construct their own adventure for The Lord of the Rings: The Card Game.

Included in this kit are:

Note: The encounter cards in The Mines of Moria are fully compatible with the Escape from Khazad-dûm custom scenario kit and vice versa. Additional copies of each kit may be purchased to increase your customization options when using the Advanced-build rules. The Mines of Moria contains sets 1-14 and Escape from Khazad-dûm contains sets 15-28. The encounter cards from both kits can be identified by the brown border around the encounter set number.

Build Your Own Adventure

There are two ways to create your own scenario: Quickbuild or Advanced-build. If this is your first time playing The Mines of Moria, follow the Quick-build rules.

Quick-build Rules

The Quick-build rules allow you to build your own adventure in minutes using only the contents of this set. To create a Quick-build custom scenario follow these 3 steps:

  1. Create your quest deck by choosing one stage 2 and one stage 3 and placing them in numerical order under stage 1.
  2. Create your encounter deck by choosing 7 different encounter sets and shuffling them together. Each encounter set is identified by a different number.
  3. Choose what type of game to play: cooperative or competitive. To play a cooperative game, simply follow the standard game rules. To play a competitive game, see below.

Note: If you wish to surprise yourself in cooperative play, you can randomly choose your encounter sets and quest cards.

Advanced-build Rules

The Advanced-build rules give players greater flexibility to customize a scenario. The quest deck is built using the same rules as Quick-build, but the encounter deck is built by selecting individual encounter cards instead of entire encounter sets. To create an Advanced-build custom scenario, follow these guidelines:

Note: When building a custom scenario, you can choose encounter cards from both The Mines of Moria and Escape from Khazad-dûm, but you cannot mix quest cards.

Competitive Rules

The Mines of Moria was designed to encourage competitive play for The Lord of the Rings: The Card Game. These rules are intended for games of 1v1 or 2v2. A 1v1 game allows players to test their best solo decks against their opponent-s custom scenario, and 2v2 maintains the cooperative aspect of the LCG as teammates work together to outrace the opposing team. The team that defeats their scenario first wins!

Setting Up a Competitive Game

In order to play a competitive game of The Lord of the Rings LCG, each team must bring the following:

  1. A player deck for each team member
  2. Enough threat dials and tokens for each team member
  3. One custom scenario for the opposing team to play

Important: Before the game begins, teams trade custom scenarios so that the adventure you play is the one your opponent created, and vice versa.

Playing a Competitive Game

To play a competitive game using The Mines of Moria, follow these rules:

  1. Resource Phase and Planning Phase
  2. Quest Phase and Travel Phase
  3. Encounter Phase, Combat Phase and Refresh Phase

Rules Clarifications

Difficulty level

Easy Mode

easymode

During step 2 of Setup, "Place Heroes and Set Initial Threat Levels", add one resource to each hero's resource pool. When building the encounter deck, remove any card with the "difficulty" indicator around its encounter set icon (a gold border) from the current scenario's encounter deck.

Related Quests

Home

Back

Escape from Khazad-dûm

User rating (5.5)

rated by 2 players

Rate this Quest!

Keywords

Surge

When an encounter card with the surge keyword is revealed during the staging step of the quest phase or in setup, reveal 1 additional card from the encounter deck. Resolve the surge keyword immediately after resolving any when revealed effects on the card.

Guarded

The guarded keyword is a reminder on some objective cards to reveal and attach the next card of the encounter deck to the objective when it enters the staging area from the encounter deck, and place them both in the staging area. The objective cannot be claimed as long as any encounter card is attached. Once that encounter is dealt with, the objective remains in the staging area until it is claimed. If another objective card comes up while attaching a card for the guarded keyword, place the second objective in the staging area, and use the next card of the encounter deck to fulfil the original keyword effect. Enemy and location cards attached to guarded objectives do still count their threat while the enemy or location is in the staging area. An encounter card attached to a guarded objective is dealt with in the following method, depending on its card type:

Once all encounter cards attached to a guarded objective are dealt with, the players can claim the objective in the manner specified by its card text.

Rulings

Escape from Khazad-dûm is a custom scenario kit. It comes with everything a player needs to construct their own adventure for The Lord of the Rings: The Card Game.

Included in this kit are:

Note: The encounter cards in Escape from Khazad-dûmare fully compatible with The Mines of Moria custom scenario kit and vice versa. Additional copies of each kit may be purchased to increase your customization options when using the Advanced-build rules. The Mines of Moria contains sets 1-14 and Escape from Khazad-dûm contains sets 15-28. The encounter cards from both kits can be identified by the brown border around the encounter set number.

Build Your Own Adventure

There are two ways to create your own scenario: Quickbuild or Advanced-build. If this is your first time playing Escape from Khazad-dûm, follow the Quick-build rules.

Quick-build Rules

The Quick-build rules allow you to build your own adventure in minutes using only the contents of this set. To create a Quick-build custom scenario follow these 3 steps:

  1. Create your quest deck by choosing one stage 2 and one stage 3 and placing them in numerical order under stage 1.
  2. Create your encounter deck by choosing 7 different encounter sets and shuffling them together. Each encounter set is identified by a different number.
  3. Choose what type of game to play: cooperative or competitive. To play a cooperative game, simply follow the standard game rules. To play a competitive game, see below.

Note: If you wish to surprise yourself in cooperative play, you can randomly choose your encounter sets and quest cards.

Advanced-build Rules

The Advanced-build rules give players greater flexibility to customize a scenario. The quest deck is built using the same rules as Quick-build, but the encounter deck is built by selecting individual encounter cards instead of entire encounter sets. To create an Advanced-build custom scenario, follow these guidelines:

Note: When building a custom scenario, you can choose encounter cards from both Escape from Khazad-dûm and The Mines of Moria, but you cannot mix quest cards.

Competitive Rules

Escape from Khazad-dûm was designed to encourage competitive play for The Lord of the Rings: The Card Game. These rules are intended for games of 1v1 or 2v2. A 1v1 game allows players to test their best solo decks against their opponent-s custom scenario, and 2v2 maintains the cooperative aspect of the LCG as teammates work together to outrace the opposing team. The team that defeats their scenario first wins!

Setting Up a Competitive Game

In order to play a competitive game of The Lord of the Rings LCG, each team must bring the following:

  1. A player deck for each team member
  2. Enough threat dials and tokens for each team member
  3. One custom scenario for the opposing team to play

Important: Before the game begins, teams trade custom scenarios so that the adventure you play is the one your opponent created, and vice versa.

Playing a Competitive Game

To play a competitive game using Escape from Khazad-dûm, follow these rules:

  1. Resource Phase and Planning Phase
  2. Quest Phase and Travel Phase
  3. Encounter Phase, Combat Phase and Refresh Phase

Rules Clarifications

Difficulty level

Easy Mode

easymode

During step 2 of Setup, "Place Heroes and Set Initial Threat Levels", add one resource to each hero's resource pool. When building the encounter deck, remove any card with the "difficulty" indicator around its encounter set icon (a gold border) from the current scenario's encounter deck.

Related Quests

Home

Back

Wrath and Ruin

Official difficulty (7)

User rating (6.6)

rated by 21 players

Rate this Quest!

Keywords

Doomed X

If an encounter card with the doomed keyword is revealed during the staging step of the quest phase or in setup, each player must raise his threat level by the specified value.

Surge

When an encounter card with the surge keyword is revealed during the staging step of the quest phase or in setup, reveal 1 additional card from the encounter deck. Resolve the surge keyword immediately after resolving any when revealed effects on the card.

Archery X

Tom and Kris are playing the scenario "Into Ithilien," and two copies of Southron Mercenaries are in play. Southron Mercenaries has the keyword archery X, where X is the number of players in the game. This gives a cumulative archery value of 4. At the beginning of the combat phase, the players decide to deal 2 damage to Kris' ally Gandalf, and 2 damage to Tom's hero Denethor.

While a card with the archery keyword is in play, players must deal damage to character cards in play equal to the specified archery value at the beginning of each combat phase. This damage can be dealt to characters under any player's control, and it can be divided among the players as they see fit. If there is disagreement as to where to assign archery damage, the first player makes the final decision. If multiple cards with the archery keyword are in play, the effects are cumulative. Remember that does not block archery damage.

Rulings

Controlling Locations

Wrath and Ruin is a battle to liberate the capital of Dorwinion from the forces of Mordor. To represent Dorwinion's struggle to drive the enemy from every last corner of the ruined city, the players are instructed to take control of locations when they leave play.

Stage 1B and 2B both read: "Forced: When a location leaves play as an explored location, the first player takes control of it." To take control of a location, the first player removes all progress from the just explored location and places it in front of him in his play area instead of discarding it. Locations under any player's control are still in play. Their game text is active and they can be affected by card effects.

Losing Control of a Location

There are many encounter card effects that force players to return locations they control to the staging area. Additionally, some locations have triggered effects that will cause players to return them to the staging area.

When a player returns a location he controls to the staging area, he loses control of that location and removes all progress from it. If a player is eliminated from the game, each location controlled by that player is returned to the staging area.

Difficulty level

Easy Mode

easymode

During step 2 of Setup, "Place Heroes and Set Initial Threat Levels", add one resource to each hero's resource pool. When building the encounter deck, remove any card with the "difficulty" indicator around its encounter set icon (a gold border) from the current scenario's encounter deck.

Related Quests

Home

Back

The City of Ulfast

Official difficulty (6)

User rating (7.2)

rated by 20 players

Rate this Quest!

Keywords

Doomed X

If an encounter card with the doomed keyword is revealed during the staging step of the quest phase or in setup, each player must raise his threat level by the specified value.

Surge

When an encounter card with the surge keyword is revealed during the staging step of the quest phase or in setup, reveal 1 additional card from the encounter deck. Resolve the surge keyword immediately after resolving any when revealed effects on the card.

Indestructible

An enemy with the Indestructible keyword cannot be destroyed by damage, even when it has damage on it equal to its hit points.

Strategy Tip

While you are searching for Ulchor in the city of Ulfast, you will have to tread carefully to avoid being detected by the City Guard, an imposing enemy with 8 attack strength!

The City Guard cannot leave the staging area, but it is considered to be engaged with each player whose threat is equal to or higher than its engagement cost of 45. While that may not seem like a problem, each quest stage will reduce the City Guard's engagement cost by 5 for each round you linger there.

That means it will only take a few rounds for the City Guard's engagement cost to be reduced to a point where it ends up considered to be engaged with you When that happens, the City Guard will make attacks against you like any other enemy that is engaged with you. So manage your threat with care and move quickly to avoid being defeated.

Difficulty level

Easy Mode

easymode

During step 2 of Setup, "Place Heroes and Set Initial Threat Levels", add one resource to each hero's resource pool. When building the encounter deck, remove any card with the "difficulty" indicator around its encounter set icon (a gold border) from the current scenario's encounter deck.

Related Quests

Home

Back

Challenge of the Wainriders

Official difficulty (5)

User rating (6.9)

rated by 18 players

Rate this Quest!

Keywords

Surge

When an encounter card with the surge keyword is revealed during the staging step of the quest phase or in setup, reveal 1 additional card from the encounter deck. Resolve the surge keyword immediately after resolving any when revealed effects on the card.

Doomed X

If an encounter card with the doomed keyword is revealed during the staging step of the quest phase or in setup, each player must raise his threat level by the specified value.

Archery X

Tom and Kris are playing the scenario "Into Ithilien," and two copies of Southron Mercenaries are in play. Southron Mercenaries has the keyword archery X, where X is the number of players in the game. This gives a cumulative archery value of 4. At the beginning of the combat phase, the players decide to deal 2 damage to Kris' ally Gandalf, and 2 damage to Tom's hero Denethor.

While a card with the archery keyword is in play, players must deal damage to character cards in play equal to the specified archery value at the beginning of each combat phase. This damage can be dealt to characters under any player's control, and it can be divided among the players as they see fit. If there is disagreement as to where to assign archery damage, the first player makes the final decision. If multiple cards with the archery keyword are in play, the effects are cumulative. Remember that does not block archery damage.

Indestructible

An enemy with the Indestructible keyword cannot be destroyed by damage, even when it has damage on it equal to its hit points.

Race

Race is a keyword used on quest cards in Challenge of the Wainriders. It represents the players' chariot race against the Wainriders. Quest cards with the race keyword cannot be defeated outside of the quest phase, and progress cannot be placed on them by player card effects.

When a quest stage with the race keyword is defeated, it is not removed from play after it is defeated. Instead, the quest stage remains in play and all progress is removed from it at the end of the phase.

Rulings

The Circuit

When setting up the quest deck for the Challenge of the Wainriders, arrange stages 1, 2, and 3 in a row from left to right. Then, place stages 4, 5, and 6 in a row above from right to left, so that stage 4 is positioned directly above stage 3. The two rows together make "the circuit". After creating the circuit, flip each quest stage over and place The Challengers objective and The Wainriders objective at stage 1B so that the staging area looks like this: 

The Challengers objective represents the players' position in the race, and The Wainriders objective represents their opponents' position. The stage that The Challengers objective is at is considered "the Wainriders' stage". When the players defeat a quest stage, they advance The Challengers objective counterclockwise to the next stage of the circuit. The Wainriders objective will also advance around the circuit in a counterclockwise direction. If The Challengers objective has advanced through more quest stages than The Wainriders, then the players are considered to be ahead of The Wainriders. When the players defeat stage 6, they complete the circuit. In order to defeat the scenario, The Challengers objective must complete the circuit twice before The Wainriders objective completes the circuit twice.

Racing X Tests

Tony quest successfully at stage 2B and placed a total of 11 progress on that stage, triggering its effect: "Forced: When this stage is defeated, make a racing test. To pass requires 1 straight result plus and additional straight result for each stage you have completed this round. If the players pass the test, excess progress is placed on the next stage. If the players fail the test, deal 1 damage to each character." Tony exhausts Aragorn who has 3 , so he discards the top 3 cards of the encounter deck. Among the discarded cards are two straight results, which is more than enough to pass the test. Tony advances The Challengers objective to stag 3B of the circuit and places the 7 excess progress on that stage, triggering its effect: "Forced: When this stage is defeated, make a racing test. To pass require 1 turn result, plus an additional turn result for each stage you have completed this round. If the players pass the test, excess progress is placed on the next stage. If the players fail the test, each player discards an ally he controls." Tony exhausts Eowyn who has 4 , so he discards the top 4 card of the encounter deck. There is only one turn result among the discarded cards, which is not enough to pass the rest, so he fails. For failing the test, Tony must discard an ally he controls. However, he has still defeated stage 3B. He advances The Challengers to stage 4B, but he does not place the remaining 3 progress on that stage.
Racing tests represent the heroes' ability to drive their chariot over difficult and dangerous terrain. Succeeding at these tests will beam the difference between winning and losing the race. Each quest stage has a Forced effect that initiates a racing X test when that stage is defeated. When his happens, the first player commits a single character to the test by exhausting it. Then, the first player discards the top X cards of the encounter deck, where X is the total value of that character's indicated attribute (, , or ). Some encounter cards have racing test results printed in their lower-right-hand corners. The results types are straight, turn and wild (the wild result counts both as a straight and a turn result). Each racing test specifies which result and how many of that result the players need to discard in order to pass.

Difficulty level

Easy Mode

easymode

During step 2 of Setup, "Place Heroes and Set Initial Threat Levels", add one resource to each hero's resource pool. When building the encounter deck, remove any card with the "difficulty" indicator around its encounter set icon (a gold border) from the current scenario's encounter deck.

Related Quests

Home

Back

Under the Ash Mountains

Official difficulty (7)

User rating (8.2)

rated by 18 players

Rate this Quest!

Keywords

Surge

When an encounter card with the surge keyword is revealed during the staging step of the quest phase or in setup, reveal 1 additional card from the encounter deck. Resolve the surge keyword immediately after resolving any when revealed effects on the card.

Doomed X

If an encounter card with the doomed keyword is revealed during the staging step of the quest phase or in setup, each player must raise his threat level by the specified value.

Strategy Tip

In this adventure, the heroes are sneaking into Mordor by way of the tunnels of Torech Gorgor - a labyrinthian cave system under the Ash Mountains. There is little chance of finding food or water during the passage, so the heroes must move quickly to reach the other side before their supplies run out.

To represent the theme of dwindling supplies, the quest stages and encounter deck will discard cards from the top of your player deck. If you have no cards in your deck at the end of the round, your characters starve to death and you?re eliminated from the game.

In order to avoid that horrible fate, players will need to more judicious than normal when it comes to triggering various card drawing abilities. Think carefully before you use these abilities as each card you take into your hand is one less card in your deck, and one step closer to being eliminated.

Difficulty level

Easy Mode

easymode

During step 2 of Setup, "Place Heroes and Set Initial Threat Levels", add one resource to each hero's resource pool. When building the encounter deck, remove any card with the "difficulty" indicator around its encounter set icon (a gold border) from the current scenario's encounter deck.

Related Quests

Home

Back

The Land of Sorrow

Official difficulty (9)

User rating (7.8)

rated by 15 players

Rate this Quest!

Keywords

Surge

When an encounter card with the surge keyword is revealed during the staging step of the quest phase or in setup, reveal 1 additional card from the encounter deck. Resolve the surge keyword immediately after resolving any when revealed effects on the card.

Doomed X

If an encounter card with the doomed keyword is revealed during the staging step of the quest phase or in setup, each player must raise his threat level by the specified value.

Archery X

Tom and Kris are playing the scenario "Into Ithilien," and two copies of Southron Mercenaries are in play. Southron Mercenaries has the keyword archery X, where X is the number of players in the game. This gives a cumulative archery value of 4. At the beginning of the combat phase, the players decide to deal 2 damage to Kris' ally Gandalf, and 2 damage to Tom's hero Denethor.

While a card with the archery keyword is in play, players must deal damage to character cards in play equal to the specified archery value at the beginning of each combat phase. This damage can be dealt to characters under any player's control, and it can be divided among the players as they see fit. If there is disagreement as to where to assign archery damage, the first player makes the final decision. If multiple cards with the archery keyword are in play, the effects are cumulative. Remember that does not block archery damage.

Difficulty level

Easy Mode

easymode

During step 2 of Setup, "Place Heroes and Set Initial Threat Levels", add one resource to each hero's resource pool. When building the encounter deck, remove any card with the "difficulty" indicator around its encounter set icon (a gold border) from the current scenario's encounter deck.

Related Quests

Home

Back

The Fortress of Nurn

Official difficulty (10)

User rating (8.9)

rated by 37 players

Rate this Quest!

Keywords

Surge

When an encounter card with the surge keyword is revealed during the staging step of the quest phase or in setup, reveal 1 additional card from the encounter deck. Resolve the surge keyword immediately after resolving any when revealed effects on the card.

Doomed X

If an encounter card with the doomed keyword is revealed during the staging step of the quest phase or in setup, each player must raise his threat level by the specified value.

Rulings

The Power of Mordor Deck

The Power of Mordor Deck represents Sauron's expanding influence over Middle-Earth. To build The Power of Mordor deck when setting up The Fortress of Nurn, take each card from "The Power of Mordor" encounter set and shuffle them together. This is The Power of Mordor deck.

Storm the Castle

While setting up The Fortress of Nurn, the players are instructed to add all 4 copies of the ?Storm the Castle? side quest to the staging area. Each of these side quests is double-sided, with ?Storm the Castle? on one side, and a different side quest on the reverse side. These should be randomized before adding them to the staging area so that the players do not know which side quest is on the reverse side.

When a copy of Storm the Castle is chosen as the current quest at the beginning o the quest phase, two things happen. First, the players reveal the faceup encounter card under that side quest and resolve its staging. Second, the players flip Storm the Castle over and make the side quest on the reverse side the current quest until the end of the phase. That side quest will remain in play until it is defeated.

Difficulty level

Easy Mode

easymode

During step 2 of Setup, "Place Heroes and Set Initial Threat Levels", add one resource to each hero's resource pool. When building the encounter deck, remove any card with the "difficulty" indicator around its encounter set icon (a gold border) from the current scenario's encounter deck.

Related Quests

Home

Back

The Hunt for the Dreadnaught

User rating (4.6)

rated by 10 players

Rate this Quest!

Keywords

Surge

When an encounter card with the surge keyword is revealed during the staging step of the quest phase or in setup, reveal 1 additional card from the encounter deck. Resolve the surge keyword immediately after resolving any when revealed effects on the card.

Doomed X

If an encounter card with the doomed keyword is revealed during the staging step of the quest phase or in setup, each player must raise his threat level by the specified value.

Archery X

Tom and Kris are playing the scenario "Into Ithilien," and two copies of Southron Mercenaries are in play. Southron Mercenaries has the keyword archery X, where X is the number of players in the game. This gives a cumulative archery value of 4. At the beginning of the combat phase, the players decide to deal 2 damage to Kris' ally Gandalf, and 2 damage to Tom's hero Denethor.

While a card with the archery keyword is in play, players must deal damage to character cards in play equal to the specified archery value at the beginning of each combat phase. This damage can be dealt to characters under any player's control, and it can be divided among the players as they see fit. If there is disagreement as to where to assign archery damage, the first player makes the final decision. If multiple cards with the archery keyword are in play, the effects are cumulative. Remember that does not block archery damage.

Boarding X

Boarding is a keyword that appears on many ship-enemies. When a ship-enemy with the Boarding keyword engages a player from the staging area, reveal the top X cards from the Corsair Deck and put the revealed enemies into play, engaged with that player. Note that the Boarding keyword does not resolve if the ship-enemy engages a player from another player's play area, or from the encounter deck or discard pile.

Massive

An enemy with the Massive keyword cannot leave the staging area, is considered to be engaged with each player, and attacks each player in turn during the combat phase.

Pillage X

Pillage is a keyword that appears on some enemies. After an enemy with Pillage X attacks a player, that player discards the top X cards of their deck.

Rulings

Difficulty Modes

The Hunt for the Dreadnaught has 3 difficulty modes: Easy, Standard and Hard. When playing this scenario, choose which difficulty mode to play, find its corresponding Setup card (as denoted by the card's title) and remove the two other Setup cards from the game. For Epic Multiplayer Mode, each group may choose its own difficulty mode.

Ships

There are two kinds of ship cards: Ship-Enemies and Ship-Objectives. Both ship-enemies and ship-objectives count as ship cards, but have different rules associated with them. 

Ship-Enemies

Ship-enemies function in the same way as enemies and are considered to be enemies for all purposes, with the following exceptions: 

  • Attacks made by ship-enemies can only be defended by ship-objectives. Non-ship cards cannot defend against a ship-enemy.
  • If an attack made by a ship-enemy is left undefended, damage from that attack must be assigned to a ship-objective you control, instead of to a hero you control. 

Ship-objectives

Ship-objectives are encounter cards (not player cards) which function in the same way as objective-allies and are considered to be allies (and characters) for all purposes, with the following exceptions:

  • Ship-objectives can only attack ship-enemies. Non-ship enemies cannot be attacked by a ship-objective. 
  • Ship-objectives can only defend against attacks made by ship-enemies. Ship-objectives cannot defend against attacks made by non-ship enemies. 

Preparing Your Fleet

When ships are included in a scenario's encounter deck, that scenario's Setup will instruct the players to "prepare their fleet." To prepare their fleet, each player chooses and takes control of one of the unique Basic ship-objectives included in the encounter sets. Each ship-objective (including the 4 Gondorian Warships) that is not used is then set aside.

The Corsair Deck

The Corsair Deck is a separate deck made up of only non-Ship enemies, and represents the sailors, pirates and raiders players may encounter on Corsair ships.

When ships are included in a scenario's encounter deck, that scenario's Setup will instruct the players to "prepare the Corsair Deck." This is done by removing all non-Ship non-unique enemies from the encounter deck, placing them in a separate facedown pile, and shuffling it. This pile is referred to as the Corsair Deck. The other non-unique enemies and ship-enemies remain in the standard encounter deck.

The enemies in the Corsair Deck are only revealed through encounter card effects, such as the Boarding keyword.

The Corsair Deck has its own discard pile. Whenever a non-Ship Corsair enemy would be placed in the discard pile, place it in the Corsair discard pile instead.

When the Corsair Deck runs out of cards, immediately shuffle the Corsair discard pile back into the Corsair Deck.

Global Values

Global Values are calculated based on the total number of participating players among all groups at the start the event. The Searching the High Seas quest stage 1B and the large Dreadnaught enemy have global values: 
  • The global quest point value for quest stage 1B is 8 per player among all groups. In Epic Multiplayer Mode, this value is shared between all the groups, and is tracked by the event organizer. 
  • The Dreadnaught enemy has a global hit point value of 15 per player among all groups. In Epic Multiplayer Mode, that hit point value is shared between all the groups, and damage placed on any copy of the Dreadnaught is tracked by the event organizer.

Per Player ()

The symbol next to a value multiplies that value by the number of players in that group who started the scenario.

Epic Multiplayer Mode

Epic Multiplayer Mode is a variant in which any number of players can play The Hunt for the Dreadnaught together in multiple groups. To play in Epic Multiplayer Mode, first divide the players into separate groups. At least one player must be assigned to each group, and no more than four players may be assigned to a single group. It is recommended that players be split between groups as evenly as possible. Each group requires one copy of The Hunt for the Dreadnaught in order to play.

After dividing players into groups, designate one person to be the ?event organizer?. The event organizer is responsible for tracking the progress placed on each group?s quest stage 1B and damage placed on the Dreadnaught. During gameplay, observe the following additional rules:

  • Each group has its own play area, and plays the game separately from the other groups. Rules, actions, and card effects cannot affect players in other groups, unless explicitly stated otherwise. 
  • Each group can proceed to the next round or quest stage independently of one another; there is no need to wait until all groups have reached the same point before proceeding.
  • Players may freely communicate between groups.

Difficulty level

Easy Mode

easymode

During step 2 of Setup, "Place Heroes and Set Initial Threat Levels", add one resource to each hero's resource pool. When building the encounter deck, remove any card with the "difficulty" indicator around its encounter set icon (a gold border) from the current scenario's encounter deck.

Related Quests

Home

Back

Ambush at Erelas

Official difficulty (5)

User rating (6.3)

rated by 7 players

Rate this Quest!

Keywords

Surge

When an encounter card with the surge keyword is revealed during the staging step of the quest phase or in setup, reveal 1 additional card from the encounter deck. Resolve the surge keyword immediately after resolving any when revealed effects on the card.

Doomed X

If an encounter card with the doomed keyword is revealed during the staging step of the quest phase or in setup, each player must raise his threat level by the specified value.

Archery X

Tom and Kris are playing the scenario "Into Ithilien," and two copies of Southron Mercenaries are in play. Southron Mercenaries has the keyword archery X, where X is the number of players in the game. This gives a cumulative archery value of 4. At the beginning of the combat phase, the players decide to deal 2 damage to Kris' ally Gandalf, and 2 damage to Tom's hero Denethor.

While a card with the archery keyword is in play, players must deal damage to character cards in play equal to the specified archery value at the beginning of each combat phase. This damage can be dealt to characters under any player's control, and it can be divided among the players as they see fit. If there is disagreement as to where to assign archery damage, the first player makes the final decision. If multiple cards with the archery keyword are in play, the effects are cumulative. Remember that does not block archery damage.

Looter

Looter is a new keyword that appears on enemies in this quest. After you engage an enemy with the Looter keyword, place a random card from your hand and the top X cards of your deck into that enemy's loot pile. This is done every time an enemy with the Looter keyword engages a player, even if there are already cards in that enemy's loot pile.

Rulings

Loot Pile

"Ambush at Erelas" sees the players set upon by brigands looting their valuable supplies and resources. Some cards and abilities refer to an enemy's or objective's loot pile. A loot pile is a faceup pile of player cards placed next to that enemy or objective. Cards in a loot pile are not in play and are under no player's control. Cards in a loot pile are considered blank, except for their cost, sphere, and card type. Note that an enemy or objective with 0 cards in its loot pile still has a loot pile.

A Long-extended Party

An unofficial fan scenario, developed by A Long-extended Party (ALeP). See https://alongextendedparty.com for details.

Difficulty level

Easy Mode

easymode

During step 2 of Setup, "Place Heroes and Set Initial Threat Levels", add one resource to each hero's resource pool. When building the encounter deck, remove any card with the "difficulty" indicator around its encounter set icon (a gold border) from the current scenario's encounter deck.

Related Quests

Home

Back

The Battle for the Beacon

Official difficulty (7)

User rating (7.3)

rated by 6 players

Rate this Quest!

Keywords

Surge

When an encounter card with the surge keyword is revealed during the staging step of the quest phase or in setup, reveal 1 additional card from the encounter deck. Resolve the surge keyword immediately after resolving any when revealed effects on the card.

Doomed X

If an encounter card with the doomed keyword is revealed during the staging step of the quest phase or in setup, each player must raise his threat level by the specified value.

Archery X

Tom and Kris are playing the scenario "Into Ithilien," and two copies of Southron Mercenaries are in play. Southron Mercenaries has the keyword archery X, where X is the number of players in the game. This gives a cumulative archery value of 4. At the beginning of the combat phase, the players decide to deal 2 damage to Kris' ally Gandalf, and 2 damage to Tom's hero Denethor.

While a card with the archery keyword is in play, players must deal damage to character cards in play equal to the specified archery value at the beginning of each combat phase. This damage can be dealt to characters under any player's control, and it can be divided among the players as they see fit. If there is disagreement as to where to assign archery damage, the first player makes the final decision. If multiple cards with the archery keyword are in play, the effects are cumulative. Remember that does not block archery damage.

Rulings

A Long-extended Party

An unofficial fan scenario, developed by A Long-extended Party (ALeP). See https://alongextendedparty.com for details.

Difficulty level

Easy Mode

easymode

During step 2 of Setup, "Place Heroes and Set Initial Threat Levels", add one resource to each hero's resource pool. When building the encounter deck, remove any card with the "difficulty" indicator around its encounter set icon (a gold border) from the current scenario's encounter deck.

Related Quests

Home

Back

The Horse-Lord's Ire

Official difficulty (7)

User rating (7.2)

rated by 5 players

Rate this Quest!

Keywords

Surge

When an encounter card with the surge keyword is revealed during the staging step of the quest phase or in setup, reveal 1 additional card from the encounter deck. Resolve the surge keyword immediately after resolving any when revealed effects on the card.

Doomed X

If an encounter card with the doomed keyword is revealed during the staging step of the quest phase or in setup, each player must raise his threat level by the specified value.

Archery X

Tom and Kris are playing the scenario "Into Ithilien," and two copies of Southron Mercenaries are in play. Southron Mercenaries has the keyword archery X, where X is the number of players in the game. This gives a cumulative archery value of 4. At the beginning of the combat phase, the players decide to deal 2 damage to Kris' ally Gandalf, and 2 damage to Tom's hero Denethor.

While a card with the archery keyword is in play, players must deal damage to character cards in play equal to the specified archery value at the beginning of each combat phase. This damage can be dealt to characters under any player's control, and it can be divided among the players as they see fit. If there is disagreement as to where to assign archery damage, the first player makes the final decision. If multiple cards with the archery keyword are in play, the effects are cumulative. Remember that does not block archery damage.

Guarded (X)

During the planning phase, Tyler plays "Necklace of Girion" which has the Guarded (enemy or location) keyword, so he discards cards from the top of the encounter deck until he discards an enemy or location. In this case the first card he discards is Lonely Lands. He adds the Lonely Lands to the staging area and attaches Necklace of Girion to it as a Guarded objective. Once that Lonely Lands is explored, Tyler will take control of the Necklace of Girion and attach it to a hero of his choice.

Guarded (X) is a new version of the Guarded keyword that appears on both objective cards and some player card attachments. X is a card type: enemy or location. When a card with Guarded (X) enters play, discard cards from the encounter deck until an encounter card with the matching type is discarded. Then, add that card to the staging area and attach the Guarded (X) card to it as a guarded objective. Once attached, an objective card with the Guarded (X) keyword works just like an objective with the original Guarded keyword. If the encounter deck is empty while resolving the Guarded (X) keyword, shuffle the encounter discard pile into the encounter deck and finish resolving the Guarded (X) keyword.

A player card attachment with the Guarded (X) keyword cannot be attached to a character until it is free of encounters. Once free of encounters, its owner gains control of it attaches it to an eligible card.

Vast

The Vast keyword appears on some locations in this cycle, and represents the large distances the players must travel when journeying from place to place within Rohan. Each location with the Vast keyword is considered to be a "vast location", with the following additional text:

Travel: Each player must either exhaust a Mount attachment or a hero they control.

and

Response: After placing progress on this location from questing successfully (even if this location is explored), place an additional progress on any vast location for each Mount attachment the players control.

Rulings

A Long-extended Party

An unofficial fan scenario, developed by A Long-extended Party (ALeP). See https://alongextendedparty.com for details.

Difficulty level

Easy Mode

easymode

During step 2 of Setup, "Place Heroes and Set Initial Threat Levels", add one resource to each hero's resource pool. When building the encounter deck, remove any card with the "difficulty" indicator around its encounter set icon (a gold border) from the current scenario's encounter deck.

Related Quests

Home

Back

The Aldburg Plot

Official difficulty (5)

User rating (5.4)

rated by 7 players

Rate this Quest!

Keywords

Surge

When an encounter card with the surge keyword is revealed during the staging step of the quest phase or in setup, reveal 1 additional card from the encounter deck. Resolve the surge keyword immediately after resolving any when revealed effects on the card.

Doomed X

If an encounter card with the doomed keyword is revealed during the staging step of the quest phase or in setup, each player must raise his threat level by the specified value.

Guarded (X)

During the planning phase, Tyler plays "Necklace of Girion" which has the Guarded (enemy or location) keyword, so he discards cards from the top of the encounter deck until he discards an enemy or location. In this case the first card he discards is Lonely Lands. He adds the Lonely Lands to the staging area and attaches Necklace of Girion to it as a Guarded objective. Once that Lonely Lands is explored, Tyler will take control of the Necklace of Girion and attach it to a hero of his choice.

Guarded (X) is a new version of the Guarded keyword that appears on both objective cards and some player card attachments. X is a card type: enemy or location. When a card with Guarded (X) enters play, discard cards from the encounter deck until an encounter card with the matching type is discarded. Then, add that card to the staging area and attach the Guarded (X) card to it as a guarded objective. Once attached, an objective card with the Guarded (X) keyword works just like an objective with the original Guarded keyword. If the encounter deck is empty while resolving the Guarded (X) keyword, shuffle the encounter discard pile into the encounter deck and finish resolving the Guarded (X) keyword.

A player card attachment with the Guarded (X) keyword cannot be attached to a character until it is free of encounters. Once free of encounters, its owner gains control of it attaches it to an eligible card.

Rulings

A Long-extended Party

An unofficial fan scenario, developed by A Long-extended Party (ALeP). See https://alongextendedparty.com for details.

Difficulty level

Easy Mode

easymode

During step 2 of Setup, "Place Heroes and Set Initial Threat Levels", add one resource to each hero's resource pool. When building the encounter deck, remove any card with the "difficulty" indicator around its encounter set icon (a gold border) from the current scenario's encounter deck.

Related Quests

Home

Back

Fire on the Eastemnet

Official difficulty (6)

User rating (5)

rated by 3 players

Rate this Quest!

Keywords

Surge

When an encounter card with the surge keyword is revealed during the staging step of the quest phase or in setup, reveal 1 additional card from the encounter deck. Resolve the surge keyword immediately after resolving any when revealed effects on the card.

Doomed X

If an encounter card with the doomed keyword is revealed during the staging step of the quest phase or in setup, each player must raise his threat level by the specified value.

Steeds X

Steeds is a new keyword found on locations and quest cards in "Fire on the Eastemnet". The Steeds keyword uses resource tokens to represent the steeds roaming Rohan which are vulnerable to capture by orcs. When a card with the Steeds keyword enters play, place resource tokens on it equal to its specified value X. Resource tokens placed on a card in this way are called "steeds" and do not count as resources. When a location is explored, a quest stage is defeated, or an enemy is defeated, move all steeds from that card to the Wild Steeds objective card.

Rulings

Wild Steeds & Captured Steeds

When setting up the scenario, stage 1A instructs the players to put the objective cards Wild Steeds and Captured Steeds into the staging area. These cards represent the fate of the horses of Rohan. During the game, scenario effects will add steeds to Wild Steeds and Captured Steeds. To win the game, the players will need to finish with more steeds on Wild Steeds than on Captured Steeds.

Capturing Steeds

When an enemy "captures steeds", move all steeds from that enemy to Captured Steeds. Then, move one steed from Wild Steeds to that enemy.

A Long-extended Party

An unofficial fan scenario, developed by A Long-extended Party (ALeP). See https://alongextendedparty.com for details.

Difficulty level

Easy Mode

easymode

During step 2 of Setup, "Place Heroes and Set Initial Threat Levels", add one resource to each hero's resource pool. When building the encounter deck, remove any card with the "difficulty" indicator around its encounter set icon (a gold border) from the current scenario's encounter deck.

Related Quests

Home

Back

The Gap of Rohan

Official difficulty (6)

User rating (7)

rated by 5 players

Rate this Quest!

Keywords

Surge

When an encounter card with the surge keyword is revealed during the staging step of the quest phase or in setup, reveal 1 additional card from the encounter deck. Resolve the surge keyword immediately after resolving any when revealed effects on the card.

Time X

Time X is a keyword that represents the urgency of the heroes' quest. When a card with the Time X keyword is revealed, the players put X resource tokens on that card. These tokens are called "time counters." At the end of each refresh phase, remove 1 time counter from each card with the Time X keyword, if able. When the last time counter is removed, there will be a triggered effect that resolves on that card. Some encounter cards will also remove time counters, making it more difficult for the players to predict when they will run out of time.

Frostbite X

Frostbite is a new keyword in The Gap of Rohan. The Frostbite keyword represents the effects of the worsening storm, as the heroes struggle to press onward despite lacking the proper provisions. When a card with the Frostbite keyword is in play, each player must exhaust X characters at the beginning of the round, where X is that card's Frostbite value.

Rulings

A Long-extended Party

An unofficial fan scenario, developed by A Long-extended Party (ALeP). See https://alongextendedparty.com for details.

Difficulty level

Easy Mode

easymode

During step 2 of Setup, "Place Heroes and Set Initial Threat Levels", add one resource to each hero's resource pool. When building the encounter deck, remove any card with the "difficulty" indicator around its encounter set icon (a gold border) from the current scenario's encounter deck.

Related Quests

Home

Back

The Glittering Caves

Official difficulty (7)

User rating (8)

rated by 4 players

Rate this Quest!

Keywords

Surge

When an encounter card with the surge keyword is revealed during the staging step of the quest phase or in setup, reveal 1 additional card from the encounter deck. Resolve the surge keyword immediately after resolving any when revealed effects on the card.

Archery X

Tom and Kris are playing the scenario "Into Ithilien," and two copies of Southron Mercenaries are in play. Southron Mercenaries has the keyword archery X, where X is the number of players in the game. This gives a cumulative archery value of 4. At the beginning of the combat phase, the players decide to deal 2 damage to Kris' ally Gandalf, and 2 damage to Tom's hero Denethor.

While a card with the archery keyword is in play, players must deal damage to character cards in play equal to the specified archery value at the beginning of each combat phase. This damage can be dealt to characters under any player's control, and it can be divided among the players as they see fit. If there is disagreement as to where to assign archery damage, the first player makes the final decision. If multiple cards with the archery keyword are in play, the effects are cumulative. Remember that does not block archery damage.

Rulings

The Cave Card Type

The 12 cards from the Exploring the Caves encounter set are "cave" cards, a new card type introduced in this scenario. Caves are immune to player card effects. Throughout the game, players move unique tokens representing themselves and Helm Hammerhand around a 4-by-3 grid of cave cards, called the Caves Map. When a player?s token is on a cave, that player and each character that player controls are considered to be at that cave. Travel actions on caves can only be performed by a player at that cave. Other game mechanics, like ranged and sentinel, function as normal, even while players are at different caves.

Adjacent vs. Connected Caves

Two caves are called adjacent if they occupy neighboring positions in the Caves Map. Diagonal caves are not adjacent. Two adjacent caves are also called connected if the artwork on their shared border shows a continuous path.

Setting Up the Caves Map

  1. Shuffle the caves together and deal them faceup in a 4-across, 3-down grid in their own play area.
  2. Starting with the first player, each player takes turns swapping any 2 adjacent caves in the Caves Map. The players may make up to 6 swaps in this way. After the swaps, if any cave cannot be reached from the top-left cave by a continuous path of connected caves, raise each player's threat by 1 and return to step 1. Otherwise, proceed to step 3.
  3. Each player places a unique player token on the top-left cave (this does not count as moving to that cave). These tokens can be anything as long as they are different from the standard game tokens. Place another unique token on the bottom-right cave. This is Helm Hammerhand's token and marks his current cave.

Clues

Clues are facedown cards attached to caves. To set up the clues:
  1. Shuffle the 12 cards of the Search for the Horn encounter set together to form the Clue Deck. Look at the top 2 cards, and place a resource token on each cave indicated by name in the bottom right corner of those cards. If all of the indicated caves are in the left half of the Caves Map, remove all resource tokens from the Caves Map and repeat this step.
  2. Remove the bottom card of the Clue Deck from the game without looking at it. The cave indicated on this card represents the secret whereabouts of Helm's Horn.
  3. Shuffle the 11 remaining cards of the Clue Deck together again and attach 1 card from it facedown to each cave with a resource token. Then, remove all resource tokens from the Caves Map.
  4. Look at the remainder of the Clue Deck and place a damage token on each indicated cave. These have been ruled out as possible places for Helm's Horn. Shuffle the looked at cards into the encounter deck.

To move a player or Helm Hammerhand to another cave, move the corresponding unique token to that cave. Typically, when players move, they must move to a connected cave. Helm Hammerhand, being a wraith, typically moves to an adjacent cave, regardless of whether that cave happens to be connected. If Helm Hammerhand is instructed to move toward the nearest player, and there exist multiple equidistant paths toward a nearest player, the first player decides which of those paths Helm Hammerhand will take.

"Search This Cave"

The text "search this cave" is found in a travel action on each cave in the Caves Map. It represents the players searching that cave for a clue to the whereabouts of Helm's Horn, so that they can find the horn and sound it in Helm's presence to quell the vengeful spirit. 

To "search this cave", reveal the clue card attached to that cave as if it were revealed by the encounter deck. After resolving the staging of the clue card, add a damage token to the cave indicated in the clue card's bottom right corner. You cannot search a cave if it has no attached clue.

After all the clues have been revealed, only 1 undamaged cave will remain, corresponding to the card that was removed from the game during the Caves Map setup.

Hard Mode

The Glittering Caves has an additional difficulty mode called hard mode. To play in hard mode, during step 1 of setting up the clues, look at the top 10 cards of the Clues Deck instead of only the top 2 cards.

A Long-extended Party

An unofficial fan scenario, developed by A Long-extended Party (ALeP). See https://alongextendedparty.com for details.

Difficulty level

Easy Mode

easymode

During step 2 of Setup, "Place Heroes and Set Initial Threat Levels", add one resource to each hero's resource pool. When building the encounter deck, remove any card with the "difficulty" indicator around its encounter set icon (a gold border) from the current scenario's encounter deck.

Related Quests

Home

Back

Mustering of the Rohirrim

Official difficulty (7)

User rating (7)

rated by 2 players

Rate this Quest!

Keywords

Doomed X

If an encounter card with the doomed keyword is revealed during the staging step of the quest phase or in setup, each player must raise his threat level by the specified value.

Surge

When an encounter card with the surge keyword is revealed during the staging step of the quest phase or in setup, reveal 1 additional card from the encounter deck. Resolve the surge keyword immediately after resolving any when revealed effects on the card.

Indestructible

An enemy with the Indestructible keyword cannot be destroyed by damage, even when it has damage on it equal to its hit points.

Vast

The Vast keyword appears on some locations in this cycle, and represents the large distances the players must travel when journeying from place to place within Rohan. Each location with the Vast keyword is considered to be a "vast location", with the following additional text:

Travel: Each player must either exhaust a Mount attachment or a hero they control.

and

Response: After placing progress on this location from questing successfully (even if this location is explored), place an additional progress on any vast location for each Mount attachment the players control.

Rulings

A Long-extended Party

An unofficial fan scenario, developed by A Long-extended Party (ALeP). See https://alongextendedparty.com for details.

Difficulty level

Easy Mode

easymode

During step 2 of Setup, "Place Heroes and Set Initial Threat Levels", add one resource to each hero's resource pool. When building the encounter deck, remove any card with the "difficulty" indicator around its encounter set icon (a gold border) from the current scenario's encounter deck.

Related Quests

Home

Back

Blood in the Isen

Official difficulty (9)

User rating (9)

rated by 8 players

Rate this Quest!

Keywords

Surge

When an encounter card with the surge keyword is revealed during the staging step of the quest phase or in setup, reveal 1 additional card from the encounter deck. Resolve the surge keyword immediately after resolving any when revealed effects on the card.

Doomed X

If an encounter card with the doomed keyword is revealed during the staging step of the quest phase or in setup, each player must raise his threat level by the specified value.

Archery X

Tom and Kris are playing the scenario "Into Ithilien," and two copies of Southron Mercenaries are in play. Southron Mercenaries has the keyword archery X, where X is the number of players in the game. This gives a cumulative archery value of 4. At the beginning of the combat phase, the players decide to deal 2 damage to Kris' ally Gandalf, and 2 damage to Tom's hero Denethor.

While a card with the archery keyword is in play, players must deal damage to character cards in play equal to the specified archery value at the beginning of each combat phase. This damage can be dealt to characters under any player's control, and it can be divided among the players as they see fit. If there is disagreement as to where to assign archery damage, the first player makes the final decision. If multiple cards with the archery keyword are in play, the effects are cumulative. Remember that does not block archery damage.

Rulings

A Long-extended Party

An unofficial fan scenario, developed by A Long-extended Party (ALeP). See https://alongextendedparty.com for details.

Difficulty level

Easy Mode

easymode

During step 2 of Setup, "Place Heroes and Set Initial Threat Levels", add one resource to each hero's resource pool. When building the encounter deck, remove any card with the "difficulty" indicator around its encounter set icon (a gold border) from the current scenario's encounter deck.

Related Quests

Home

Back

The Scouring of the Shire

User rating (7)

rated by 4 players

Rate this Quest!

Keywords

Surge

When an encounter card with the surge keyword is revealed during the staging step of the quest phase or in setup, reveal 1 additional card from the encounter deck. Resolve the surge keyword immediately after resolving any when revealed effects on the card.

Indestructible

An enemy with the Indestructible keyword cannot be destroyed by damage, even when it has damage on it equal to its hit points.

Peril

When a player reveals an encounter card with the Peril keyword, he must resolve the staging of that card on his own without conferring with the other players. The other players cannot take any actions or trigger any responses during the resolution of that card's staging.

Rulings

Sharkey Deck

The Sharkey deck is a separate deck that represents the dangerous powers of Sharkey. To create the Sharkey deck, take each treachery card with the Sharkey trait from the encounter deck and shuffle them together. This is the Sharkey deck.

Special Saga Rules

When playing The Scouring of the Shire, follow the "New Staging Rules" found on page 3 of The Black Riders Saga expansion rulebook.

When setting up The Scouring of the Shire, the first player takes control of the Frodo Baggins included in this expansion. This version of Frodo Baggins can only be used while playing The Scouring of the Shire and cannot be used in any other quests. Players cannot use any other version(s) of Frodo Baggins or cards with the title "Saruman" when playing this quest.

Campaign Mode

New campaign and boon cards are included in The Scouring of the Shire. These cards allow the players to play The Scouring of the Shire as part of The Lord of the Rings campaign. It should be played after Mount Doom, from The Mountain of Fire Saga Expansion.

The complete rules for campaign mode can be found in The Black Riders Saga Expansion, which is required to play campaign mode.

Campaign Rewards

The Scouring of the Shire includes 1 contract card, Into the West, which cannot be used until the players have earned it while playing campaign mode. Once earned, this card may be used by the players who earned it when playing any quest (not just Saga quests).

A Long-extended Party

An unofficial fan scenario, developed by A Long-extended Party (ALeP). See https://alongextendedparty.com for details.

Difficulty level

Easy Mode

easymode

During step 2 of Setup, "Place Heroes and Set Initial Threat Levels", add one resource to each hero's resource pool. When building the encounter deck, remove any card with the "difficulty" indicator around its encounter set icon (a gold border) from the current scenario's encounter deck.

Related Quests

Home

Back

The Nine are Abroad

Official difficulty (9)

User rating (8.5)

rated by 4 players

Rate this Quest!

Keywords

Surge

When an encounter card with the surge keyword is revealed during the staging step of the quest phase or in setup, reveal 1 additional card from the encounter deck. Resolve the surge keyword immediately after resolving any when revealed effects on the card.

Doomed X

If an encounter card with the doomed keyword is revealed during the staging step of the quest phase or in setup, each player must raise his threat level by the specified value.

Rulings

The Middle-Earth Map

Arrange the 10 region cards to form a map of Middle-earth in your staging area, as show below. In this quest, some effects will tell you to place cards onto or next to certain regions. The rules for interacting with this map are found on rules card 4/8, "Exploring Middle-earth". Read those rules, then place that card faceup next to the map (also shown below).

Exploring Middle-Earth

Quest Phase

All cards on the Middle-earth Map contribute their except for locations on your current region. Those locations are considered to be active, and progress must first be placed on them (distributed in any way) before it is placed on the current quest. 

Travel Phase

You cannot travel to locations.

During the travel phase, as an action, the first player may move the progress token marking your group's current region to a neighboring region (north, east, south, or west). The first time this action is triggered each round, there is no cost. To trigger it additional times in a round, the first player must remove 3 progress tokens from the main quest.

Encounter Phase

Only enemies that were on the same region as you at any point during the round can be optionally engaged, and only those enemies will make engagement checks. Immunity Enemies and locations that are not on your current region are immune to player card effects.

Investigate Rumors

Some cards in this quest instruct your group to "investigate rumors". To investigate rumors, a player in your group must control at least 1 ready character. If no players in your group have any ready characters, your group cannot investigate rumors and this text is ignored.

To begin, any player exhausts 1 character they control and discards the top X cards from the encounter deck, where X is that character's highest attribute (, , or ). Set aside any discarded cards with a Rumor effect. The same or another player may repeat this process any number of times, with an action window occurring between discarding the cards and exhausting another character. 

Once the players decide to stop exhausting characters, they must choose 1 Rumor effect among the set aside cards, if any. Then, discard those set aside cards and resolve the chosen Rumor effect. There is no penalty if no Rumor effects are found. 

Rumor effects are ignored when the players are not investigating rumors.

Easy Mode

The cost to move additional times each round is 1 instead of 3.

Forced: After a location is explored (and before triggering that location's Forced effect), each player may ready a character they control.

Hard Mode

Each player cannot reduce their threat by more than 1 each round.

Forced: After a location is explored (and before triggering that location's Forced effect), all players must resolve the shadow effect of the bottommost Nazgûl enemy in the encounter discard pile. Then, place that enemy on the top of the discard pile.

Epic Multiplayer Mode

This quest can be played by up to 9 groups of players, with 1-4 players per group. Each group must have their own copy of the quest and plays their own separate game. Unless a card effect specifically mentions the other groups, cards only affect the game in which they are played. Once the game has begun, each group can play at their own pace.

A Long-extended Party

An unofficial fan scenario, developed by A Long-extended Party (ALeP). See https://alongextendedparty.com for details.

FAQ & Errata

FAQ

Q: Can player card effects be used on a card that is being revealed, before it is placed on a region?

A: The passive text on enemies is active immediately and will place them on a region at the very beginning of the reveal process. So unless that region is your current region, the enemies will be immune to effects like Thalin's ability. However, the Forced effect on locations that places them on a region triggers only after the card has entered play. Therefore a card like The Door is Closed or Warden of Arnor could be used, even if that location is going to be placed on a region other than your current region.

Q: Can I play cards to the staging area?

A: Yes. When a card is added to the staging area and does not specify a region to put it on, such as a player side quest, place it next to the Middle-earth Map. You can also play attachments on cards in the staging area, such as Ancient Mathom or The Road Goes Ever On, provided their targets aren't immune to player card effects.

Q: How does the Burglar's Turn Contract work in The Nine are Abroad?

A: Since you never actually travel to locations, it will never trigger. If you wish to create a house rule, you could trigger it on a location in your current region at the end of the travel phase if you moved regions that phase.

Difficulty level

Easy Mode

easymode

During step 2 of Setup, "Place Heroes and Set Initial Threat Levels", add one resource to each hero's resource pool. When building the encounter deck, remove any card with the "difficulty" indicator around its encounter set icon (a gold border) from the current scenario's encounter deck.

Related Quests

Home

Back

The Siege of Erebor

Official difficulty (7)

User rating (6)

rated by 3 players

Rate this Quest!

Keywords

Archery X

Tom and Kris are playing the scenario "Into Ithilien," and two copies of Southron Mercenaries are in play. Southron Mercenaries has the keyword archery X, where X is the number of players in the game. This gives a cumulative archery value of 4. At the beginning of the combat phase, the players decide to deal 2 damage to Kris' ally Gandalf, and 2 damage to Tom's hero Denethor.

While a card with the archery keyword is in play, players must deal damage to character cards in play equal to the specified archery value at the beginning of each combat phase. This damage can be dealt to characters under any player's control, and it can be divided among the players as they see fit. If there is disagreement as to where to assign archery damage, the first player makes the final decision. If multiple cards with the archery keyword are in play, the effects are cumulative. Remember that does not block archery damage.

Doomed X

If an encounter card with the doomed keyword is revealed during the staging step of the quest phase or in setup, each player must raise his threat level by the specified value.

Toughness X

After Ian plays the Gandalf ally from his hand, he chooses to deal 4 damage to Uruk-hai Archer. The Uruk-hai Archer has toughness 1, so it reduces the damage that it is dealt from 4 to 3.

An enemy with the toughness keyword reduces the amount of damage it takes by X each time it is assigned any amount of damage.

Rulings

Multiple Stages and Main Quests

In The Siege of Erebor, multiple stages are in play at the same time, with a main quest and staging area assigned to each. Each stage can also have a corresponding active location.

At the beginning of the round, each player, starting with the first, chooses a stage. This will be their stage until the beginning of the next round. Different players may choose the same stage. Enemies engaged with a player remain engaged with that player even when their stage changes.

When you play a card or apply the effects of a player card ability, only consider the players and cards at your stage as part of the game. This means that you cannot lower a player?s threat, play an attachment on a character, use the ranged keyword to declare or participate in an attack, etc., unless the cards or players involved share a stage with you.

The active location, staging area, engaged enemies, and play area of each player at a stage are all said to be at that stage, and any card effect that targets "the main quest" will target the main quest it shares a stage with.

West and East

After setup, the 4 stages should be arranged in a line so that The Eastern Defenses is in the rightmost ("eastmost") stage, and Erebor is in the leftmost ("westmost") stage (see below). The term "eastmost stage" will refer to different stages throughout the game as stages leave play.

Resolve each game step from west to east (whether there are players at that stage or not) before going on to the next game step. If a game step involves player order, resolve it in ascending player order of players at that stage. Note that when resolving a quest at a stage with no players, it is likely the quest will be unsuccessful; however, as there are no players at that stage, no one will increase their threat.

Moves West or East

The phrase "moves west" or "moves east" represents forces moving from one part of the battlefield to another.

When a card moves west, it is added to the nearest staging area that is still in play to the left of its current stage, towards Erebor. Cards at the leftmost stage cannot move west.

When a card moves east, it is added to the nearest staging area that is still in play to the right of its current stage, away from Erebor. Cards at the rightmost stage cannot move east.

Revealing an Encounter Card

In The Siege of Erebor, the rules for revealing an encounter card are modified slightly. When revealing an encounter card, any player at any stage can interact with it as normal. However, after being revealed, enemies and locations are added to the staging area of the stage indicated in the bottom-right corner of their card. If the stage indicated for an enemy or a location is not in play, discard that enemy or location without resolving its effects and instead deal 2 damage to the eastmost main quest.

Abandoning a Main Quest

When a main quest is abandoned: 
  1. From lowest to highest engagement cost, each enemy in the staging area of the abandoned quest's stage moves west.
  2. Discard each location at the abandoned quest's stage from play. Then, raise the threat of each player in the game by the number of locations discarded.
  3. Each player at the abandoned quest's stage immediately changes their stage to the nearest stage to the west. Enemies engaged with a player remain engaged with that player. If it is the quest phase, committed characters become committed to the main quest at the new stage (or to a side quest if it was the current quest at the new stage).
  4. Remove any other cards at the abandoned quest's stage (such as objectives or side quests) from the game. The abandoned stage has now left play.
  5. Add the abandoned quest to the victory display and trigger the Forced effect on it.
  6. Play resumes.

Effect Reminders

Beginning of the Round:
  • Each player chooses a stage

Staging Step:

  • 1 additional card from Eastern Assault

End of the Round:

  • City Walls
  • Focused Onslaught
  • Wainraiders
  • Easterling Supply Camp
  • Besieger enemies
  • Hold the North (always last)

A Long-extended Party

An unofficial fan scenario, developed by A Long-extended Party (ALeP). See https://alongextendedparty.com for details.

FAQ & Errata

The Siege of Erebor

Q: Can player side quests be played in this quest?

A: Player side quests are played into their controller's staging area, and can be chosen as the current quest as normal by the first player in turn order at that stage.

Q: Can I travel to locations or engage enemies at other stages?

A: No, only at your stage.

Q: Why are there 2 copies of Brand son of Bain?

A: One copy uses the official card text. The other copy (identified by "FTCL" near its © text) uses modified text and {Traits} from ALeP's Free to Choose List, an optional set of rules changes found on our website. Use whichever you prefer!

Difficulty level

Easy Mode

easymode

During step 2 of Setup, "Place Heroes and Set Initial Threat Levels", add one resource to each hero's resource pool. When building the encounter deck, remove any card with the "difficulty" indicator around its encounter set icon (a gold border) from the current scenario's encounter deck.

Related Quests

Home

Back

Pies for the Party

Official difficulty (5)

User rating (5)

rated by 0 player

Rate this Quest!

Keywords

Surge

When an encounter card with the surge keyword is revealed during the staging step of the quest phase or in setup, reveal 1 additional card from the encounter deck. Resolve the surge keyword immediately after resolving any when revealed effects on the card.

Archery X

Tom and Kris are playing the scenario "Into Ithilien," and two copies of Southron Mercenaries are in play. Southron Mercenaries has the keyword archery X, where X is the number of players in the game. This gives a cumulative archery value of 4. At the beginning of the combat phase, the players decide to deal 2 damage to Kris' ally Gandalf, and 2 damage to Tom's hero Denethor.

While a card with the archery keyword is in play, players must deal damage to character cards in play equal to the specified archery value at the beginning of each combat phase. This damage can be dealt to characters under any player's control, and it can be divided among the players as they see fit. If there is disagreement as to where to assign archery damage, the first player makes the final decision. If multiple cards with the archery keyword are in play, the effects are cumulative. Remember that does not block archery damage.

Indestructible

An enemy with the Indestructible keyword cannot be destroyed by damage, even when it has damage on it equal to its hit points.

Rulings

Attribute Tokens

Attribute tokens are a new class of tokens that affect a card's stats. There are different kinds of attribute tokens, such as tokens, tokens, etc. If a card has X tokens of a given attribute on it, it has +X of that attribute. For example, if an enemy has 3 tokens on it, it gets +3 . Attribute tokens are not removed from a card unless it leaves play, or you are otherwise instructed to remove them.

Last Gasp

Last Gasp is a new timing trigger that functions as a Forced ability and appears on some enemies who are dangerous even in death. When an enemy with the Last Gasp trigger is destroyed, the engaged player (or the first player, if that enemy was not engaged with any player) must trigger that enemy's Last Gasp effect. Note that no enemy featuring this trigger appears in the scenarios of The Shire's Reckoning, but it will be used in the upcoming Fell Summer cycle.

A Long-extended Party

An unofficial fan scenario, developed by A Long-extended Party (ALeP). See https://alongextendedparty.com for details.

Difficulty level

Easy Mode

easymode

During step 2 of Setup, "Place Heroes and Set Initial Threat Levels", add one resource to each hero's resource pool. When building the encounter deck, remove any card with the "difficulty" indicator around its encounter set icon (a gold border) from the current scenario's encounter deck.

Related Quests

Home

Back

Sundown on the Shire

Official difficulty (6)

User rating (6)

rated by 0 player

Rate this Quest!

Keywords

Rulings

Attribute Tokens

Attribute tokens are a new class of tokens that affect a card's stats. There are different kinds of attribute tokens, such as tokens, tokens, etc. If a card has X tokens of a given attribute on it, it has +X of that attribute. For example, if an enemy has 3 tokens on it, it gets +3 . Attribute tokens are not removed from a card unless it leaves play, or you are otherwise instructed to remove them.

Last Gasp

Last Gasp is a new timing trigger that functions as a Forced ability and appears on some enemies who are dangerous even in death. When an enemy with the Last Gasp trigger is destroyed, the engaged player (or the first player, if that enemy was not engaged with any player) must trigger that enemy's Last Gasp effect. Note that no enemy featuring this trigger appears in the scenarios of The Shire's Reckoning, but it will be used in the upcoming Fell Summer cycle.

The Wolf Deck

To create the Wolf deck, remove each non-unique Wolf enemy from the encounter deck and shuffle them together into a separate deck. When a card from the Wolf deck leaves play, it is placed in a separate Wolf deck discard pile. Whenever the Wolf deck is empty, immediately shuffle the Wolf deck discard pile into the Wolf deck.

If both the Wolf deck and the Wolf deck discard pile are empty and you must reveal a card from the Wolf deck, the players as a group must discard 1 character from play instead.

A Long-extended Party

An unofficial fan scenario, developed by A Long-extended Party (ALeP). See https://alongextendedparty.com for details.

Difficulty level

Easy Mode

easymode

During step 2 of Setup, "Place Heroes and Set Initial Threat Levels", add one resource to each hero's resource pool. When building the encounter deck, remove any card with the "difficulty" indicator around its encounter set icon (a gold border) from the current scenario's encounter deck.

Related Quests

Home

Back

Secrets of the Old Forest

Official difficulty (7)

User rating (8.5)

rated by 2 players

Rate this Quest!

Keywords

Surge

When an encounter card with the surge keyword is revealed during the staging step of the quest phase or in setup, reveal 1 additional card from the encounter deck. Resolve the surge keyword immediately after resolving any when revealed effects on the card.

Rulings

Attribute Tokens

Attribute tokens are a new class of tokens that affect a card's stats. There are different kinds of attribute tokens, such as tokens, tokens, etc. If a card has X tokens of a given attribute on it, it has +X of that attribute. For example, if an enemy has 3 tokens on it, it gets +3 . Attribute tokens are not removed from a card unless it leaves play, or you are otherwise instructed to remove them.

Last Gasp

Last Gasp is a new timing trigger that functions as a Forced ability and appears on some enemies who are dangerous even in death. When an enemy with the Last Gasp trigger is destroyed, the engaged player (or the first player, if that enemy was not engaged with any player) must trigger that enemy's Last Gasp effect. Note that no enemy featuring this trigger appears in the scenarios of The Shire's Reckoning, but it will be used in the upcoming Fell Summer cycle.

A Long-extended Party

An unofficial fan scenario, developed by A Long-extended Party (ALeP). See https://alongextendedparty.com for details.

Difficulty level

Easy Mode

easymode

During step 2 of Setup, "Place Heroes and Set Initial Threat Levels", add one resource to each hero's resource pool. When building the encounter deck, remove any card with the "difficulty" indicator around its encounter set icon (a gold border) from the current scenario's encounter deck.

Related Quests

Home

Back

Number of Players

Difficulty Levels

Saga Expansions Rules

Effects Reference

  • Player Actions can be played during action windows and when their triggering conditions are met.

    • Red: Players cannot interrupt with Actions. Responses can still be played if their conditions are met.

    • Green: Any player can take actions generally, or between the game steps stated in the rules.

  • Responses can always be played if their triggering conditions are met.

  • Forced effects must always be resolved if their triggering conditions are met.

  • When revealed effects must be resolved as soon as the card is revealed (before any keyword).

Playing Solo Reference

  • You're always the 'first player'
  • You're always the 'last player'
  • Ignore any effect targeting the 'next player'

Setting the Game

  1. Shuffle decks

    • Shuffle
      player decks
      your deck
    • Build the encounter deck from the encounter sets indicated on the quest cards
    • Follow the instructions on the "Setup" face of the Nightmare Mode card. Remove all indicated cards and shuffle the Nightmare Deck in the encounter deck.
    • Easy mode indicator Remove any card with the "difficulty"� indicator around its encounter set icon (a gold border) from the current scenario's encounter deck.
    • Shuffle the encounter deck.
  2. Determine first player

    , who gets the first player token.

    You are always the first player

  3. Place Heroes and Set Initial Threat Levels

    • At the beginning of the Campaign, record the name of
      each player
      your
      heroes. Any change or dead hero from one scenario to the next adds +1 starting threat.
    • Follow any Setup instruction on Boons & Burdens from the Campaign Pool. Attach 'Permanent' Boons & Burdens to the recorded heroes.
    • The first player takes
      Take
      control of a Hero with the Ring-bearer trait with The One Ring attached to him, or Aragorn.
    • The first player must take
      Take
      control of Bilbo Baggins.
    • Add one to each
      player's
      of your
      hero's resource pool.
  4. Setup Token Bank

  5. Draw Starting Hand

    (6 cards)
  6. Set Quest Cards

  7. Follow Scenario Setup Instruction

    • Follow any instruction of quest card 1A.
    • Flip the Nightmare Mode card from the "Setup" face to the "Nightmare Mode" face and follow any additional instruction.
    • Place the Campaign Card next to the quest card and follow any additional instruction.
    • Follow any instruction of quest card 1B.
    • Surge, Doomed, and Guarded keywords should be resolved any time the card on which they occur is revealed from the encounter deck, including during setup.

Round Sequence

  1. Resource

    • Each player simultaneously adds
      Add
      1 to each of
      his
      your
      heroes' resource pools.
    • After collecting resources,
      each player draws
      draw
      1 [PlayerCard].
    • Player actions.
  2. Planning

    • Each player, starting with the first player,
      You
      can spend to play ally & attachment cards from
      their
      your
      hand into
      their
      your
      play area.
      Attachment cards are assigned to one of the player's cards & are placed face up & overlapped by the card they are attached to.
      A player
      You
      can share the resource tokens of each hero that is within the same sphere of influence.
      Neutral cards can be paid for with the from any of the player's hero's resource pools.
  3. Quest

    1. Step 1 - Commit characters:
      Each player, starting with the first player, exhausts
      exhaust
      the heroes & allies that
      they
      you
      want to commit to the quest.
    2. Step 2 - Staging:
      Cards are revealed
      One card is revealed
      from the encounter deck
      , equal to the number of players
      &
      are
      is
      placed face up in the staging area.
      Players reveal encounter cards individually in player order during the staging step of the quest phase and resolves individually its staging.
      If the encounter deck is emptied, shuffle the discard deck & place it face down as the encounter deck.

      Player actions.

    3. Step 3 - Resolution: The sum of the of all committed characters is compared with the sum of the of all cards in the staging area.
      • = no further action is required.
      • > the difference is added in to the current stage of the quest or location card, if in play.
      • > the difference is added to
        each player's
        your
        threat tracker.
      Players immediately
      Immediately
      advance to the next stage of a quest as soon as
      they
      you
      place a number of equal to or greater than the number of quest points the current quest card has. Reveal the next quest card and follow any instruction. This does not interrupt the round sequence.

      Player actions.

  4. Travel

    • One location card can be moved from the staging area & placed alongside the current quest card to be the active location, provided no other location card is active (any progress tokens that are earned by questing are placed on the active location card whilst it is in play).
    • Player actions.
  5. Encounter

    • Each player, starting with the first player, has
      You have
      the option to engage one enemy from the staging area. The engaged enemy is moved in front of
      the player
      you
      .
    • Player actions.
    • For each player, starting with the first player, an
      An
      engagement check is made against all enemies in the staging area.
      • Each enemy's engagement value, from highest to lowest, is compared to the current player's threat level.
      • If the engagement value is less than or equal to the current player's threat level, the enemy engages the player. This is done by moving the enemy in front of
        the player
        you
        .
      • Engagement checks alternate between players until all enemies in the staging area, that can be engaged, have been engaged.
    • Player actions.
  6. Combat

    • Beginning with the first player, each player deals
      Deal
      shadow cards: an card is placed face down on each engaged enemy card (from the enemy with the highest engagement value to the lowest). No cards are placed if the encounter deck is emptied in the combat phase.
    • Step 1 - Enemy attacks:
      • Beginning with the first player, each player resolves
        Resolve
        all enemy attacks as follows:
        • Choose an enemy whose attack is to be resolved.
        • Choose one Hero or Ally as the defender. The character is exhausted (the player can choose to let the attack go undefended).
        • Flip over the encounter card that was placed on the enemy & resolve shadow effects if any.
        • Resolve the combat by comparing the attacking card's strength with the defending card's strength .
          • ≥ no damage dealt.
          • > the difference is added in to the attacked card.
          • If the attack is undefended equaling the value of the enemy must be dealt to a single Hero (without taking into account its value).
          • The character dies if the number of on the card equals the card's Hit Points. The card is discarded.
    • Step 2 - Players attacks:
      • Choose a character or characters that will attack an enemy. Character(s) is/are exhausted. An enemy can only be attacked once
        per player
        .
      • Resolve the combat as above using the combined of your characters against the of the target.
      • Dead enemies are immediately discarded, as well as their shadow cards.
      Once all combat has been resolved, shadow cards on the remaining enemies are discarded. Enemies that have not been killed this round remain engaged with the player, but are no longer engaged with specific characters.
  7. Refresh

    • All exhausted cards are readied.
    • Each player's
      Your
      threat value is increased by 1.
    • The first player token is passed to the left.
    • The first player gains control of the attached Ring-bearer or Aragorn, all resources in that hero's resource pool, and all cards attached to that hero
    • The first player takes control of Bilbo Baggins, all resources in his pool, and all cards attached to him.
    • Player actions.

Ending the Game

  • Player Elimination:
    • A player is eliminated from the game if all of his heroes are killed, if his threat level reaches 50, or if a card effect forces his elimination.
    • If Bilbo Baggins dies,
      the players
      you
      have lost the game.
    • If Ring-bearer or Aragorn dies,
      the players
      you
      have lost the game.
    • When a player is eliminated, the remaining players continue to play the game.
    • If all players are eliminated, the game ends in a loss  for the players.
  • Winning Condition:

    If at least one player survives through the completion of the final stage of the scenario, the game ends in a victory for the players.

  • Turn over the campaign card and follow any resolution instructions. The players then record their results by entering all of the relevant information in the Campaign Log. After the players defeat a scenario and record their results in the Campaign Log, they must add any boons and/or burdens earned to the Campaign Pool.

Options

Back

Timing & Gameplay

This section provides a detailed overview of the phases and framework steps of an entire game round. The phase sequence timing chart depicts each framework step and action window that occurs throughout a game round. The "Framework Details" section explains how to handle each framework step presented in the game's flow chart, in the order that the framework steps occur throughout the round.

Framework Steps

Numbered items presented in the brown boxes are known as framework steps. Framework steps are mandatory occurrences dictated by the structure of the game. Green windows are special framework steps that indicate the possibility of the game returning to an earlier framework step in the chart. These repetitive sequences can end in various ways, such as when all players have performed the steps in a sequence, or when a player makes a specific decision. Each of these windows explains when and how the game either loops back or progresses to a later framework step.

Action Windows

An action ability may only be triggered during an action window. Action windows are presented in red boxes on the chart. When an action window opens, the first player has the first opportunity to initiate an action, or pass. Opportunities to initiate actions then proceed in player order until all players consecutively pass, at which point the action window closes and the game advances to the next step on the timing chart. Note that if a player passes his or her opportunity to act, but all other players do not consecutively pass in sequence, the original player may still take an action when the progression of action opportunities comes back around to that player.

Resolve each action completely before the next action opportunity.

Follow this excellent guide from Seastan (Chris Stanford)

Setting the Game

Setup occurs before the game begins.

Card effects triggered during Setup are fully resolved.

In order to setup the game, follow these 7 steps:
  1. Shuffle Decks - Shuffle all player decks and the encounter deck. Do not shuffle the quest deck.
  2. Place Heroes and Set Initial Threat Levels - Each player places their heroes in his or her play area, adds up the threat cost of the heroes he or she controls, and sets his or her threat dial at the same value. This value is that player's initial threat level for the game.
  3. Setup Token Bank - Place the damage tokens, progress tokens, and resources tokens in a pile next to the encounter deck. All players take tokens from this bank as needed throughout the game.
  4. Determine First Player - The players determine a first player based on a majority group decision. If this proves impossible, determine a first player at random. Once determined, the first player takes the first player token and places it in front of him or her as reference.
  5. Draw Setup Hand - Each player draws 6 cards from the top of his or her player deck. If a player does not wish to keep this starting hand, that player may take a single mulligan.
  6. Set Quest Cards - Arrange the quest cards in sequential order, based off the numbers on the back of each card. Stage 1A should be on top, with the numbers increasing in sequence moving down the stack. Place the quest deck near the encounter deck, in the center of the play area.
  7. Follow Scenario Setup Instructions - The back of the first quest card typically provides setup instructions for a scenario. Follow these instructions before flipping the quest card.
After completing these steps, players begin the game starting with the first game round.

0.0 Round Begins
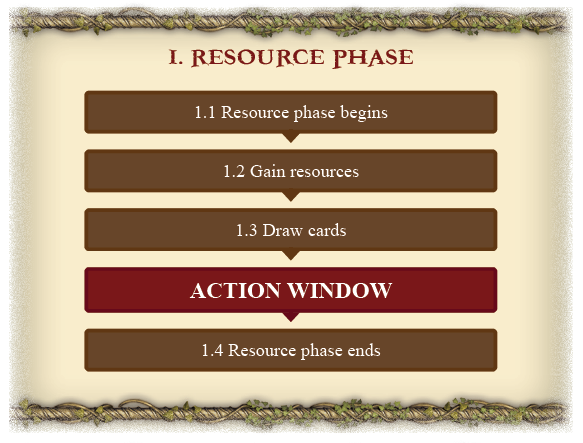
0.1 Round Ends

Framework Details

Each of the following entries corresponds to the framework step of the same number on the Round Sequence Timing Chart.

0.0 Round begins

This step formalizes the beginning of a game round.

The beginning of a round is an important game milestone that may be referenced in card text, either as a point at which an ability may or must resolve, or as a point at which a lasting effect or constant ability begins or expires.

I. Resource Phase

1.1 Resource phase begins

This step formalizes the beginning of the resource phase.

The beginning of a phase is an important game milestone that may be referenced in card text, either as a point at which an ability may or must resolve, or as a point at which a lasting effect or constant ability begins or expires.

1.2 Gain resources

Each player simultaneously adds 1 resource to each of his or her heroes' resource pools.

1.3 Draw cards

Each player simultaneously draws 1 card.

1.4 Resource phase ends

This step formalizes the end of the resource phase.

The end of a phase is an important game milestone that may be referenced in card text, either as a point at which an ability may or must resolve, or as a point at which a lasting effect or constant ability expires or begins.

II. Planning Phase

2.1 Planning phase begins

This step formalizes the beginning of the planning phase.

2.2 Planning action window

This is a special action window in which the active player (in addition to triggering standard action abilities) is permitted to play ally and attachment cards from his or her hand.

To play a card from hand, a player must pay the card's resource cost by spending resource tokens from the resource pools of one or more of his or her heroes that match the sphere of influence of the card being played. Spent resources are removed from heroes' resource pools and returned to the general token bank. 

This action window remains open until all players consecutively pass, so that the active player has the opportunity to play as many ally and attachment cards as he or she desires and can afford at this time.

2.3 Next active player

The next player (in player order) becomes the active player. Return to step 2.2.

If all players have been the active player this phase, proceed.

2.4 Planning phase ends

This step formalizes the end of the planning phase.

III. Quest Phase

3.1 Quest phase begins

This step formalizes the beginning of the quest phase.

3.2 Commit characters

In player order, each player has an opportunity to commit any number of his or her characters to the quest.

To commit a character to a quest, a player must exhaust the character.

3.3 Staging

The encounter deck reveals one card per player. This is known in the game as "staging." These cards are revealed one at a time, with any when revealed abilities being resolved before the next card is revealed.

Enemy, location, and objective cards revealed in this manner are placed in the staging area. 

Treachery cards are resolved and (unless otherwise indicated by the card text) placed in the discard pile. 

If the encounter deck is ever empty during the quest phase, the encounter discard pile is shuffled and reset back into the encounter deck.

3.4 Quest resolution

Compare the combined willpower strength () of all committed characters against the combined threat strength () of all cards in the staging area.

If the  is higher, the players have successfully quested, and they make progress on the quest. A number of progress tokens equal to the amount by which their  overcame the  are placed on the current quest card. Note: If there is an active location, progress tokens are placed on that location until it is explored, and the remainder are then placed on the current quest.

If the  is higher, the players have unsuccessfully quested and they are driven back by the encounter deck. Each player must raise his or her threat dial by the amount by which the  was higher than the combined  of all committed characters.

If the combined committed  score is equal to the  score in the staging area, the players have not quested successfully or unsuccessfully: no progress tokens are placed, and the players do not increase their dials.

Characters committed to a quest are considered committed to that quest through the end of the quest phase, unless a card ability removes them from the quest. Those characters do not ready at the end of this step.

3.5 Quest phase ends

This step formalizes the end of the quest phase.

IV. Travel Phase

4.1 Travel phase begins

This step formalizes the beginning of the travel phase.

4.2 Travel opportunity

The players (as a group) have the opportunity to travel to any one location in the staging area by removing it from the staging area and placing it alongside the current quest card. This causes the location to become the active location.

The players can only travel to one location at a time. The first player makes the final decision on whether and where to travel.

Players cannot travel to a new location if another location card is active; the players must explore the active location before traveling elsewhere.

4.3 Travel phase ends

This step formalizes the end of the travel phase.

V. Encounter Phase

5.1 Encounter phase begins

This step formalizes the beginning of the encounter phase.

5.2 Optional engagement

Each player (in player order) has one option to engage one enemy in the staging area. This is done by moving the enemy from the staging area and placing it in front of the engaging player, in that player's play area.

The enemy's engagement cost has no bearing on this procedure.

5.3 Engagement checks

The players make a series of engagement checks, to determine if any of the enemies remaining in the staging area engage them.

The first player compares his or her threat level against the engagement cost of each of the enemies in the staging area. The enemy with the highest engagement cost that is equal to or lower than this player's threat level engages the player and is moved from the staging area into the space in front of the player. This is known as making an engagement check.

After the first player makes an engagement check, the next player (in player order) makes an engagement check. Once all players have made an engagement check, the first player makes second engagement check. Players continue making engagement checks in this manner until there are no enemies remaining in the staging area that can engage any of the players.

Whether an enemy is engaged through an engagement check, through a card effect, or through a player's choice, the end result is the same: the enemy is considered to have engaged the player, and the player is considered to have engaged the enemy.

5.4 Encounter phase ends

This step formalizes the end of the encounter phase.

VI. Combat Phase

6.1 Combat phase begins

This step formalizes the beginning of the combat phase.

6.2 Deal shadow cards

Deal one card from the encounter deck, facedown, to each engaged enemy. These cards are known as shadow cards.

Deal shadow cards to each player's enemies in player order.

When dealing to a single player's enemies, deal to the enemy with the highest engagement cost first, to the enemy with the next highest engagement cost second, and so forth, until each of that player's engaged enemies has been dealt a shadow card.

If the encounter deck runs out of cards, any enemies that have not been dealt shadow cards are not dealt shadow cards this round.

6.3 "Resolve enemy attacks" process begins

This step formalizes the beginning of the "enemy attacks" process.

In the steps that follow, each enemy that is engaged with a player will have one opportunity to make an attack.

6.4a Next enemy attack initiates

The active player (starting with the first player) chooses an eligible enemy that he or she is engaged with to resolve its attack. An eligible enemy is one that has not yet attacked this round and is still able to attack.

Use the "Enemy Attack Resolution" flowchart to resolve an enemy's attack.

If no eligible enemies remain for the active player to choose, proceed to 6.5.

6.5 Next player becomes active player

The next player (in player order) becomes the active player. Return to step 6.4a.

If all players have resolved enemy attacks, proceed to 6.6.

6.6 "Resolve enemy attacks" process ends

This step formalizes the end of the "enemy attacks process.

6.7 "Resolve player attacks" process begins

This step formalizes the beginning of the "player attacks" process. In the steps that follow, each player will have opportunities to declare attacks with his or her ready characters against enemies.

6.8a Active player declares next attack

The active player (starting with the first player) may declare an attack against one of his or her enemies. 

Use the "Player Attack Resolution" flowchart to resolve a player's attack.

If the active player is unable to or chooses not to declare an attack, proceed to 6.9.

6.9 Next player becomes active player

The next player (in player order) becomes the active player. Return to step 6.8.

If all players have resolved player attacks, proceed to 6.10. 

6.10 "Resolve player attacks" process ends 

This step formalizes the end of the "player attacks" process. 

6.11 Combat phase ends

This step formalizes the end of the combat phase. Discard all shadows cards from all enemies at this time. 

VII. Refresh Phase 

7.1 Refresh phase begins 

This step formalizes the beginning of the refresh phase. 

7.2 Ready cards 

Simultaneously ready all exhausted cards. 

7.3 Raise threat 

Each player simultaneously increases his or her threat by 1. 

7.4 Pass first player token 

The first player passes the first player token to the next player (clockwise) to his or her left. That player becomes the new first player. 

7.5 Refresh phase ends 

This step formalizes the end of the combat phase.

0.1 Round ends

This step formalizes the end of a game round.

Proceed to step 0.0 of the next game round. 

The end of a round is an important game milestone that may be referenced in card text, either as a point at which an ability may or must resolve, or as a point at which a lasting effect or constant ability begins or expires.

Enemy Attack Resolution

6.4b Enemy attack initiates

The active player chooses which attack (among the enemies to they are engaged that has not yet attacked this round) to resolve.

6.4.1 Declare defender

The active player may choose one ready character he or she controls to declare as a defender for this attack. A character must exhaust to be declared as a defender.

The active player may instead decide to let the attack go undefended by declaring no defenders for that attack.

Unless a card ability specifies otherwise, a player can only declare defenders against enemies with whom he or she is engaged.

6.4.2 Resolve shadow effect

The active player flips the attacking enemy's shadow card faceup and resolves any shadow effect the card might have.

6.4.3 Determine combat damage

Combat damage is determined by subtracting the defense strength () of the defending character from the attack strength () of the attacking enemy. The remaining value is the amount of damage that must immediately be dealt to the defending character. If the  is equal to or higher than the , no damage is dealt. 

If an attack is undefended, all damage from the attack must be assigned to a single hero controlled by the active player. If a defending character leaves play or is removed from combat before damage is assigned, the attack is considered undefended. A character's  does not absorb damage from undefended attacks. 

If a character is destroyed by an attack, additional damage from the attack is not dealt to other other characters.

6.4.4 Enemy attack ends

This step formalizes the end of the enemy's attack. Return to step 6.4a in the main flowchart.

Player Attack Resolution

6.8b Player attack initiates

The active player chooses 1 enemy with whom he or she is currently engaged, and exhausts any number of characters he or she controls to declare them as attackers against that enemy.

If each of the attacking characters declared during this step has ranged, the attack may be declared against any enemy that is engaged with any player.

6.8.1 Ranged option

Any number of ranged characters controlled by other players may exhaust to be declared as attackers. 

6.8.2 Determine attack strength

Add up the total of all characters that are currently attacking.

6.8.3 Determine combat damage

This is done by subtracting the target enemy's from the combined of all the attacking characters. The remaining value is the amount of damage that is immediately dealt to the target enemy being attacked. 

If the is equal to or higher than the , no damage is dealt.

6.8.4 Player attack ends

This step formalizes the end of the attack. 

Characters that were declared as attackers are only considered to be attacking through the resolution of this step (and all reactions to it). 

Return to step 6.8a in the main flowchart.
Home

Back
Home

Back

A Burning Brand

Errata

Should read: "Restricted. Response: Exhaust A Burning Brand to cancel a shadow effect just triggered during an attack that attached character is defending."

Home

Back

A Good Harvest

Q & A

Q: Can I use A Good Harvest (AtS 10) to play a 0 cost card without a resource match?

A: No. A Good Harvest only allows you to spend resources for the named sphere, a resource match is still needed to play cards with no resource cost.

Home

Back

A Watchful Peace

Errata

Should read: "Response: After a location worth no victory points leaves play as an explored location..."

Home

Back

Against the Trolls

Q & A

Q: Is Against the Trolls (SoM 32) the final stage of Conflict at the Carrock?

A: Yes.

Home

Back

Amon Lhaw

Q & A

Q: Are attachments already in play discarded when Amon Lhaw (SoM 84) becomes the active location?

A: No. Attachments only check play restrictions when entering play. Attachments already in play will stay attached.

Home

Back

Assault on the Golden Wood

Q & A

What is the difference between a "group" and a "team"?

"Group" refers to the 3-12 players who are participating in the event together. "Team" refers to the 1-4 players at the same stage.

What does it mean for a card to be "in a victory display"?

A card is in a victory display if it is in the victory display of any team in your group.

Home

Back

Banks of the Anduin

Q & A

Q: What happens to Banks of the Anduin (CORE 113) if it is drawn as a Shadow card?

A: It will be discarded from play at the end of the combat phase, like other Shadow cards. When a card is drawn as a Shadow card, only its Shadow text is considered to be active.

Home

Back

Below the Mines/Sheltered Rocks

Q & A

Q: When players have separate staging areas at stage 4 of Foundations of Stone, can there be multiple copies of unique cards in play?

A: No. Players must still respect the rules for playing unique cards when they are split up. For example, if a player has Gandalf (CORE 73) in play, then no other player can play Gandalf.

Home

Back

Beravor

Errata

Should read: "Action: Exhaust Beravor to choose a player. That player draws 2 cards. Limit once per Round."

Home

Back

Bitter Wind

Q & A

Q: If I can't discard 3 resources from all of my heroes due to Bitter Wind (KD 56), do I have to partially fulfill the effect?

A: Yes, players should resolve as much of any "discard" effect as they are able to.

Home

Back

Blade of Gondolin

Q & A

Q: If Legolas has a Blade of Gondolin (CORE 39) and destroys an enemy, can he trigger his response, finish off a quest card, and still place progress tokens on the next quest with the Blade of Gondolin's response?

A: Yes. Quest cards are immediately replaced as soon as players place enough progress on them, and this replacement does not interrupt the current round sequence. If the current quest card only needs 1 progress on it, then a player could also trigger the Blade's effect first, and then Legolas' in order to maximize the number of progress tokens placed. (There is no carry-over progress from an effect).

Home

Back

Blocking Wargs

Errata

Should read: "Surge. When Revealed: Deal 1 damage to each character committed to the quest."

Omit the parenthetical.

Home

Back

Blue Mountain Trader

Errata

Should read: "Then, that player moves 1 resource from the resource pool of a hero he controls to the resource pool of a hero you control, or Blue Mountain Trader is discarded. (Limit once per round.)"

Home

Back

Boromir

Errata

Should read: "Raise your threat by 1 to ready Boromir. (Limit once per phase.)"

Home

Back

Brand son of Bain

Q & A

Q: Can Brand son of Bain (SoM 72) trigger his response if he participates in a ranged attack that defeats an enemy engaged with another player instead of declaring the attack himself ?

A: Yes. Declaring an attack and participating in an attack are both subsets of attacking. In both cases Brand attacks and can trigger his response if the enemy is defeated.

Home

Back

Caldara

Errata

Should read: "(Limit once per game.)"

Home

Back

Caradhras

Q & A

Q: If Caradhras (DD 15) is in my victory display when I complete stage 2 of The Redhorn Gate, will it become the active location even though it is not in play?

A: Yes. You will remove Caradhras from your victory display and put it back into play as the active location. Cards in the victory display are not removed from the game and can still be referenced by effects. If players get too far ahead of themselves via card effects, they'll find a return journey is necessary!

Home

Back

Caught in a Web

Q & A

Q: How does a player resolve the situation in which a single hero has multiple copies of Caught in a Web (CORE 80) attached?

A: The player must pay for each copy of Caught in a Web before the hero can ready. Each copy of the card creates an independent condition that must be fulfilled before readying the attached hero, so if each condition is not fulfilled the hero cannot ready. End result, if a hero has two copies of Caught in a Web attached, the player will have to pay 4 resources from that hero's resource pool in order to ready the card.

Home

Back

Chieftan Ufthak

Q & A

Q: When do "after this enemy attacks" Forced effects like those on Chieftan Ufthak (CORE 90) and Wargs (CORE 85) resolve?

A: These effects resolve immediately after step 4 of enemy attack resolution.

Home

Back

Counter-attack

Errata

Should read: "When Revealed: Each player must either return the location he controls..."

Home

Back

Crazy Cob

Q & A

Q: If there are no characters with poison attached when Crazy Cob (OtD 29) is revealed from the encounter deck, does it still make an attack?

A: Yes. Since each character has 0 poison, the first player will choose which character Crazy Cob attacks.

Home

Back

Desperate Alliance

Q & A

Q: If I give control of one of my heroes to another player with Desperate Alliance (OtD 10) and my other heroes are killed, am I eliminated from the game?

A: No. A player is not eliminated from the game unless each of his heroes is killed. The hero chosen by Desperate Alliance is still in play and will return to your control at the end of the phase.

Home

Back

Devilry of Saruman

Errata

Should read: "When Revealed: Place 3 progress on the main quest..."

Home

Back

Dol Guldur Beastmaster

Errata

Should read: "Forced: When Dol Guldur Beastmaster attacks..."

The additional shadow card is dealt when the Dol Guldur Beastmaster is chosen during step 1 of enemy attack resolution.

Home

Back

Dori

Q & A

Q: Can I use Dori (OHUH 9) to prevent damage from being assigned to Beorn (OHUH 5), even though Beorn is immune to player card effects?

A: Yes. Dori's Response targets the damage being assigned, not the character it is being assigned to, so Beorn's immunity does not factor.

Home

Back

Dungeon Jailor

Q & A

Q: Does Dungeon Jailer (CORE 101) shuffle guarded objectives back into the encounter deck?

A: Yes. Dungeon Jailer will shuffle any unclaimed objective, whether or not it is guarded.

Home

Back

Dungeon Torch

Q & A

Q. Does a player with the Dungeon Torch (CORE 109) raise his threat by 2 or 3 during the refresh phase?

A: Dungeon Torch's effect does not replace the regular 1 threat raise, but adds to it. So the player with the Dungeon Torch raises his threat by 3.

Home

Back

Dúnedain of Annúminas

Q & A

Q: When the first player takes control of a Dúnedain of Annúminas at stage 1, does he resolve its "when revealed" effect?

A: No.

Q: What happens when a Dúnedain of Annúminas is destroyed?

A: It is placed in the encounter deck discard pile.

Home

Back

Dwarrowdelf Axe

Q & A

Q: If the effect on Dwarrowdelf Axe (KD 7) destroys an enemy, can I play Foe-hammer (OHUH 15)?

A: No. In order to play Foe-hammer, the attacking character must destroy the enemy. That means dealing enough damage to it with attack strength.

Home

Back

Eleanor

Ruling

The replacement card is also revealed from the encounter deck. Resolve any "When revealed" effects and keywords on the new card following the standard game rules.

Q & A

Q: If Eleanor (CORE 8) is used to cancel the "when revealed" effects of a treachery card, are any surge or doomed keywords on that card also canceled?

A: No. Eleanor only cancels the "when revealed" effects of the treachery card. Any surge or doomed keywords on the card resolve before the new (replacement) card is revealed.

Home

Back

Elevenses

Q & A

Q: Can I play Elevenses (DC 36) after resolving a quest since characters are considered to be committed to the quest until the end of the quest phase?

A: No. Elevenses says "Play only after the staging step" which means it is only playable immediately after the staging step ends.

Home

Back

Erebor Battle Master

Errata

Should read: "Erebor Battle Master gets +1 for each other Dwarf ally you control. (Limit +4 .)"

Home

Back

Expecting Mischief

Q & A

Q: If I play Expecting Mischief (OHUH 18) and it deals enough damage to the first enemy revealed to destroy it, do I still resolve any "when revealed" or keyword effects on that enemy?

A: No. The effect on Expecting Mischief resolves the same way as the effect on Thalin (Core 6).

Home

Back

Expert Treasure-hunter

Errata

Should read: "Attach to a hero. Limit 1 per hero."

Home

Back

False Lead

Q & A

Q: After False Lead (SF 25) is revealed and its effect resolves, do the players continue staging?

A: No. The quest phase ends immediately and the players do not continue staging.

Home

Back

FAQ

Q & A

Q: Can player card effects be used on a card that is being revealed, before it is placed on a region?

A: The passive text on enemies is active immediately and will place them on a region at the very beginning of the reveal process. So unless that region is your current region, the enemies will be immune to effects like Thalin's ability. However, the Forced effect on locations that places them on a region triggers only after the card has entered play. Therefore a card like The Door is Closed or Warden of Arnor could be used, even if that location is going to be placed on a region other than your current region.

Q: Can I play cards to the staging area?

A: Yes. When a card is added to the staging area and does not specify a region to put it on, such as a player side quest, place it next to the Middle-earth Map. You can also play attachments on cards in the staging area, such as Ancient Mathom or The Road Goes Ever On, provided their targets aren't immune to player card effects.

Q: How does the Burglar's Turn Contract work in The Nine are Abroad?

A: Since you never actually travel to locations, it will never trigger. If you wish to create a house rule, you could trigger it on a location in your current region at the end of the travel phase if you moved regions that phase.

Home

Back

Feint

Errata

Should read: "Combat Action: Choose an enemy engaged with a player. That enemy cannot attack that player this phase."

Q & A

Q: When should Feint (CORE 34) be played?

A: This card should be played any time before resolving step 1 of the target enemy's attack during the combat phase. (Once the act of resolving an enemy's attack begins, it is too late to prevent it from attacking with Feint.)

Home

Back

Fili

Errata


Ruling


Q & A

Q: Can you put Fili (OHUH 6) into play for free from your hand after you play Kili (OHUH 7)?

A: No. For either character's ability to work, the other character must enter play from your hand.


Home

Back

Fortune or Fate

Q & A

Q: Can I use Fortune or Fate (CORE 54) to put Beorn (OHUH 5) into play from a player's discard pile, even though he is immune to player card effects?

A: Yes. A hero's ability is only active while it is in play. Therefore, Beorn is not immune to player card effects (such as Fortune or Fate) while he is in the discard pile.

Home

Back

Háma

Errata

Should read: "(Limit 3 times per game for the group.)"

Home

Back

Helm of Secrecy

Errata

Should read: "Swap those heroes, moving all eligible attachments to the hero from your collection."

Omit “and damage tokens”.

Home

Back

Horn of Gondor

Errata

Should read: "Response: After a character is destroyed, add 1 resource to attached hero's pool."

Home

Back

Impenetrable Fog

Errata

Should read: "When Revealed: The first player either places 3 progress tokens on To the Tower, or..."

Home

Back

Kili

Errata


Ruling


Q & A

Q: Can you put Fili (OHUH 6) into play for free from your hand after you play Kili (OHUH 7)?

A: No. For either character's ability to work, the other character must enter play from your hand.


Home

Back

Leaf-wrapped Lembas

Q & A

Q: If I use the ability on Leaf - wrapped Lembas ("Add Leaf-wrapped Lembas to the victory display , and remove it from the campaign pool, to ready all heroes in play.") but I lose the scenario and have to play it again, do I still remove Leaf-wrapped Lembas from the campaign pool?

A: No. While removing the boon from the campaign pool is part of the cost to trigger the Action on each of the Gift attachments (Phial of Galadriel, Three Golden Hairs, Lórien Rope, or Leaf - wrapped Lembas), that decision should not be recorded until after the scenario is defeated. Even then, if the players are unhappy with the result, they may still choose not to record their results and try again.

Home

Back

Legacy of Durin

Errata

Should read: "Response: After you play a Dwarf character from your hand, exhaust Legacy of Durin to draw 1 card."

Home

Back

Legolas

Q & A

Q: Does the effect on Legolas (CORE 5) place progress tokens on an active location, if there is one?

A: Yes. Always place progress tokens on an active location instead of the quest, unless the ability specifically states to bypass any active location.

Q: If there is an active location with the text "Immune to player card effects" when Legolas participates in an attack that destroys an enemy, do I place 2 progress on the active location or the quest?

A: No. When Legolas' ability would put progress on the current quest, if there is an active location, it puts progress on that location instead. If that location is immune to player card effects, it ignores Legolas' ability. Therefore, no progress would be placed on the active location or the current quest.

Home

Back

Light of Valinor

Q & A

Q: If I have Light of Valinor (D 107) attached to a hero I control, can that hero commit to the quest while exhausted?

A: No. Characters must be ready and able to exhaust in order to quest, attack, or defend. Card effects that allow a character to perform any of those actions without exhausting do not allow exhausted characters to perform those actions.

Home

Back

Lost and Alone

Q & A

Q: How does the card Lost and Alone (DD 124) work? What if the hero gets attached to a Nameless Thing (DD 125) or was my last hero in play?

A: You only put the lost hero back into play if you draw the hero, whether during the resource phase or through a card effect. If the hero is discarded or attached to a card like a Nameless Thing, then treat it like any other card. In the latter situation, the value of the hero would be null, since it has no printed cost. If your last hero gets shuffled into your deck you are not eliminated from the game; heroes are not considered to be killed unless they are in your discard pile. You will continue playing until you either draw the hero, are eliminated through other means, or the game ends.

Home

Back

Lost in the Dark

Errata

Should read: "When Revealed: Reveal stage 3 and create a separate staging area for the first player using that stage. If there are no other players in the game, discard this stage and each card in its staging area. All other players advance to stage 4."

Home

Back

Love of Tales

Errata

Should read: "Response: After a Song card is played, exhaust Love of Tales to add 1 resource..."

Home

Back

Master of Lore

Errata

Should read: "Action: Exhaust Master of Lore to name a card type. Lower the cost for you to play the next card of that type by 1 until the end of the phase (to a minimum of 1)."

Home

Back

Mines of Moria

Q & A

Q: If Mines of Moria (TRD 52) is in the staging area and there is an active location, where is progress placed first?

A: Progress must be placed on the Mines of Moria in the staging area before it can be placed on the active location because the game text on Mines of Moria overrides the game rules via the Golden Rule.

Home

Back

Nameless Thing

Q & A

Q: If a card is attached to Nameless Thing (D 125) as part of the resolution of its Forced effect, is that card's game text active?

A: No. Cards that are attached to Nameless Thing (or Elder Nameless Thing) as a result of triggering its Forced effect are considered attachments with no card title or game text. The only active part of the attached card is its cost.

Home

Back

Narvi's Belt

Errata

Should read: "Action: Exhaust Narvi's Belt to give attached hero a , , , or icon until the end of the Phase."

Home

Back

Nazgûl of Dol Guldur

Errata

Should have the text: "No attachments can be played on Nazgúl of Dol Guldur."

Q & A

Q: If I cancel the Shadow effect on a card dealt to the Nazgúl of Dol Guldur (CORE 102), is the effect still considered to have resolved, making me discard a character?

A: No. Resolving an effect means that the effect triggered and resolved to the fullest extent possible. Canceling the effect will prevent the Nazgúl of Dol Guldur's ability from triggering, just as if the card had no Shadow effect to begin with.

Home

Back

Nori

Errata

Should read: "Response: After you play a Dwarf character from your hand, reduce your threat by 1."

Home

Back

O Elbereth! Gilthonial!

Errata

Title should read: "A Elbereth! Gilthoniel!" Should read: "Response: After a non-unique enemy attacks you..."

Home

Back

Out of Sight

Errata

Should read: "Action: Enemies engaged with you cannot attack you this phase."

Home

Back

Out of the Dungeons

Errata

If a facedown Orc Guard would be returned to the staging area, it is instead placed in its owner's discard pile.

Q & A

Q: If all of a player's heroes (except for the captured hero) are destroyed during the Escape from Dol Guldur scenario, is that player eliminated from the game?

A: Yes, the player is eliminated, and the players (as a group) have lost.

Home

Back

Out of the Wild

Errata

Should read: "Shuffle the encounter deck. Add Out of the Wild to the victory display."

Home

Back

Óin

Q & A

Q: When Oin (OtD 4) gains the tactics resource icon from his ability, does that count as the "printed" tactics ressource icon?

A: No. The "printed" resource icon always refers to the icon that appears in the Resource Icon space.

Home

Back

Pelennor Fields

Q & A

Q: If there are two copies of Pelennor Fields (MaO 10) in the staging area and I travel to one of them, do I still have to raise my threat by 3? What if I have the opportunity to travel and travel to neither of them?

A: If a card is self-referential, it refers only to that copy of itself. So if you travel to one copy of the pelennor Fields, the other copy will raise your threat by 3 because it only takes into account whether you traveled to that particular copy of the Pelennor Fields. So if you travel to neither copy, they both resolve and you must raise your threat by 6.

Home

Back

Protector of Lórien

Errata

Should read: "Action: Discard a card from your hand to give attached hero +1 or +1 until the end of the phase. Limit 3 times per phase."

Home

Back

Proud Hunters

Q & A

Q: Can I use Proud Hunters (H 32) to add resources to Beorn's (OHaUH 1) resource pool even though he is immune to player card effects?

A: Yes. A hero's resource pool is a separate game element from the hero card, so cards that target Beorn's resource pool (and not Beorn) are not affected by his immunity to player card effects.

Home

Back

Quick Strike

Q & A

Q: Can characters with the ranged keyword participate in an attack declared through the card Quick Strike (CORE 35)?

A: No. There is no opportunity for other characters to join a Quick Strike attack. One character is exhausted to pay for the cost of Quick Strike, and the effect is that the exhausted character is immediately declared as an attacker against the target enemy. The card's resolution does not allow for a standard declaration step in which other characters can declare.

Q: Can I use Quick Strike (Core 35) to declare an attack against an enemy that is immune to player card effects?

A: Yes. The effect of Quick Strike targets a character and allows that character to make an attack, therefore the chosen enemy's immunity does not factor.

Home

Back

Radagast

Q & A

Q: When paying for a Creature with ressources from Radagast's (SoM 59) pool, is a resource match required?

A: No. Radagast's ability breaks the need for a ressource match if the resources are coming only from his pool. (If combining his resources with resources from a hero's pool, the hero's sphere must match the sphere of the Creature being played.)

Home

Back

Ranger Spikes

Q & A

Q: If there is an unattached Ranger Spikes (HoN17) in the staging area when an enemy with the ambush keyword is revealed from the deck, what happens?

A: The Ranger Spikes will attach to that enemy, preventing the players from making the engagement checks for the ambush keyword.

Home

Back

Ravens of the Mountain

Errata

Should read: "Action: Exhaust a hero you control to shuffle the encounter deck and look at its top card..."

Home

Back

Rebuild the Defenses

Q & A

Q: What is the difference between a 'group' and a 'team'?

A: 'Group' refers to the 3-12 players who are participating in the event together. 'Team' refers to the 1-4 players at the same stage.

Q: What does it mean for a card to be "in a victory display"?

A: A card is in a victory display if it is in the victory display of any team in your group.

Q: Does damage on an enemy remain on that enemy when it moves to a different stage?

A: Yes.

Home

Back

Return to Rhosgobel

Q & A

Q: Wilyador (SoM 64) cannot be healed of more than 5 wounds by a single effect, so how do I resolve the "when revealed" text on Return to Rhosgobel 3B (SoM62)?

A: Heal 5 wounds from Wilyador for each Athelas objective card as its own separate action.

Home

Back

Riddles in the Dark

Q & A

Q: While attempting to answer a Riddle in the scenario Dungeons Deep and Caverns Dim, when can players take actions?

A: Players can take actions after step 2, before step 3.

Home

Back

Sacked!

Q & A

Q: If a Sacked! (SoM 48) card is placed on a hero while that hero is questing is that hero removed from the quest?

A: No. Sacked! specifies only that the hero cannot commit to the quest, and the hero is already committed. However, the hero cannot commit to quests on future rounds while Sacked! is attached.

Home

Back

Sam Gamgee

Q & A

Q: If I engage more than one enemy with a higher engagement cost than my threat, will the second part of Sam Gamgee's (TBR 2) ability trigger more than once, even if I cannot ready him more than once?

A: Yes. Because it does not use the word "then", Sam's bonus to , and is not dependent on him readying. His readying effect and his bonus to , and are two different effects that both have the trigger of engaging an enemy with a higher engagement cost than your threat.

Home

Back

Saruman

Q & A

Q: If I use the Response effect on Saruman (VoI 3) to treat an encounter card guarding an objective as out of play, does that mean I can claim that objective because it is free of encounters?

A: No. When a card is considered to be out of play, each card attached to it is also considered to be out of play. Because objectives with the Guarded keyword are attached to the enemy or location that is guarding it, if that enemy or location is considered to be out of play, the guarded objective is too.

Q: If I am engaged with The Lord of the Dead (SoE 5) when I play Saruman (VoI 3), do I still have to raise each player's threat for his Doomed 3?

A: No. The moment Saruman enters play under your control, the passive effect on The Lord of the Dead causes you to treat his text box as blank, before the Doomed keyword can trigger.

Home

Back

Secret Entrance

Errata

Should read: "Then, look at the top card of the encounter deck. If the looked at card is not..."

Home

Back

Snow Warg

Errata

Should read: "Forced: After a character is declared as a defender against Snow Warg..."

Home

Back

Son of Arnor

Q & A

Q: Can I use Son of Arnor (SoM 15) to engage The Watcher (DD 72), even though The Watcher reads "...cannot be optionally engaged"?

A: Yes. The ability on Son of Arnor does not count as optionally engaging The Watcher. Optional engagement only occurs during step 1 of the Encounter phase

Home

Back

Stand and Fight

Ruling

Stand and Fight cannot return neutral allies from the discard pile, as neutral cards do not belong to "any Sphere."

Home

Back

Sword-thain

Q & A

Q: If I attach Sword-thain (AA 149) to a unique Lore ally (making that ally a hero), does the attached hero have the printed Lore icon?

A: Yes. If an ally with a printed sphere icon becomes a hero, that hero is also considered to have that printed sphere icon.

Q: If I use Sneak Attack (CORE 23) to put a unique ally into play during the planning phase and attach Sword-thain (AA 149) to that ally, is that ally returned to my hand at the end of the phase?

A: No. The ally that entered play with Sneak Attack is no longer an ally because it has Sword-thain attached, and Sneak Attack's delayed effect no longer affects it.

Home

Back

Thalin

Ruling

When an enemy card is revealed from the encounter deck, Thalin's ability resolves before any keyword or "When Revealed" card effects on the encounter card.

Q & A

Q: When an encounter card effects instructs me to search the encounter deck and discard pile for an enemy, reveal it, and add it to the staging area during a quest to which Thalin (CORE 6) is committed, does he still deal 1 damage to an enemy chosen from the discard pile?

A: Yes. Enemies revealed from the encounter deck and discard pile by quest card and encounter card effects are still considered to have been revealed by the encounter deck.

Home

Back

The Ambush

Errata

Should read: "At the beginning of the combat phase, each player must either turn each of his hidden cards faceup, or take 1 hidden card."

Q & A

Q: When playing The Blood of Gondor, if a card effect such as stage 1b of The Ambush (AtS 117) or Lying in Wait (AtS 129) turns each of my hidden cards faceup, and one of those cards forces me to take another hidden card, do I have to turn that card faceup as well?

A: No. When you are instructed to turn each of your hidden cards faceup, only the hidden cards that are currently in front of you at that time are turned faceup; any hidden cards you are forced to take as part of that effect, such as from Evil Crow (AtS 122), remain facedown in front of you.

Home

Back

The Balrog

Q & A

Q: How many keywords does The Balrog (RD 44) have?

A: One. Indestructible is the only keyword on The Balrog.

Home

Back

The Burglar's Turn

Q & A

Q: While making a Burgle attempt in The Lonely Mountain scenario, when can players take actions?

A: Players can take actions after step 2, before step 3.

Home

Back

The Cross-roads

Errata

Should read: "The current quest card gains siege (and loses battle)."

Home

Back

The Lord of the Dead

Q & A

Q: If I am engaged with The Lord of the Dead (SoE 5) when I play Saruman (VoI 3), do I still have to raise each player's threat for his Doomed 3?

A: No. The moment Saruman enters play under your control, the passive effect on The Lord of the Dead causes you to treat his text box as blank, before the Doomed keyword can trigger.

Home

Back

The Necromancer's Tower

Errata

Should read: "... reveal and place them in the staging area."

Q & A

Q: During the Setup for stage 1A of The Necromancer's Tower (Core 123), should each objective have one encounter card attached to it, or two?

A: One. When you reveal a Guarded objective, you must reveal the top card of the encounter deck and attach it to that objective, guarding it. The additional instruction on The Necromancer's Tower to "... attach 1 encounter to each objective card" is there as a reminder, so that players know to attach 1 encounter card to each Guarded objective.

Home

Back

The Passage of the Marshes

Errata

Should read: "Setup: Each player may change hero cards he controls without incurring the +1 threat penalty. Each player shuffles 1 copy..."

Home

Back

The Power of Mordor

Errata

Should read: "...Reveal an equal number of cards from the encounter deck..." Omit the word "Then"

Home

Back

The Siege of Erebor

Q & A

Q: Can player side quests be played in this quest?

A: Player side quests are played into their controller's staging area, and can be chosen as the current quest as normal by the first player in turn order at that stage.

Q: Can I travel to locations or engage enemies at other stages?

A: No, only at your stage.

Q: Why are there 2 copies of Brand son of Bain?

A: One copy uses the official card text. The other copy (identified by "FTCL" near its © text) uses modified text and {Traits} from ALeP's Free to Choose List, an optional set of rules changes found on our website. Use whichever you prefer!

Home

Back

The Watcher

Q & A

Q: Can I use Son of Arnor (SoM 15) to engage The Watcher (DD 72), even though The Watcher reads "...cannot be optionally engaged"?

A: Yes. The ability on Son of Arnor does not count as optionally engaging The Watcher. Optional engagement only occurs during step 1 of the Encounter phase

Home

Back

Thicket of Spears

Errata

Should read: "Action: Choose a player. That player's engaged enemies cannot attack that player this phase."

Home

Back

Thror's Map

Errata

Should read: "Travel Action: Discard Thrór's Map to choose a location in the staging area."

Home

Back

Tower Gate

Q & A

Q: Do the Orc Guards generated by the effects of the Tower Gate location card and the Out of the Dungeons quest card have the Orc Trait?

A: No. Face down cards do not have traits unless the trait is gained through a card effect.

Home

Back

Trained for War

Errata

Should read: "Action: Until the end of the phase, if the current quest does not have siege, it gains battle."

Home

Back

Treacherous Fog

Q & A

Q: If a location is revealed after Treacherous Fog (CORE 118) was revealed during the same quest phase, does the revealed location get +1 from the "When Revealed" effect on Treacherous Fog?

A: Yes. The "When Revealed" effect on Treacherous Fog creates a lasting effect until the end of the phase that affects each location in the staging area. This is different from Driven by Shadow (CORE 92) which uses the language "currently in the staging area" when it is revealed and only affects enemies and locations in the staging area at the time it is revealed.

Home

Back

Troll Key

Errata

Should read: "If Troll Key is discarded, add it to the staging area. If Troll Key is unattached and in the staging area, attach it to a Troll enemy, if able."

Home

Back

Troll Purse

Errata

Should read: "If Troll Purse is discarded, add it to the staging area. If Troll Purse is unattached and in the staging area, attach it to a Troll enemy, if able."

Home

Back

Vilya

Q & A

Q: When I use the ability on Vilya (D 109) to play a card, do I still need a resource match?

A: No. Playing a card at "no cost" is different from playing a card for "0 cost." A 0 cost card still requires a resource match, however, playing a card at "no cost" removes the need for a resource match.

Home

Back

Wandering Took

Errata

Should read: "Limit once per round."

Q & A

Q: What happens if Wandering Took (CORE 43) changes control between players during combat after being declared as a defender?

A: As nothing removes Wandering Took from the combat or from play, it remains declared as a defenderagainst the attack. (The "defending player" does notchange, even though control of the defending character has changed.)

Home

Back

Wargs

Q & A

Q: When do "after this enemy attacks" Forced effects like those on Chieftan Ufthak (CORE 90) and Wargs (CORE 85) resolve?

A: These effects resolve immediately after step 4 of enemy attack resolution.

Home

Back

We Are Not Idle

Q & A

Q: When I play We Are Not Idle (D 129) and exhaust Bombur (OtD 5), do I get 2 resources?

A: No. Bombur's ability only works with cards that count the number of Dwarf characters you control. If you choose to exhaust Bombur with We Are Not Idle, you are still only exhausting 1 Dwarf character and will therefore only receive 1 resource.

Home

Back

Will of the West

Errata

Should read: "Action: Choose a player. Shuffle that player's discard pile back into his deck. Remove Will of the West from the game."

Home

Back

Wingfoot

Errata

Should read: "If a card of the named type is revealed during this quest phase, exhaust Wingfoot to ready attached hero."

Home

Back

Zigil Miner

Errata

Should read: "Action: Exhaust Zigil Miner and name a number to discard the top 2 cards of your deck. If at least one of those cards has cost equal to the named number, choose a hero you control. For each card that matches the named number, add 1 resource to that hero's resource pool."